- Home
- Accounting Systems
- How To Use QuickBooks Online

How to Use QuickBooks® Online: A Beginner's Guide
Published September 23, 2024 | Revised October 10, 2024 | Edited November 7, 2024

by L. Kenway BComm CPB Retired
NEXT IN SERIES >> How To Create Custom Reports in QuickBooks Online
A Guide To Learning How To Use QuickBooks Online
Table of Contents
The Basics To Get Started
1. Introduction
2. Getting Started
3. Setting Up Your Company
4. Connecting Bank Accounts and Credit Cards
5. Navigation and Interface Overview
QuickBooks Online Workflow
1. Sales Workflow
2. Expenses Workflow
3. Transactions Workflow
4. Manage Settings and Preferences Workflow
5. Payroll Workflow (Requires an add-on subscription)
6. Transfers and Journal Entries Workflow
7. Workflow Tips Integrated into QBO
After The Data Entry
1. Generating Reports To Gain Insights
2. Taxes and Compliance
3. Best Practices
4. Productivity Tips
5. Troubleshooting and Support
Advanced Features and Add-ons
1. Payroll and Employees
2. Inventory Management
3. Advanced Features
4. Integrating third-party apps
1. Introduction
WHAT'S COVERED
- Overview of QuickBooks Online
- Importance of Cloud-Based Accounting Solutions
- Who Should Use QuickBooks Online
- Difference Between QBO & QBD
Before we jump into learning how to use QuickBooks Online (QBO), let's look at who QBO was designed for, how cloud based solutions are different than desk top solutions, and who QBO would be a good fit for.
- Overview of QuickBooks Online:
QuickBooks Online is a cloud-based accounting software designed to help small and mid-sized businesses manage their finances. Unlike desktop versions, it offers the flexibility to access financial data from anywhere with an internet connection.
- Importance of Cloud-Based Accounting Solutions:
Cloud-based solutions provide real-time data access, automatic updates, data security, and seamless collaboration with accounting professionals.
QuickBooks Online is one of the best accounting software for small businesses at an affordable price. Gone are the days when only medium to large sized businesses could afford to use tailor made accounting systems. Harnessing technology and automation is now available for small businesses at an affordable cost. The cost of entry for businesses is low.
- Who Should Use QuickBooks Online:
QuickBooks Online is ideal for small business owners, freelancers, bookkeepers, and accountants who need an efficient way to handle their financial tasks and want to leverage the advantages of cloud computing.
QuickBooks Desktop vs. QuickBooks Online
What's the Difference?
The two offerings are different because they utilize different technologies.
QuickBooks Desktop (QBD) is a local application you download to your computer. It can be installed on more than one computer for an additional fee. Intuit switched to subscription model pricing in 2022 replacing the one-time purchase licenses. As of July 2024, Intuit is no longer accepting NEW subscribers to all desktop products (in the U.S. only at this time) except QuickBooks Enterprise products. New subscribers are encouraged to consider QuickBooks Online.
QuickBooks Online (QBO) is a cloud based service that was introduced in the States in 2001. It didn't come to Canada until March 2012. You access the SaaS (Software as a Service) platform from your internet browser. It is subscription based. System updates and upgrades are automatic and seamless. There is also an app for your phone or tablet included in your subscription price and for those who prefer not work in a browser, there is a desktop app.
Making the Transition from QD to QBO
Will it take an adjustment to learn how to use QuickBooks Online if you are coming from the QBD environment. Yes.
I've been using QBO since 2013 and now can't imagine going back to QBD. Was it a challenge to make the switch? Yes but QBO wasn't as robust as it is now so there was time spent on workarounds. Most of those issues don't exist now.
The two things I miss from QBD are (i) the old pricing structure (where I paid a fee for unlimited company files) before Intuit moved to a subscription based model, and (ii) being able to back up my data locally.
2. Getting Started
When selecting apps ... [or choosing between plans]
"strive for efficiency and convenience over bells and whistles."
Gabrielle Fontaine, PB
WHAT'S COVERED
- Setting Up Your QuickBooks Online Account
- Choosing The Right Plan For Your Business
- How To Sign Up
- The Difference Between a CPB and a CPA
Okay, let's jump in and get started on learning how to use QuickBooks Online. Here's your first steps.
- Setting Up Your QuickBooks Online Account
Go to the QuickBooks Online website for your country. In Canada, it is QuickBooks Online Canada (https://quickbooks.intuit.com/ca/). In the U.S., it is https://quickbooks.intuit.com.
- Choosing The Right Plan For Your Business
Choose a plan based on your business needs. Each plan offers different features, so choose the one that fits your needs best. If you aren't sure, read the features for each plan.
When choosing a plan, don't only focus on the cost. Why do I say that? Because you need to factor in the cost of your time when looking at adopting accounting technology. You need to consider the time it takes to do your bookkeeping and the value in error reduction as well as staying onside of the CRA (or the IRS) by being compliant. Remember, the cost of accounting software is a tax deductible business expense. You currently have five plan choices:
- Self-Employed (Solopreneur in the U.S.): For freelancers, independent contractors, and sole proprietors who need to manage their business and personal finances separately and don't have a lot of volume. It does lack many features found in QuickBooks Online but may be perfect for your circumstances. $15 CAD* $20 USD*
- Easy Start (Simple Start in the U.S.): For small businesses with broader accounting needs beyond sole proprietorship or freelance work. $24 CAD* $35 USD*
- Essentials: For small businesses that require additional features like managing bills, tracking time, multi-currencies, or payroll (add-on to the subscription). $54 CAD* *$65 USD*
- Plus: For businesses needing inventory tracking and project management. $80 CAD* $99 USD*
- Advanced: For mid-sized businesses that require more sophisticated, scalable tools and features beyond what the Essentials and Plus plans offer. It's ideal for businesses with more complex financial needs and higher transaction volumes. $160 CAD* $235 USD*
The Canadian website has a quiz you can take to help you figure out the right version for you. It asks (i) if you are incorporated or a sole proprietor, (ii) how many users there will be, (iii) if you need to connect apps, (iv) if you need to manage recurring invoices or bills, (v) if you have inventory, and (vi) what industry you are in.
Don't purchase a plan that is not a good fit for you or has features you don't need yet. You can always upgrade (or downgrade) as your business grows or changes. Be sure to check the limitations in each version for users, accounts, classes, etc.
Tip: BEFORE purchasing any app for QBO, remember to check out QBO's built-in features that automate your data entry and improve your accounting workflow. Intuit is always upgrading features so keep reviewing your needs on a regular basis.
- Sign Up
Once you've selected your plan, sign up. Follow the prompts to create an account. You'll need to provide some basic information about your business, such as your business name, industry, and contact information as well as your payment method.
Another option, if you are working with your certified professional bookkeeper, is signing up through them. Your bookkeeper can also do the initial QBO setup for you.
*at August 31, 2024
What is a Certified Professional Bookkeeper?
In the U.S., there are two main certifying bodies in the U.S. are the American Institute of Professional Bookkeepers (AIPB - Certified Bookkeeper (CB) designation) and the National Association of Certified Public Bookkeepers (NACPB - Certified Public Bookkeeper (CPB) designation).
In Canada, a Certified Professional Bookkeeper (CPB) is a designation awarded by CPB Canada (formerly the Institute of Professional Bookkeepers of Canada). CPBs are recognized for their expertise in bookkeeping and adherence to a code of professional conduct.
- Role and Expertise: CPBs specialize in maintaining financial records, handling day-to-day accounting tasks, and ensuring the accuracy of financial data. They may also assist in preparing and filing taxes, managing accounts payable/receivable, reconciling bank statements, and generating financial reports.
- Certification Process: To become a CPB, individuals must pass a certification exam and meet specific educational and experience requirements. Continuing professional development is also required to maintain the CPB designation.
- Focus: The focus is primarily on bookkeeping tasks and practical, hands-on accounting functions for small to medium-sized businesses.
What is a CPA?
Generally a CPA designation is the gold standard for professional accountants. In the U.S., CPA stands for Certified Public Accountant. It is a USA approved credential.
In 2014, the Canadian Institute of Chartered Accountants (CICA) became the Chartered Professional Accountant of Canada (CPA Canada). In Canada, the accounting profession has been unified under the single designation of Chartered Professional Accountant (CPA). However, historically, there were three different designations:
1. CPA-CA (Chartered Accountant):
- Role and Expertise: Focuses on financial management, tax, audit, and assurance services.
- Historical Background: Known for a strong emphasis on external audit and tax.
- Education and Certification: Required a combination of a degree, practical experience, and passing a series of comprehensive exams.
2. CPA-CGA (Certified General Accountant):
- Role and Expertise: Covers general and public accounting, including financial accounting and tax.
- Historical Background: Known for a comprehensive understanding of financial reporting, business strategy, and management accounting.
- Education and Certification: Required a degree, experience, and passing national certification exams.
3. CPA-CMA (Certified Management Accountant):
- Role and Expertise: Specializes in management accounting, strategic management, and financial planning.
- Historical Background: More focused on internal corporate roles, budgeting, and decision-making processes.
- Education and Certification: Similar rigorous standards with a focus on management accounting and strategic thinking.
Key Differences:
- Scope and Depth: CPAs (regardless of designation) have a broader and deeper understanding of accounting principles and practices compared to CPBs. They can perform complex financial analysis, strategic planning, and if licensed for public practice, audit or review engagements.
- Education and Certification: CPAs undergo more extensive education and a rigorous certification process, including multiple exams and practical experience. CPBs have a more focused certification process centered around bookkeeping.
- Professional Services: CPAs can provide a wide range of accounting services, including audit, tax, and advisory. CPBs primarily handle bookkeeping and straightforward accounting tasks.
In summary, while CPBs are highly skilled in bookkeeping and essential day-to-day accounting functions, CPAs possess a broader expertise and can provide higher-level financial services across diverse business needs. Both a CBP and a CPA can help you setup your books using QuickBooks Online.
3. Setting Up Your Company
WHAT'S COVERED
- Entering Company Information
- Adding Users and Setting Permissions
- Customize Settings and Personal Preferences
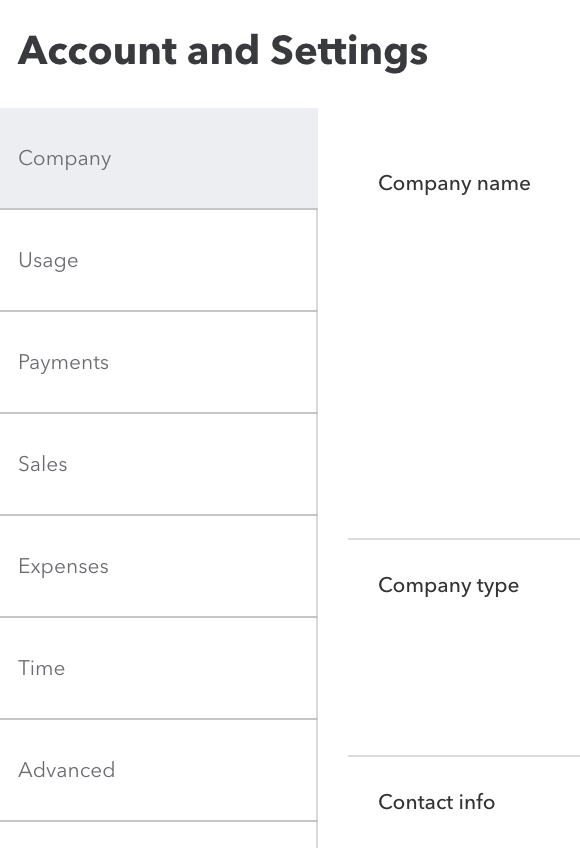 Your choices under 'Account and Settings'.
The next step in learning how to use QuickBooks Online is to setup your company on the platform. Here's how.
- Entering Company Information: Enter your company details, including your business name, address, contact number, and fiscal year start month.
- Adding Users and Setting Permissions: If you won't be the only one using the platform, navigate to 'Manage Users' under the 'Gear' (⚙️) icon. Add users and assign roles to control access levels.
- Customize Settings: (See the Screenshot to the right.) Go to the 'Gear' (⚙️) icon in the top-right corner, then 'Account and Settings' to customize your preferences:
 'Advanced' tab customization options.
- Company - Your business details, contact information, then upload your company logo.
- Usage - Depending on your subscription, QBO assigns specific usage limits. These limits apply to how many billable users, chart of accounts, classes, locations, and tags you can add to QuickBooks. There are also file size limits on document attachments.
- Payments - You can set up payment gateways if you plan to accept online payments. I'd skip this for now and come back to it.
- Sales - Customize invoices, sales form content, and online delivery.
- Expenses - Customize how you track and manage expenses.
- Time - Here's where you turn on and set up time tracking. (This feature is only available to QuickBooks Online Essentials, Plus, Advanced, Accountant, or QuickBooks Online Payroll Premium or Elite subscribers.)
- Advanced - (See the Screenshot to the left.) Set preferences for accounting details like the chart of accounts, automation, and other features.
4. Connecting Bank Accounts and Credit Cards
WHAT'S COVERED
- Importing Data
- Linking Your Bank Accounts
- Categorizing and Matching Transactions
Once you have setup your company file on the QBO platform, your next step in learning how to use QuickBooks Online is data driven. Let's take a look.
1. Importing Data (Optional) - do this step before connecting to your bank
If you are migrating your bookkeeping data from another system, keep in mind there will be some conversion procedures which may include setting up opening balances and carry forward balances. Please don't just jump in before converting your existing data if you want your previous bookkeeping data available in QBO.
- Import Customers, Suppliers, and Products/Services: If you have existing data, you can import it to QBO using their data import process.
- It's important to do this step before connecting to your bank, otherwise the imported data will overwrite any downloaded bank transactions.
- Go to the 'Gear' icon (⚙️) in the top-right corner, then 'Import Data' under the Tools column.
- Follow all the instructions to verify your data imported properly before continuing. Don't skip this step. If it didn't work, you can overwrite the data by trying again.
That said, if you have been in business for a long time, you might want to start with a clean setup of books and just start with opening balances. If you take this route, make sure you will still have access to your old system to look things up when required. From my experience, it will be "required" more than you anticipate!
2. Linking Your Bank Accounts
- Link Your Accounts: In the left-hand menu, go to Transactions > Bank transactions > Connect account. You can search for your bank and follow the instructions to link it to your QuickBooks. Once linked, QuickBooks will automatically import your bank transactions.
- Download Transactions: Once linked, QBO will start to download your bank transactions. This will help in reconciling your bank statements with QuickBooks.
- Upload Transactions: If connecting to a live bank feed makes you uncomfortable, you can also manually upload your transactions from your bank if your bank provides this feature.
3. Categorizing and Matching Transactions
- Skip this task for now. Come back to it once you are ready to start processing data.
- Go to Transactions > Bank transactions (bank feed) and begin reviewing the imported bank transactions and categorize them to the correct accounts or match them with existing transactions.
5. Navigation and Interface Overview
WHAT'S COVERED
- Left Navigation Bar
- Create (+ New) Button
- Gear (⚙️) Icon
- Dashboard
- Search (🔍) and Find Feature
- Help Icon
Now you are ready to learn how to navigate in QuickBooks Online. Don't skip this step as your navigation options are scattered throughout the platform. It will make it easier if you get familiar with them.
1. Left Navigation Bar: The first thing you will notice is the left navigation bar. It gives you access to the different sections (modules) such as Sales, Expenses, Employees, Reports, and Taxes.
Tip: You can collapse the bar if you need more screen access as it does take up quite a bit of room.
Let's take a look at what it contains:
 This is my view. Your navigation bar will look slightly different.
- Bookmarks: If you find there is a window you use a lot in any of the modules, you can setup a book mark on your navigation bar so you can go directly there. I love this feature! For example, I like to setup bookmarks for my COA, customers, suppliers, reports, bank transactions, reconcile, and recurring transactions.
- Dashboard (Home): Brings you back to the main dashboard from any screen. I chat more about this feature when I discuss QBO Navigation.
- Transactions: Allows you to connect your bank accounts, download transactions, and reconcile accounts. It includes the Chart of Accounts, where you can see and manage all your accounts and access to your recurring transactions.
- Sales: Here, you can create and manage customers, invoices, and sales receipts.
- Expenses: Manage your bills, suppliers, expenses, and purchases.
- Reports: Access various financial and accounting reports. The number of reports available is dependant upon your subscription level. This module also includes a 'Performance Centre' tab to help you manage your business.
Intuit is currently in the process of updating the technology in this module. Classic view reports will be discontinued in 2024. Modern view reports are being integrated into the QBO platform throughout 2024.
- Payroll: If you've opted to use QBO Payroll, this is where you manage payroll activities. (This module is an add-on subscription.) Intuit just recently updated the entire payroll module in 2024, so it is different than earlier versions.
- Projects: If your business manages projects, you can use this module to track project-related income and expenses. (This module is only available in Plus and Advanced subscriptions.) It's not showing on my navigation bar as I have not turned this feature on.
- Budgets: Here, you can create a budget for the coming year and then run reports to see if you met your targets. (This module is only available in Plus and Advanced subscriptions.) Coming from a corporate head office background initially, I'm a big fan of budgets and comparing your budget to your actual operating results so you stay on course and meet your targets by year-end.
New in 2024 is a module called Financial Planning. It is my understanding that it will forecast what is likely to happen over the next three to five year vs. your annual budget that focuses on what you want to happen in the coming year. - Taxes: This section helps you manage, file and pay your sales tax and payroll taxes. You can see by the menu bar I don't have payroll tax turned on, so the bar shows 'Sales Tax' instead.
- My Accountant: A dedicated space where you can invite and collaborate with your accountant. You can share documents and your accountant can make requests. Two accountants are included in any QBO subscription - one for your accountant and one for your bookkeeper. These are not categorized as a 'user'.
- Apps: Explore and integrate third-party apps to enhance QBO functionality.
You can customize the left navigation bar but I recommend you don't do that when learning how to use QuickBooks online. Wait until you have used the program for a few months. You can also collapse the nav bar (three lines to the top right of the nav bar) if it is getting in the way as it takes up a lot real estate. One of my wishes is that there would be a toggle I could set in the Settings to have this default to being collapsed.
2. Create (+ New) Button: You'll find this feature sits near the top of the left navigation bar. This button allows you to quickly create transactions like invoices, expenses, cheques (checks), estimates, and more.
I'll talk more about this navigation tool when I chat about workflow. For now, I want to point out that the screen shot below shows you can click on 'Video Tutorials' link to learn more.
Tip: If your left navigation bar is collapsed, the button becomes a '+' sitting at the top middle of your screen.
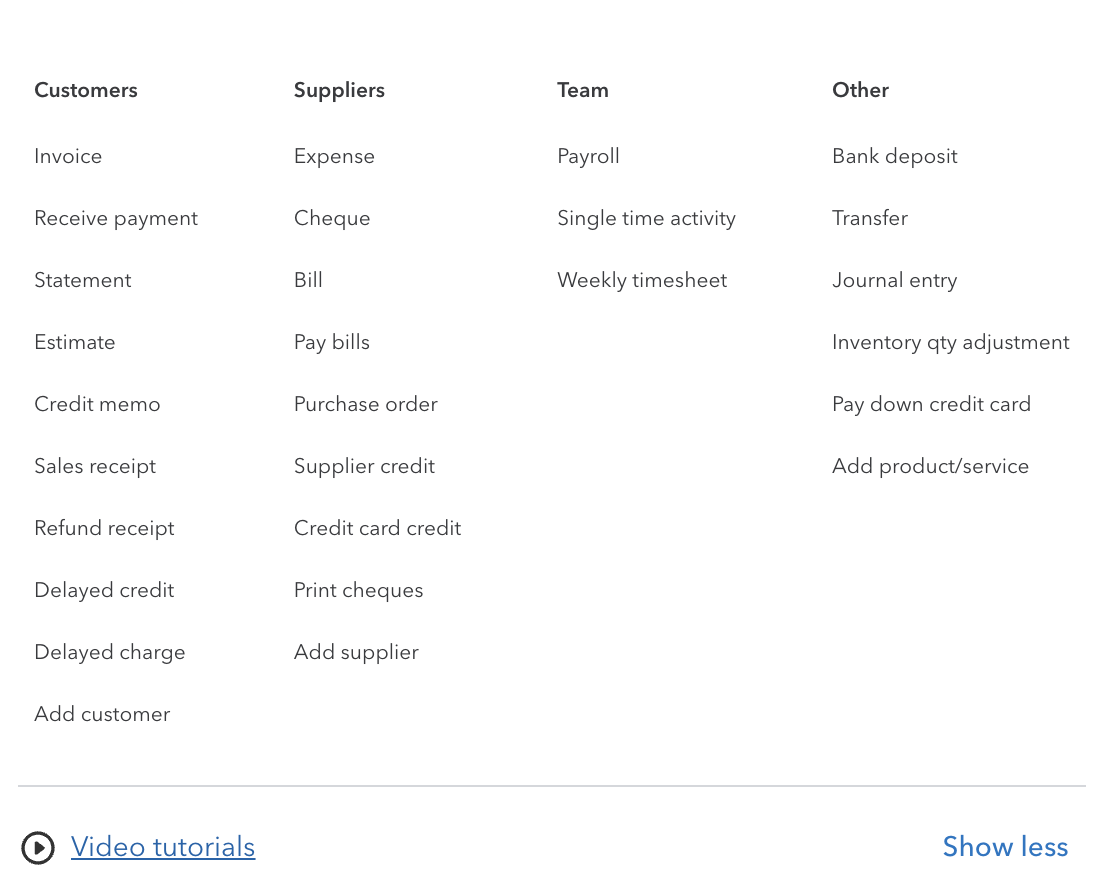 Options under the '+ New' button
3. Gear (⚙️) Icon: This is the tool that provides access to various settings and features to help you customize and manage your QuickBooks experience.
Found at the top right of the screen, this is where you can access Account and Settings, Company Settings, Manage Users, Import Data, and more. You see your options once you click on the gear. I've provided a screen shot to give you an idea of what this navigation tool contains.
The 'Import Data' feature is the tool used to convert your QBD data (or other accounting programs) to QBO data.
Tip: Many of the features found here can also be found in a dropdown menu on the navigation bar.
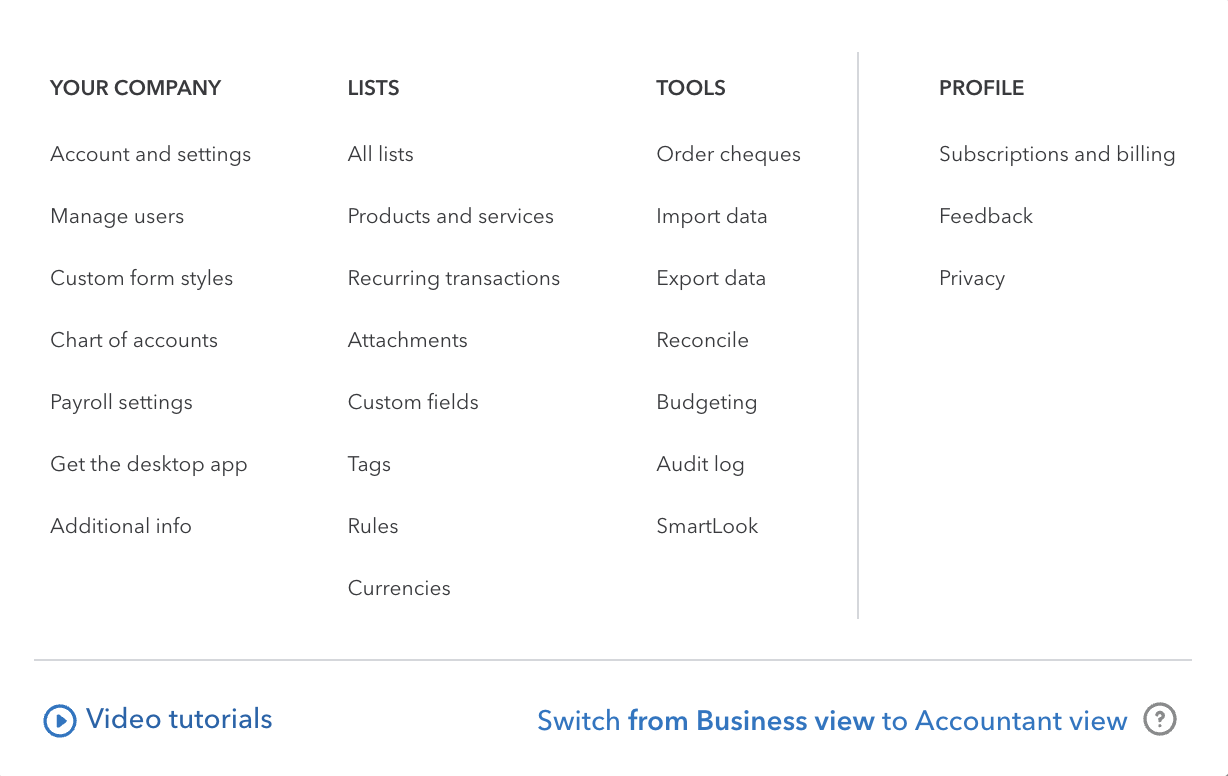 These are the menu options after you click on the Gear (⚙️) icon
4. Dashboard: Your dashboard displays an overview of your company, a checklist to help you get set up, and a Task list for anything that may need your attention.
You'll also find a 'shortcuts' list to commonly used bookkeeping tasks as well as tasks classified as 'Money In' or 'Money Out'.
I like to use the Shortcuts under Dashboard to setup the QBO workflows I use. If you click on 'Show All', you get widgets which I personally like. You can also use 'Customize Layout' to make the 'Shortcuts' box bigger if you prefer to always see widgets rather than lists.
Intuit made changes in 2024 to the QuickBooks Online dashboard. The new dashboard is more customizable, allows you to add and remove widgets from the dashboard, rearrange their positions, and resize widget sizes.
One change I'm mourning is the loss of comparatives within the widgets. I like to know where my sales have increased or decreased compared to last year, or what expenses are up or down compared to last year. I like to see my month-date information beside my year-to-date information. I'm hoping the new Dashboard platform will allow them to bring back that feature.
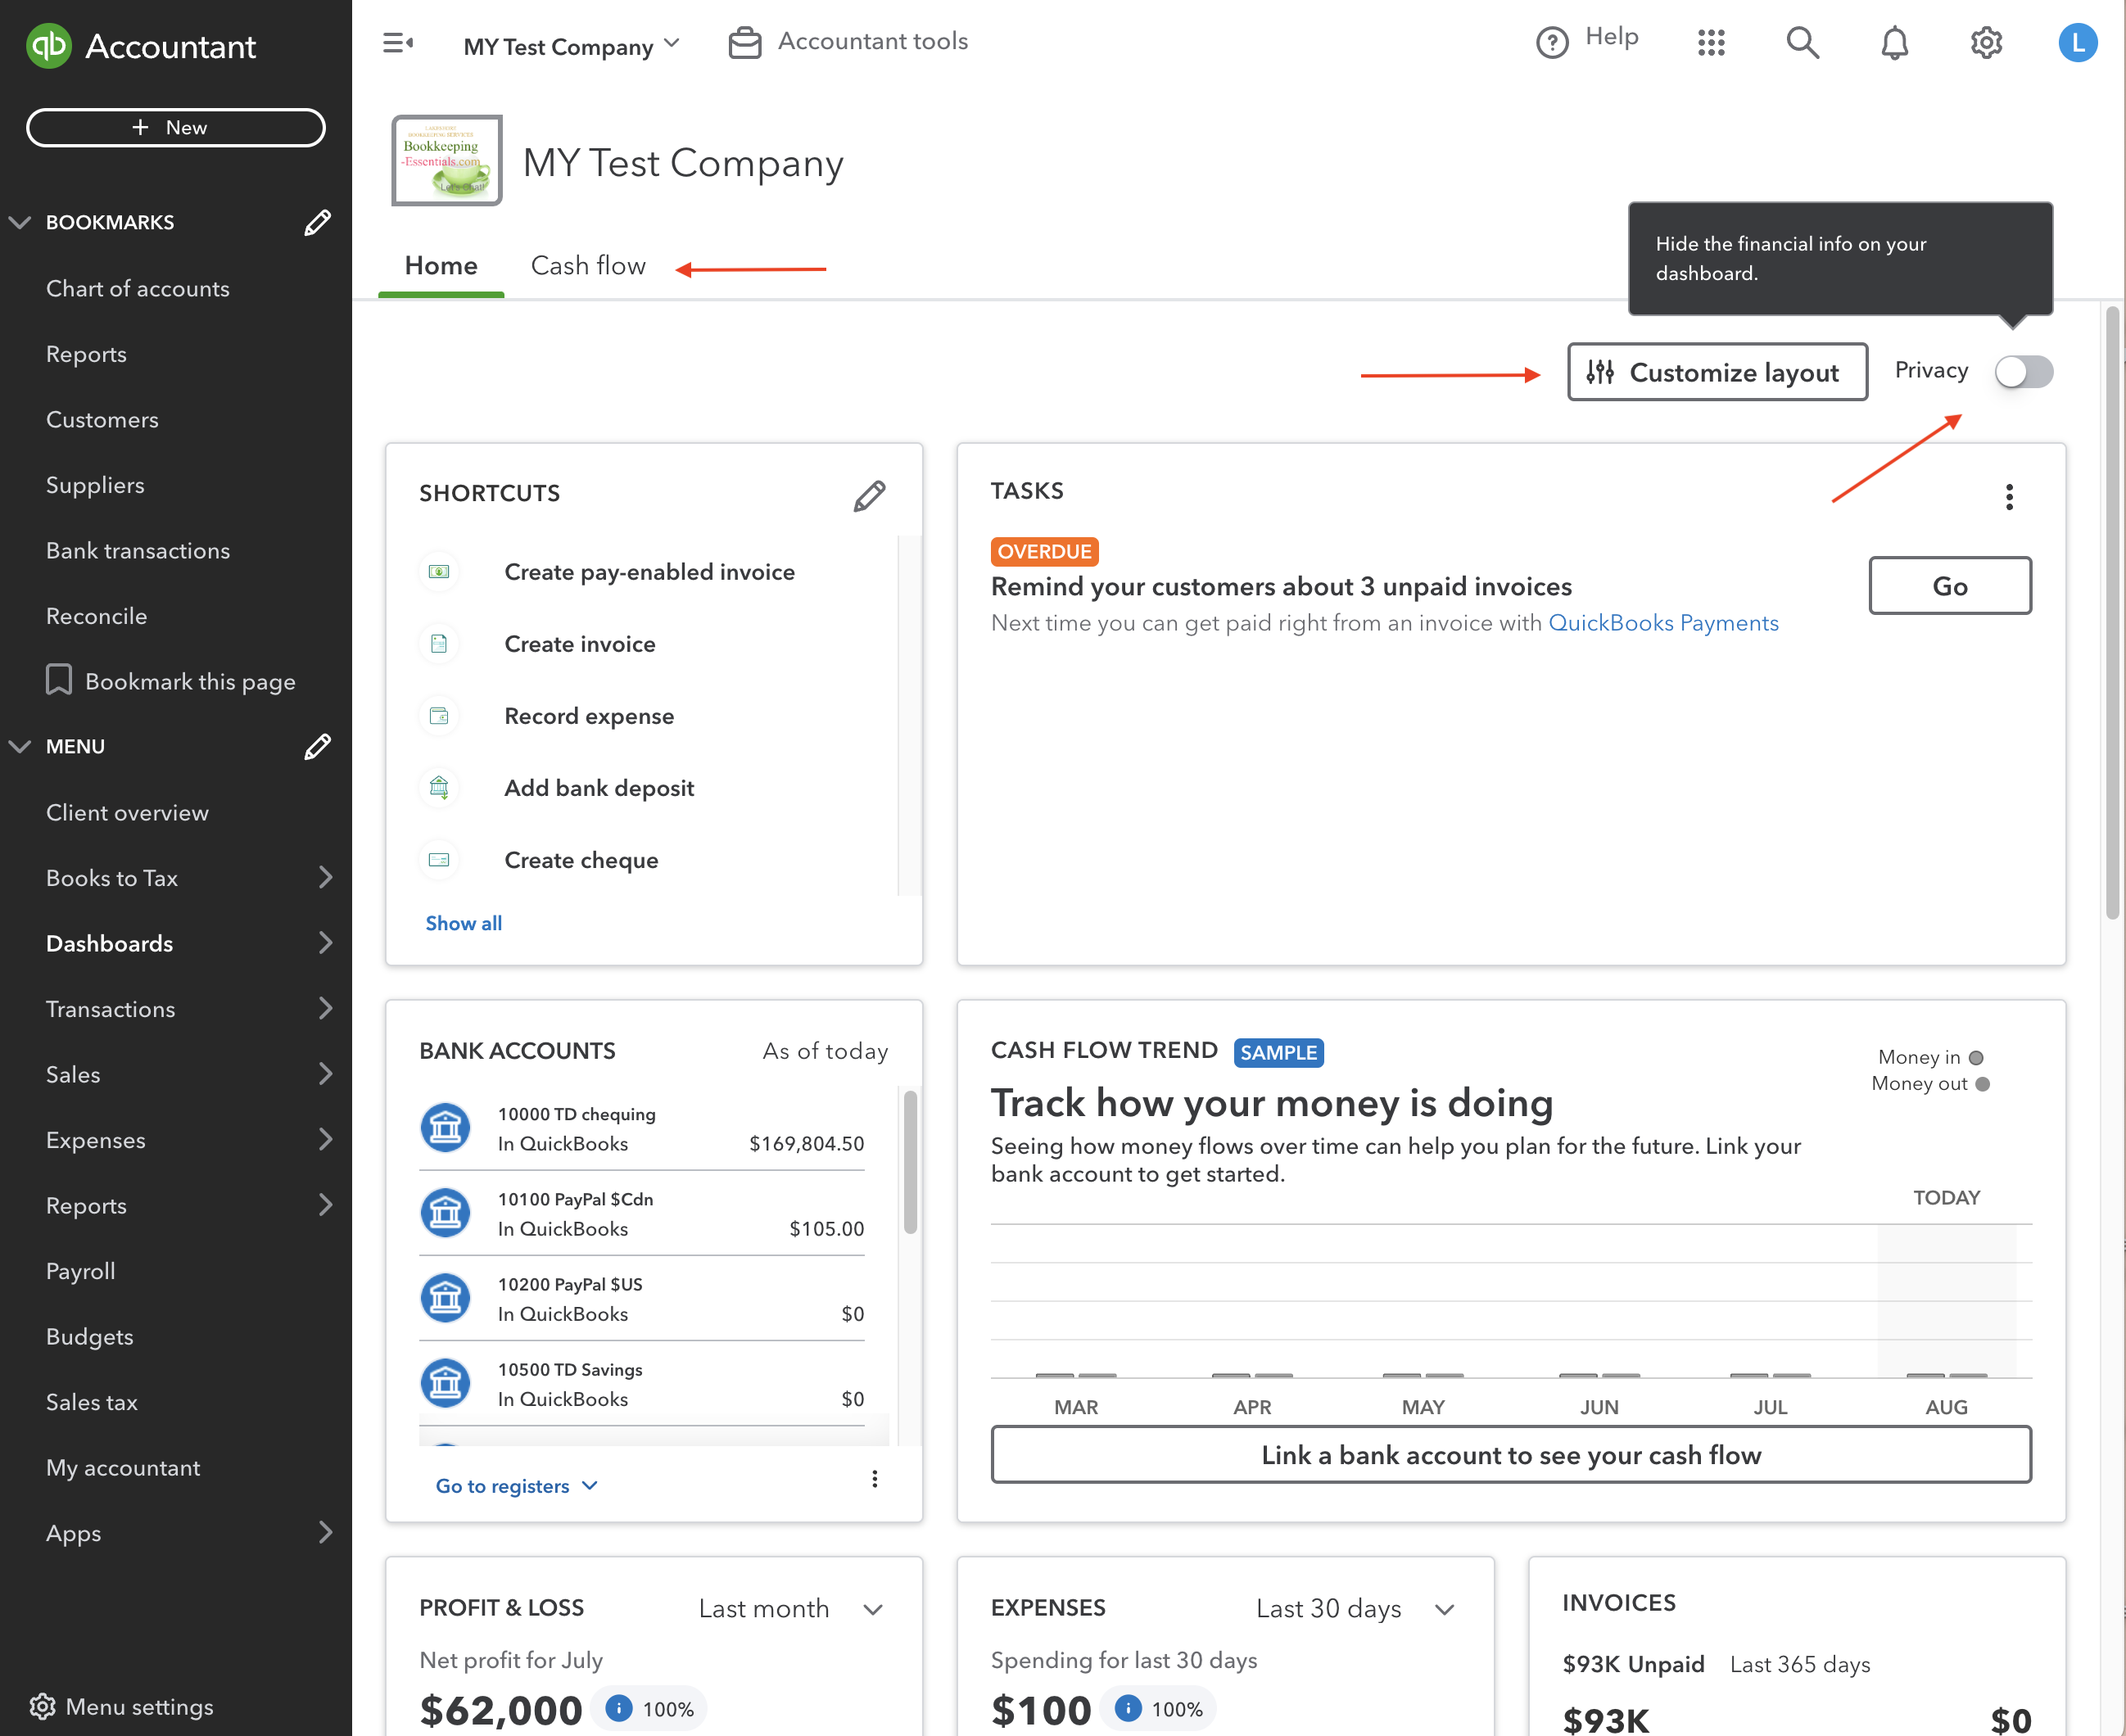 Top half of 'Dashboard' default - Shortcuts, Tasks, Bank Accounts, Cash Flow Trend
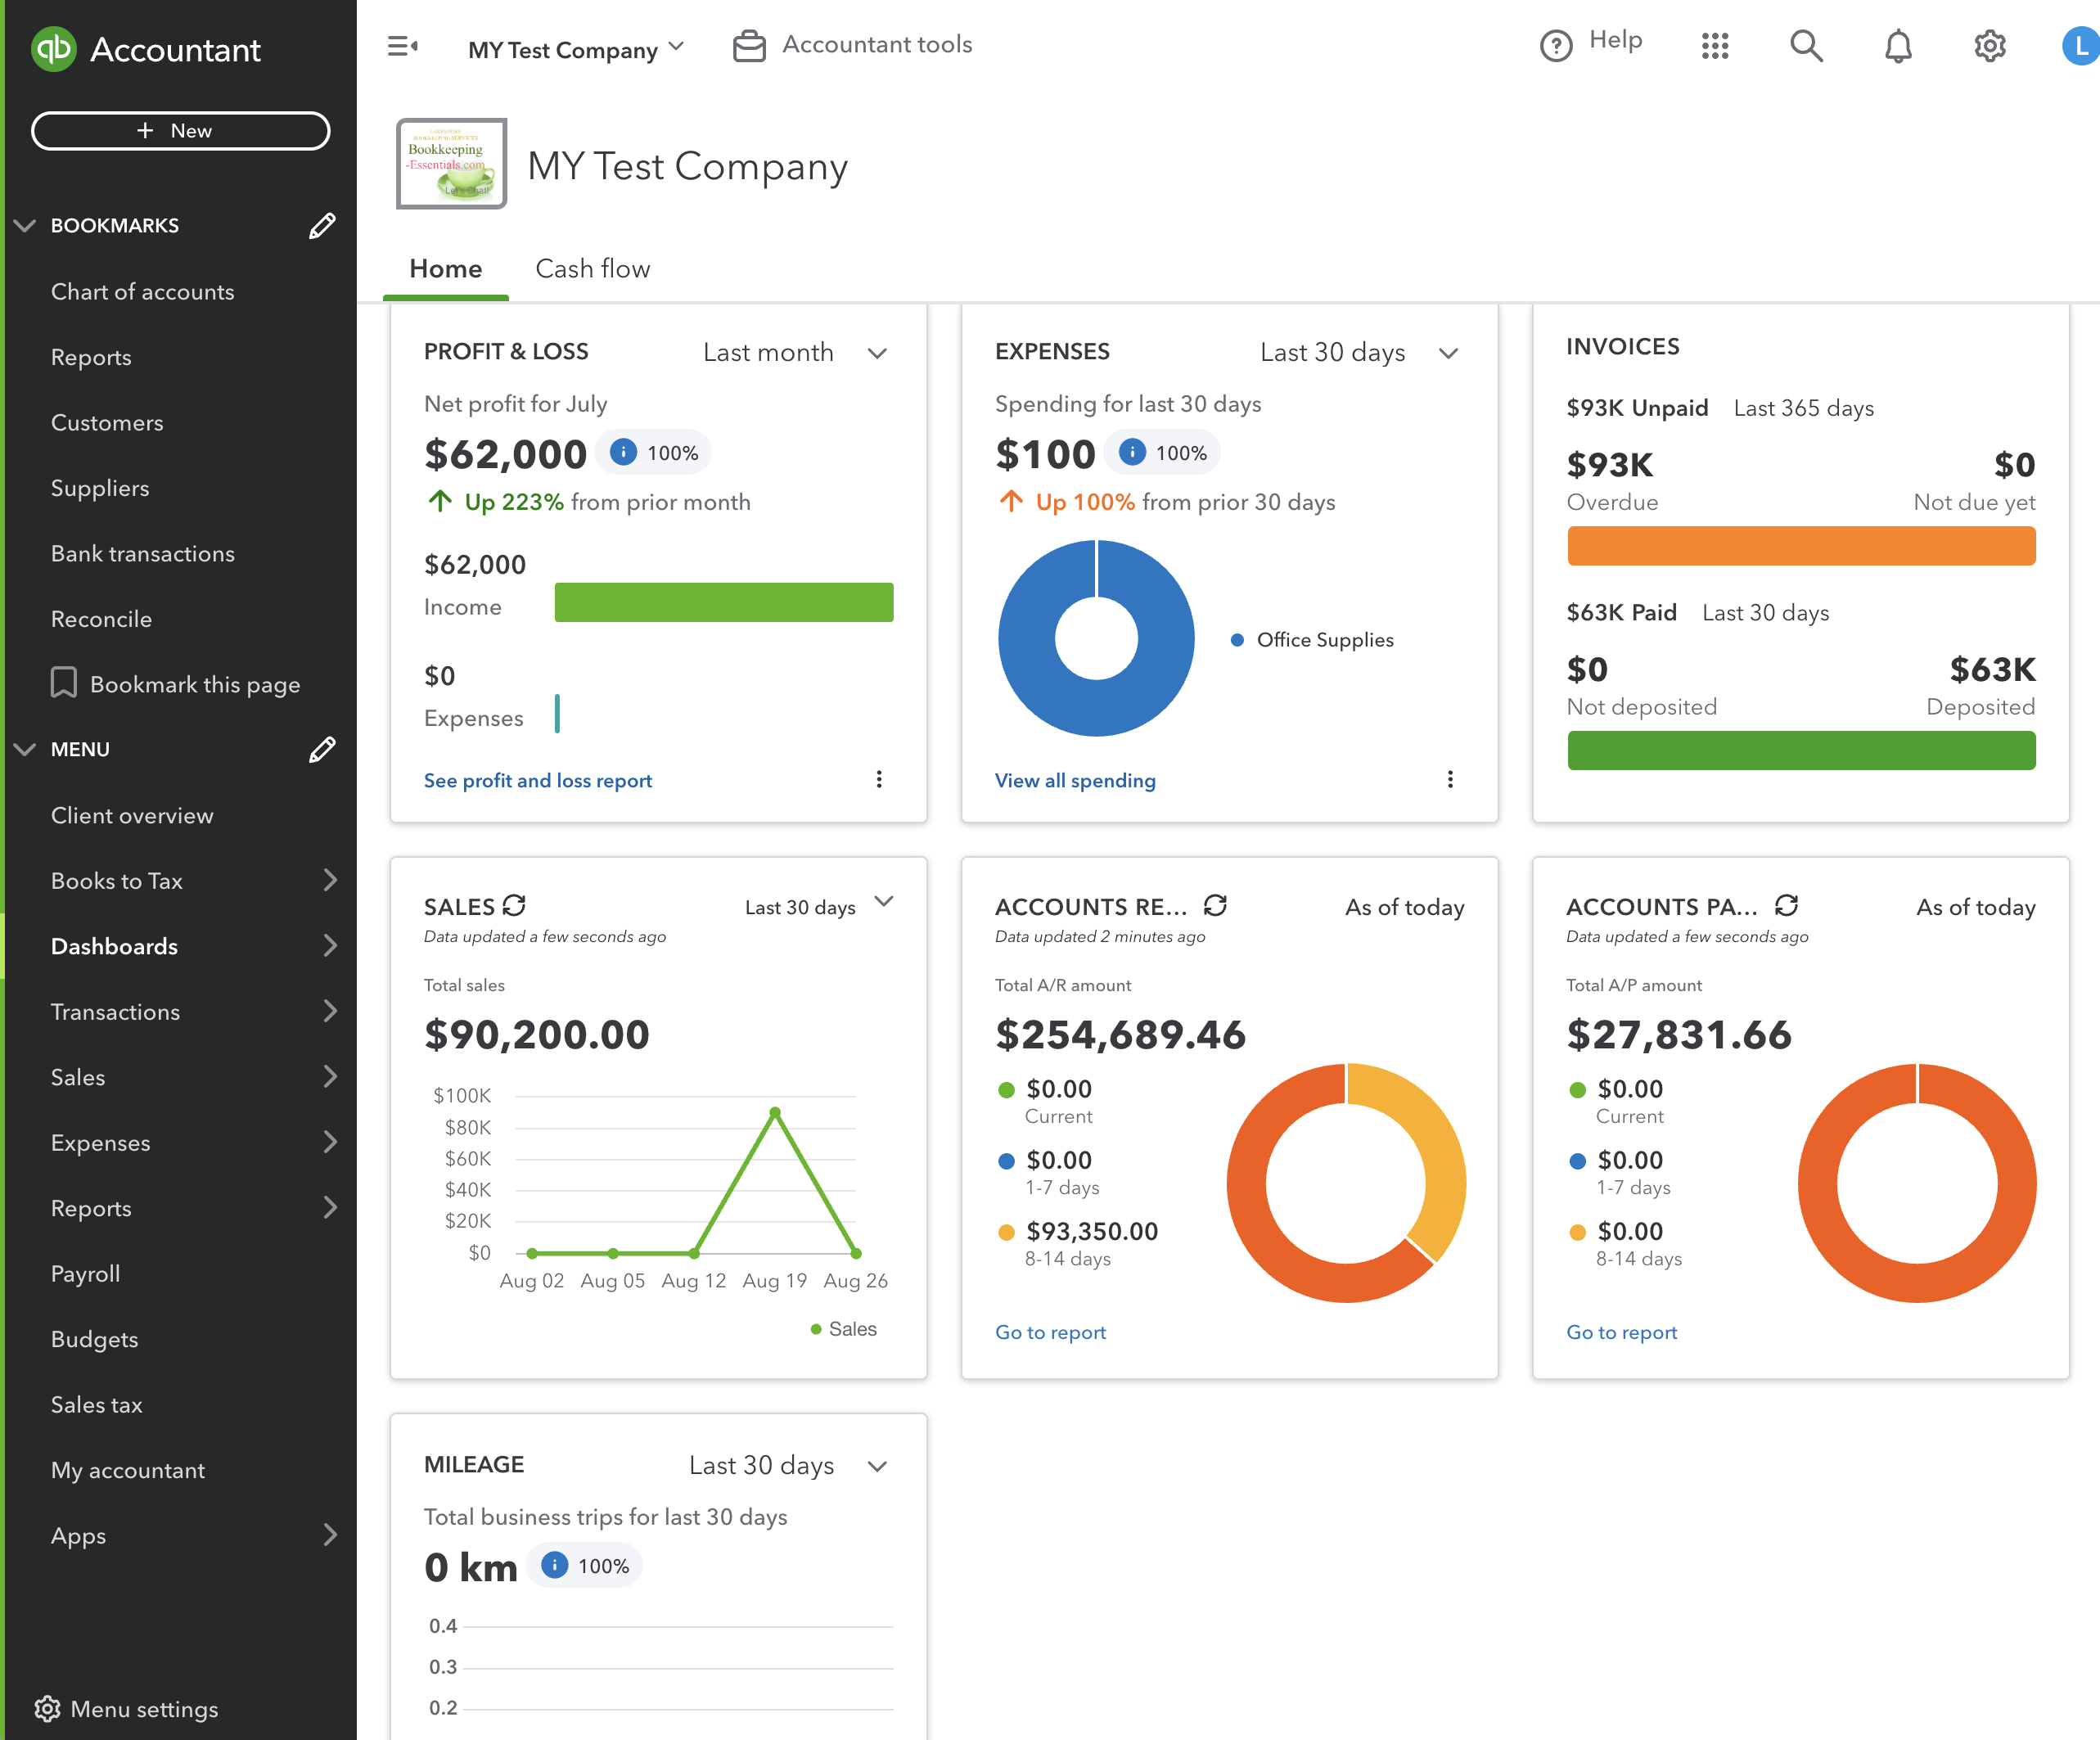 Bottom half of 'Dashboard' default - P&L, Expenses, Invoices, Sales, A/R, A/P, Mileage
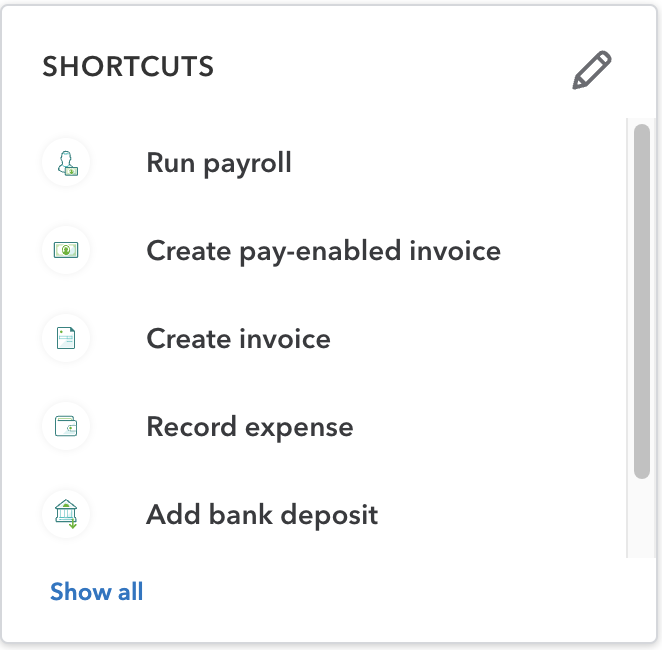 I customize my 'Shortcuts' setup for my QBO work flows on my 'Dashboard'
5. Search (🔍) and Find Feature: It is found at the top of your screen. The Search function looks for all transactions, list items, or activities that match your search. If you have a specific transaction in mind, you can use the Find feature and get matching results for transactions only. It will also show your most recent transactions posted which I find very handy and use a lot.
When learning how to use QuickBooks Online, take the time to learn how navigate the software. You won't have the gain in efficiency you are looking for if you skip this step.
6. Help Icon: Access help topics, contact support, and search for assistance on specific issues
When you first enter the QuickBooks® Desktop (QBD) program, you are presented with a flowchart of the accounting system. It gives you an overview of how your bookkeeping work flows ... and your first clue as to how to use QuickBooks®. QuickBooks Online (QBO) workflow is similar to the desktop version ... but different ... sort of like Chevys and Ford are similar but different.
Using QBO in a browser does not have a nice flowchart. However, you can get the nice QBD flowchart in QBO by using the QBO app and clicking on 'Desktop View'. The 'Desktop View' feature is for QBD users who have transitioned to QBO and want a near similar experience to QBD. It doesn't change any functionalities. It just provides a familiar interface.
In this section, I want to talk about how to learn to use the various QuickBooks Online workflows. Here are QBO workflow modules with the QuickBooks Desktop module names in brackets:
- Sales (Customers in QBD): You can manage customer information, create estimates and invoices, receive payments, and track receivables. If you have inventory turned on, you find your products and services here as well.
- Expenses (Vendors in QBD): Here, you can manage your supplier information, enter and pay bills, and track expenses. You can also track your mileage here.
- Payroll (Employees in QBD): This is where you can manage employee information, run payroll, manage your payroll taxes and file your compliance reports (if you have subscribed to QuickBooks Payroll). Time sheets and time tracking has it own section under 'Tools' found within the 'Gear' icon (⚙️) in the top-right corner.
- Transactions (Banking in QBD): You can connect your bank and credit card accounts, download transactions and manage your bank feeds. In this section, you can also upload and manage receipts, reconcile accounts, automate your banking rules. You can also manage your Chart of Accounts and recurring transactions here. (In QBD, COA and memorized transactions are found under the Company module.)
- Settings (Company in QBD): This is where you manage your company information, preferences, settings, and list management. Your Chart of Accounts and recurring transactions can be found under 'Settings' as well as under 'Transactions'. You get to this module by clicking on the gear in the upper hand corner of the screen.
Some terminology is different between the two products:
- QBD vendors are called suppliers in QBO
- QBD memorized transactions are called recurring transactions in QBO
- QBD memorized reports are called custom reports in QBO
- QBD reminders are called tasks in QBO
- QBD items and services are called products and services in QBO
Despite these terminology differences, the core functionality of these modules remains largely the same. If you are coming from an QuickBooks Desktop environment, the different names should not significantly impact your ability to navigate and use QuickBooks Online.
QBO also has a few other sections that I discussed in the previous section about getting started. In this section I want to talk about learning to navigate your various workflows in QBO.
It's important to note that while many features are similar between the two versions, some features available in QuickBooks Desktop may not be available in QuickBooks Online, or they may work differently. However, Intuit, the company behind QuickBooks, continually updates and improves the online version to provide a comprehensive and user-friendly experience for small business owners. Each year, QBO becomes more robust. Remember, this is the same path Intuit used to develop QBD after it launched in 1998.
Key Takeaway
Once you understand the QBO workflow, your transition will be easier. If you don't want your books to become messy, it is worth taking the time to learn how to use QuickBooks Online workflows.
My best advice is don't try to always relate a workflow back to how something was done in QBD. Remember when Canada changed from Fahrenheit to Celsius? I used to try and translate Celsius back to Fahrenheit so I'd know how to dress for the day. It was exhausting. Then one day I decided it was ridiculous to keep translating. When the radio said it was 20 degrees Celsius or -10 degrees Celsius, I would go outside and rate it using the following scale - very hot, hot, nice, cool, cold. That's all I needed to make the transition easy and to learn to think in "Celsius". Learning how to use QuickBooks Online will be easier if you stop translating how QBD did something.
As I mentioned, QuickBooks Online (QBO) does not have a nice accounting workflow flowchart like the desktop version unless you are working in the QBO Desktop App desktop view. Likely due to the different platforms. However QBO's workflow is very similar.
Instead of a flowchart on your browser webpage, QBO offers various navigational tools to manage your business discussed earlier. These tools are great to help you move around the platform but doesn't provide the helpful graphical flowchart found in QBD. The closest things that emulates a workflow in QuickBooks Online can found under (i) Dashboard > Shortcuts, (ii) the left hand side navigation bar, and (iii) the '+ New' icon at the top left hand corner of the screen.
Okay, let's take a closer look at the various workflows (or modules) you need to know when learning how to use QuickBooks Online.
1. Sales Workflow
Here's where you manage your sales and income. Customer transactions follow this flow; if you will:
- Receive payment later - (i) create an invoice, (ii) receive payments, (iii) record deposits.
- Receive payment immediately - (i) create a sales receipt, (ii) record deposits.
- Be doing progress billing - (i) create an estimate, (ii) create an invoice to progress bill, (ii) receive payments, (iii) record deposits.
- Be custom ordering - (i) create an estimate, (ii) convert estimate to a purchase order, (iii) create an invoice from the estimate (using 'create invoice' in the Estimate), (iv) receive payments, (v) record deposits. [QBO does not have a sales order like QBD.]
1. (i) How To Create and Send Invoices:
Use 'Invoice' for deferred payments such as customers you extended credit to.
1. Click on the '+ New' button and select 'Sales Receipt' under the 'Customers' column; or go to Dashboard > Shortcuts and click on 'Create Sales Receipt'.
2. Fill in customer information, products/services, and amounts.
3. Save and send the invoice directly from QuickBooks.
1. (ii) How To Receive An Invoice Payment:
Use 'Receive Payment' for accounts receivable payments.
1. Click on the '+ New' button and select 'Receive Payment' under the 'Customers' column.
2. Fill in the deposit information.
3. You have two choices for the 'Deposit to' field - (a) choose the account the EFT or direct debit was automatically deposited to; or (b) select 'Undeposited Funds' if you are going to make a physical bank deposit to a bricks and mortar bank or using a POS system.
4. Click on Save.
2. (i) How To Create A Sales Receipt:
Use 'Sales Receipt' for immediate payment such as a customer buying parts in the store.
1. Click on the '+ New' button and select 'Invoice' under the 'Customers' column; or go to Dashboard > Shortcuts and click on 'Create Invoice'.
2. Fill in customer information, products/services, and amounts.
3. You have two choices for the 'Deposit to' field - (a) choose the account the EFT or direct debit was automatically deposited to; or (b) select 'Undeposited Funds' if you are going to make a physical bank deposit to a bricks and mortar bank or using a POS system.
4. Save and send the invoice directly from QuickBooks.
2. (ii) How To Make A Bank Deposit:
Use 'Bank Deposit' for physical bank deposits.
1. Click on the '+ New' button and select 'Bank Deposit' under the 'Other' Column; or go to Dashboard > Shortcuts and click on 'Make Bank Deposit' under the 'Other' Column.
2. Fill in deposit information to match your bank deposit slip. All your 'Undeposited Funds' show up in the 'Bank Deposit' window allowing you to make a deposit that matches your physical bank deposit slips.
3. Save.
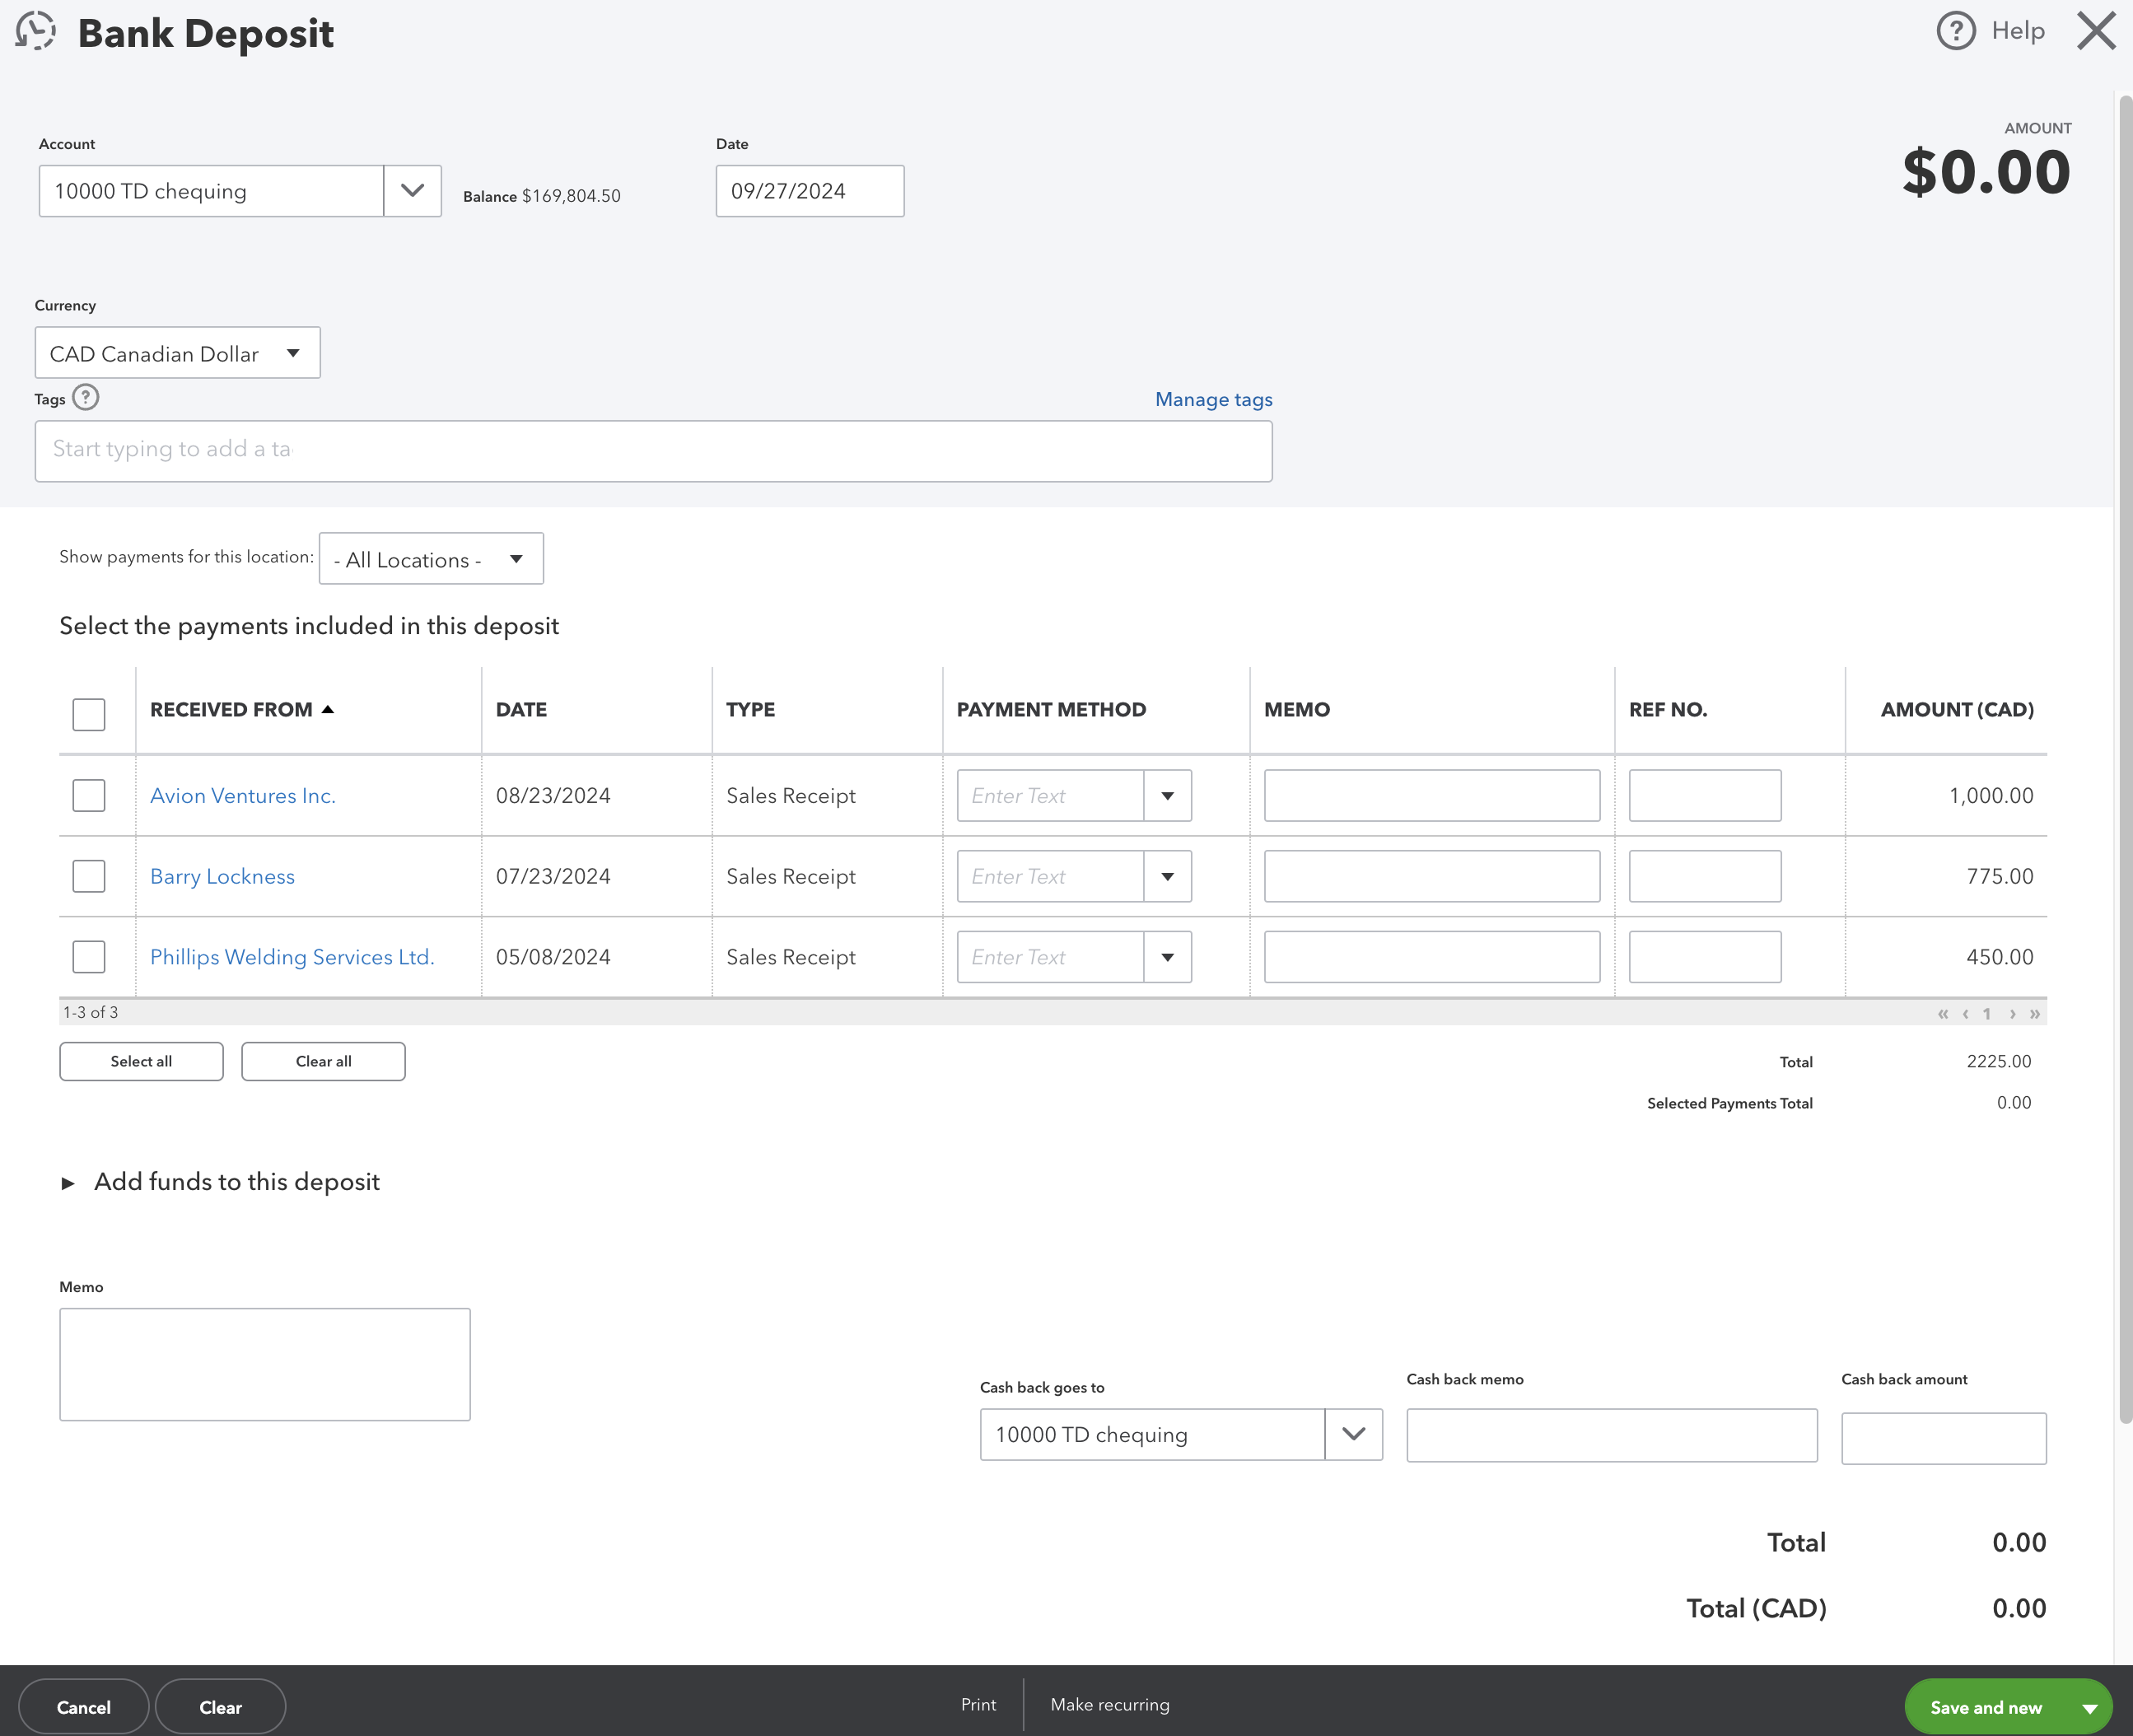 The 'Bank Deposit' feature allows you create an entry that will match your physical bank deposits you make so the entry matches bank deposit slip total and your bank statement.
Managing Customer Information:
Add a new customer
1. Go to the 'Sales' tab on the left navigation bar.
2. Select 'Customers', then 'New Customer' to add a new customer.
3. Add the customer details if you want audit ready books.
4. You can also add customers on the fly while you are in a form. If you do this, make sure you go back and enter the customer details if you want audit ready books.
Edit an existing customer
1. Go to the 'Sales' tab on the left navigation bar.
2. Select 'Customers', then select the customer from the list.
3. Click on the 'Edit' button to update the customer details.
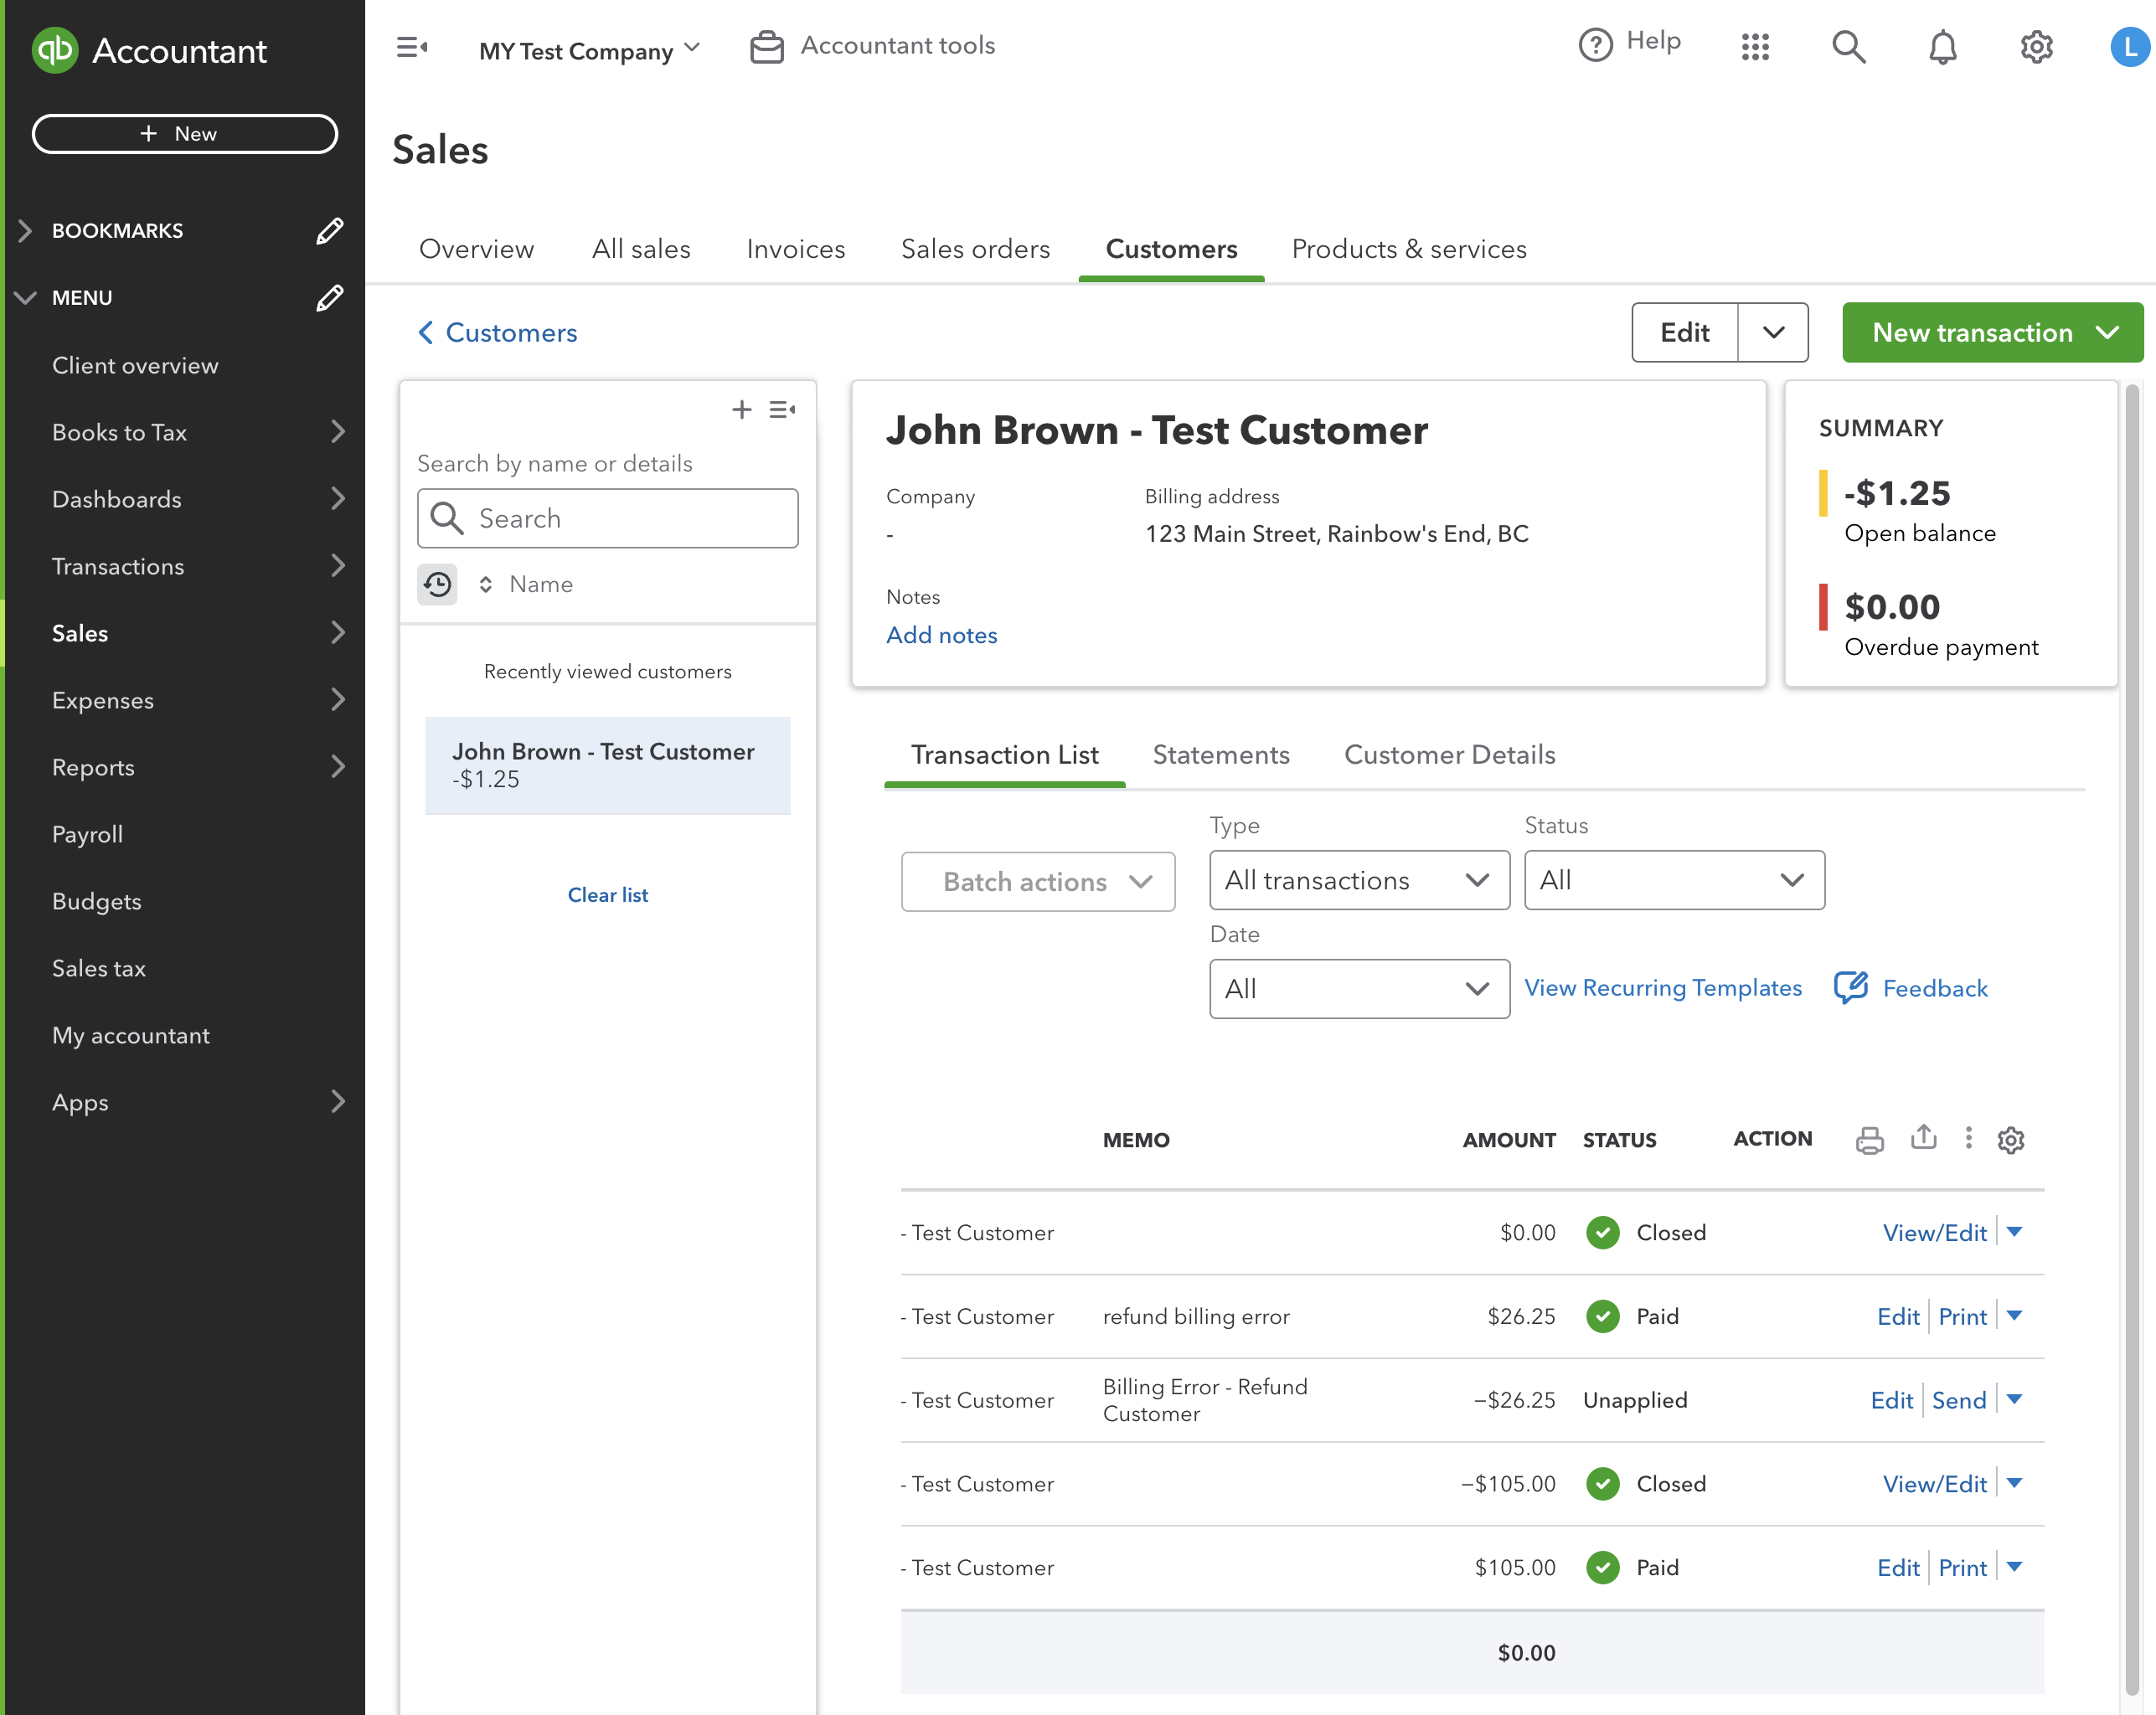 Take time to fill in customers details if you want your books to be audit ready especially if you created the customer on the fly.
Additional Sales Notes and Personal Preferences:
A third option I didn't discuss above is using the navigation bar. You can also go to 'Sales' on the left-hand menu and select 'Invoices'. Click 'New Invoice' to create an invoice. Fill in the customer details, invoice date, due date, and the products or services being billed. Save the invoice and, if needed, email it directly to the customer from QBO.
It is better, if you don't have a clue how to categorize an income transaction or a deposit (perhaps it a prepayment or complex transaction), to book these to 'uncategorized income' where your accountant can deal with them at year-end.
Audit Ready Tip - If you want audit ready books, make sure you complete the Customer information. QBO lets you add Customer's on the fly which just creates the name. Be sure to go back and fill in the address, email, and phone contact information as well as the GST/HST information.
2. Expenses Workflow
Here's where you handle your expenses and purchases. Supplier transactions follow this flow; if you will:
- Receive a bill to pay at a future date - (i) create a bill, (ii) pay bill.
- Pay bill at the same time as making the purchase - (i) create an expense receipt if you are paying by EFT, debit or credit card, or (ii) if you are paying by cheque, create a cheque.
- Pay a bill that has a purchase order and a bill - (i) create a purchase order (PO's are non-posting entries), (ii) receive inventory, (iii) enter the bill against the purchase order (using 'copy to bill' in the PO), (iv) pay bill.
1. (i) How To Enter A Bill Received:
Use 'Bill' for purchases made on credit (.i.e. you don't pay for it immediately such as utilities).
1. Click on the '+ New' button and select 'Bill' under the 'Suppliers' column; or go to Dashboard > Shortcuts and click on 'Create Bill'.
2. Enter the payee, payment account, and expense category.
3. Filling out the 'Payment Method' might help when searching for transactions but it is optional.
4. Save.
1. (ii) How To Pay a Bill By Electronic Funds:
Use 'Pay Bills' for accounts payable payments. It's important to note this just records the bill payment in QBO. You still have to sign into your bank online and physically pay the bill through the bank. QBO does not actually pay the bill for you.
1. Click on the '+ New' button and select 'Pay Bills' under the 'Suppliers' column.
2. Select the bill you want to pay and the bank account you want to post the payment to.
3. Enter the date of the payment.
4. Leave the 'Starting Cheque No.' blank if paying by electronic funds. Another option is to enter the bank reference number in the 'Starting Cheque No.' field.
5. Make sure 'Print Later' is unticked.
6. Click on the bills you want paid. The total show equal the amount of your electronic funds payment.
7. Click on Save not 'Save and Print' (that is for when you are paying by cheque).
8. If you want to record the EFT number or other bank reference number and didn't do it during step four, here's what you can do: (i) select Transactions > Chart of Accounts. (ii) Find the bank account for the bill payment and click on 'Account History' found on the right side. (iii) Find the transaction in the register (type will equal 'Bill Payment'). (iv) Enter the bank reference number in 'Ref No." field. Remember to save the change.
2. (i) How To Record An Expense
Use 'Expense' for purchases you will be paying immediately such as office supplies bought the store.
1. Click on the '+ New' button and select 'Expense' under the 'Suppliers' column; or go to Dashboard > Shortcuts and click on 'Record Expense'.
2. Enter the payee, payment account, and expense category.
3. Filling out the 'Payment Method' might help when searching for transactions but it is optional.
4. Save.
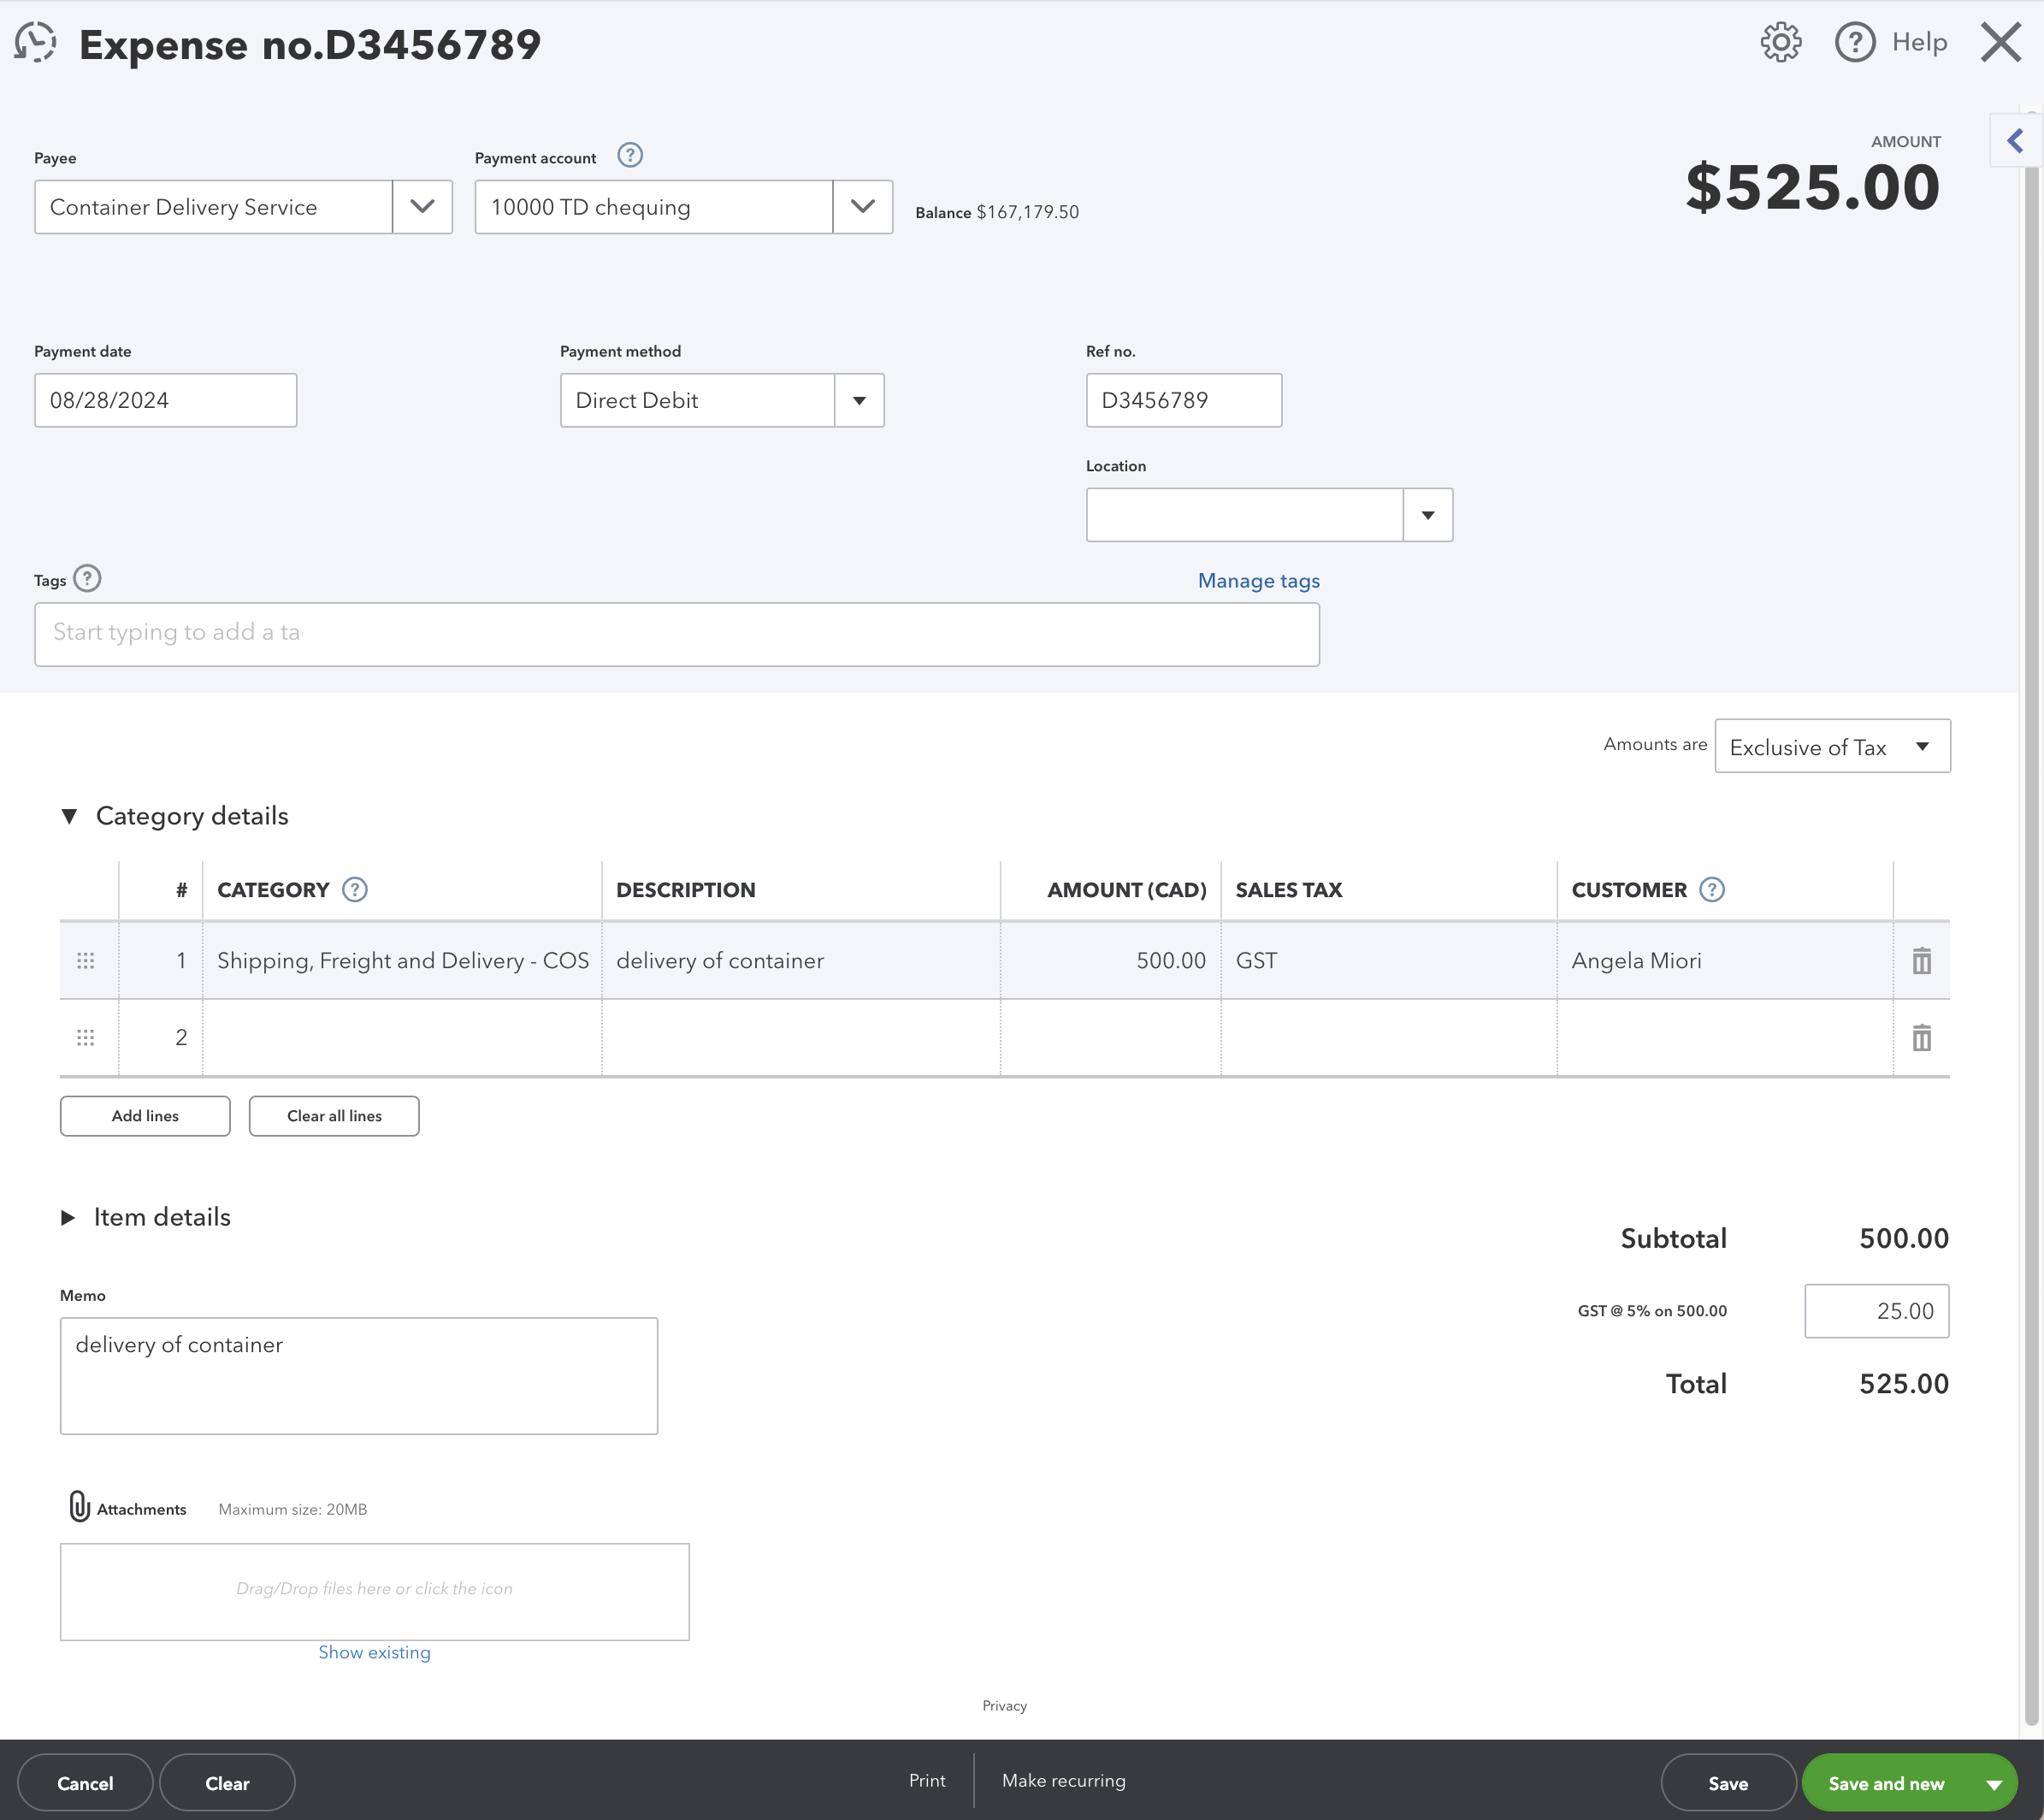 Here is an example of an Expense in QBO
3 (i) Creating and Sending Purchase Orders:
1. Click on the '+ New' button and select 'Purchase Order' under the 'Suppliers' column; or go to Dashboard > Shortcuts and click on 'Create Purchase Order'.
2. Enter supplier details, items, and quantities then Save.
There are two ways to process a purchase order once it has been filled.
Option 1 - 3 (iii) Convert a Purchase Order to a Bill:
After a supplier accepts a purchase order (PO) and sends the products, record the PO as a bill or expense in QuickBooks.
1. Open up the purchase order you want to apply against a bill.
2. Click on 'Copy to Bill'. This will take to the bill. Near the top left hand side of the bill, you should see '1 linked Purchase Order'.
3. Make sure you enter the Bill number and correct Bill date along with the terms.
4. Add anything else you need to the bill and Save.
Option 2 - 3 (iii) Apply a bill against the Purchase Order:
After a supplier accepts a purchase order (PO) and sends the products, apply the bill against the PO in QuickBooks.
1. Open up the bill in QBO.
2. On the right hand side, all outstanding POs for this supplier should show up. Select the correct PO you want to apply against this bill.
3. Near the top left hand side of the bill created, you should see '1 linked Purchase Order'.
4. Make sure you enter the Bill number and correct Bill date along with the terms. Add the customer name if it was a custom order.
5. Add anything else you need to the bill and Save.
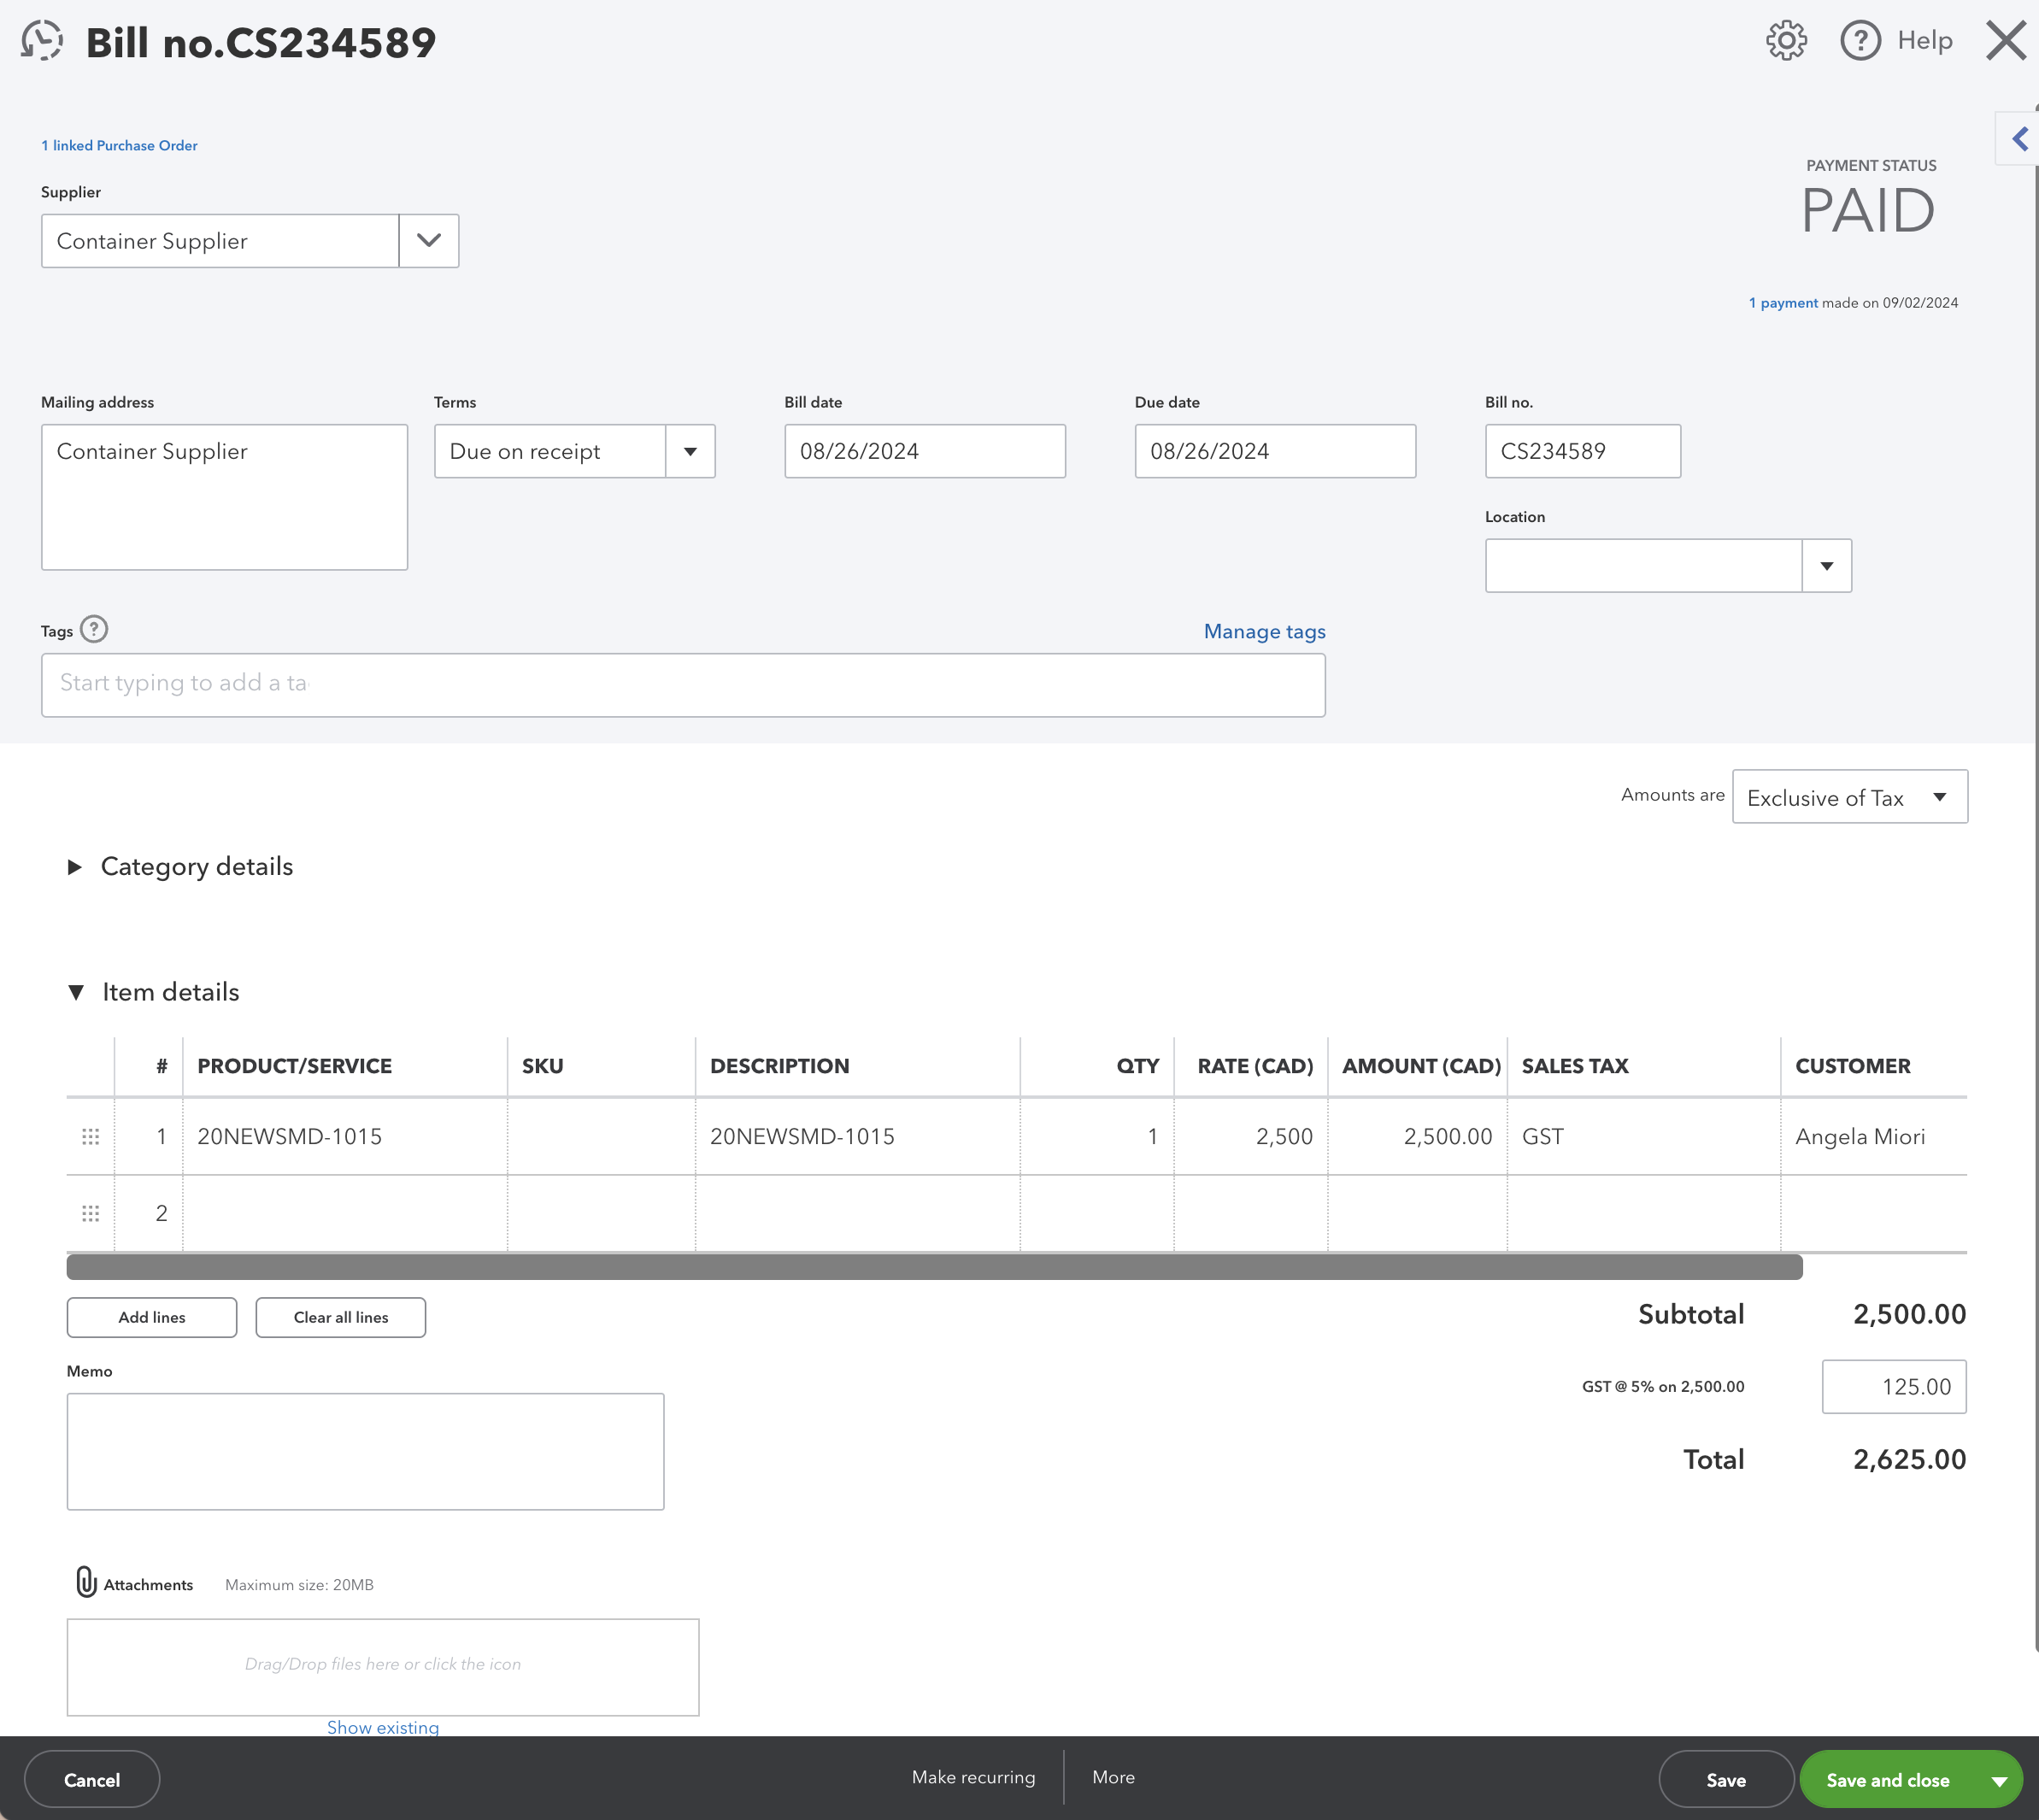 A purchase order converted to a bill
Managing Supplier Information:
Add a new supplier
1. Go to the 'Expense' tab on the left navigation bar.
2. Select 'Suppliers', then 'New Supplier' to add a new supplier.
3. Add the supplier details including their GST/HST registration number if you want audit ready books.
4. You can also add suppliers on the fly while you are in a form. If you do this, make sure you go back and enter the suppliers details if you want audit ready books.
Edit an existing supplier
1. Go to the 'Expense' tab on the left navigation bar.
2. Select 'Suppliers', then select the supplier from the list.
3. Click on the 'Edit' button to update the supplier details.
Additional Expense Notes and Personal Preferences:
A third option I didn't discuss above is using the navigation bar. You can also go to 'Expenses' on the left-hand menu and select 'Expenses' from the drop down menu selection. Click 'New Transaction', then, depending on the type of expense, choose 'Bill' if you will pay the bill later, 'Expense' if you are paying on your debit card or credit card now, or 'Cheque' (Check) if you are writing a cheque (check) now. Fill in the payee, payment account, date, amount, and categorize the expense. Click 'Save and Close' to record the expense.
It's my preference to use 'Expense' when paying by debit card and keep 'Cheque' strictly for issuing cheques. However, when you use the Pay Bills function to book an electronic funds payment, QBO posts it a 'Cheque'.
It is also my preference that you NEVER (yes I'm talking loudly!) use the 'uncategorized asset' option QBO sometimes suggests when you are in the bank feeds. It is better, if you don't have a clue how to categorize a transaction (perhaps it unusual or complex), to book these to 'uncategorized expense' where your accountant can deal with them at year-end.
Audit Ready Tip - If you want audit ready books, make sure you complete the Supplier information. QBO lets you add Supplier's on the fly which just creates the name. Be sure to go back and fill in the address, email, and phone contact information as well as the GST/HST registration number.
More >> QBO Tips for Expenses and Accounts Payables
3. Transactions Workflow
This module is where a lot of the automation magic happens to put your bookkeeping on auto pilot wherever possible. It includes the following tasks:
- Bank transactions - connect to your bank and credit cards online to create a bank feed; it saves hours of work by tracking finances automatically. If this makes you uncomfortable, some banks, not all, still offer the option to download your bank transaction in "qbo format" so you can manually upload the file to the platform. You may have to search for this feature.
I'll just mention that the thing I don't like about auto bank feeds is that I can't control how often it syncs the data. If you have very few transactions and you have two factor authentification turned on (which you should), I see no need to be syncing the data every day. For small files, I personally would love to just have the feed update when I go in to do the bookkeeping each week (or month) or some other predetermined preset. - Sales app transactions - sync your sales channel data with QuickBooks, for example Square data; it lets you skip the manual entry. A question to ask before you use this feature - Do you need the details of every sales transaction residing in QBO or would entering a sales summary be sufficient? Intuit has introduced usage limits on certain items, so it would be wise to take this into consideration.
More >> eCommerce Accounting Workflow Tips - Receipts - (i) upload from your computer or Google Drive, (ii) use the QBO app on your phone or tablet to upload 'snapped' photos of receipts directly from your mobil device, (iii) setup an email address for email forwarding of receipts (I love this feature!); use this if you are not using a document management software app. This step is a big part of what will make your books audit ready.
Personally, I prefer to use document manager software which will attach a copy of the document when posted to QBO. This gives me my document in two places should anything happen. However, when you are just starting, keeping a copy of anything uploaded on your computer or something like Google Drive, Microsoft OneDrive or DropBox would achieve the same thing. Pick whatever you will be able to stick to. Just make sure to snap a copy of the receipt somehow and upload it. - Reconcile - this is where you reconcile your accounts.
Go to 'Transactions' and then 'Reconcile' if you connected your bank and credit card accounts. Choose the bank or credit card account you wish to reconcile. Input the statement ending balance and date. Match your transactions in QBO to your bank statement; make sure they align. Once all transactions are matched and the difference at the top of the screen = zero, click 'Finish Now'.
Reconciling Tip - match and categorize all the transactions sitting in the bank feed before you reconcile the account.
For accounts that are not connected to the bank feed, go to the 'Gear' icon (⚙️) in the top-right corner, then 'Reconcile' under the Tools column. Then click on 'Get Started' if it's your first time. Another option is to go to 'Chart of Accounts'. Find the account you want to reconcile and click on 'Account History'. You will see the 'Reconcile' icon in the upper right hand corner of the account register. Enter statement details. Manually match your transactions in the account register to your bank statement. Finish reconciling.
More >> Are Account Reconciliations Really Necessary? - Rules - here is where you make rules for your frequently occurring transaction and tell QBO what should happen when certain conditions are met. Using rules saves time. QBO will also make suggestion to you on certain rules.
- Chart of accounts - here is where you manage your chart of accounts, i.e. the various categories for classifying your income and expenses.
More >> Your Chart of Accounts - A Blueprint - Recurring transactions - this is where you setup recurring transactions to run automatically such as monthly invoices, or expensing prepaid, etc. While you can access the feature through the "Settings" menu, my favourite way to setup a recurring transaction is to create the transaction like normal and then click on "Make Recurring" at the bottom middle of the form. Complete the template and save it.
4. Settings Workflow
This module holds all the back office admin stuff that makes QBO work. Some of the tasks available here are also found in the other modules because QBO usually has more than one way to perform a task. It is one of the things I love about Intuit programs.
I won't go into too much detail here because a picture says a thousand words and we have covered some of this in the other workflows. You'll find all tasks related to (i) your company, (ii) lists, (iii) tools, and (iv) your profile.

5. Payroll Workflow
Payroll is an add-on feature in QuickBooks Online. I'll just briefly touch on this module. If you do need to setup payroll, make sure you follow Intuit's detailed procedures ... to the letter.
When you first enter the payroll module, you'll be asked to view payroll plans. There are three plans to choose from: elite, premium, and core. Each plan has different functionalities so only subscribe for what you need.
Payroll tasks follow this flow*:
- Payroll overview - this is a dashboard that tells you (i) how many days to next payday, (ii) setup tasks left to do, (iii) a to do list, (iv) some shortcuts to tasks, (v) the status of auto payroll (love this feature), (vi) a list of setup resources.
- Payroll setup / settings - (i) go to overview and select "get started", (ii) check the box if employees have already been paid in the current year, (iii) select the date you want to start paying your employees in QBO, (iv) complete the fields for your business address, contact information, and payroll history if applicable, (v) add employees, (vi) complete the additional setup tasks if you have already paid your employees this year which includes adding the payroll history, (vii) complete the other setup tasks like entering tax information and connecting your bank account. Note there is an option to pay your employees by direct deposit which I highly recommend.
- Employees - add and manage your employees in this module as well as edit payroll items. You can also filter for active and inactive employees.
- Run payroll - (i) select a pay schedule, (ii) select employees you want to pay, (iii) verify the pay period and pay date are correct, (iv) change the employee's pay method if needed, (v) enter hours worked if not being paid a regular salary, (vi) preview your payroll run and check the right bank account has been selected, (vii) submit payroll run, print paycheques if applicable.
- Payroll tax payments - (i) setup your payroll information which includes providing your CRA payroll number and your T4 transmitter number, (ii) pay your taxes including selecting the payment date and bank account, (iii) print and archive your PD7A report
- Payroll tax filings - (i) review your company information, (ii) review your employee information, (iii) prepare your T4 slips and T4 summary, (iv) send T4 slips to Workforce, (v) submit T4 slips and T4 summary electronically to CRA.
- Compliance - Here is where Intuit provides you with compliance news and information that you may or may not find useful.
*this is just an overview not detailed instructions
Where Do I Find the PD7A Report in QBO?
The PD7A report is a 'Statement of Account for Current Sources Deductions' that payroll remitters must file with CRA on a scheduled basis.
Okay I bet you think what a stupid question. When I first started using QBO, my instinct was to go look under the Reports tab then Payroll. I was expecting to see a report call PD7A. Well if it is there ... it sure doesn't jump out at you.
As with most things created by Intuit, you can get to it in two different ways. On the left hand navigation bar, go to:
- Taxes > Payroll Tax > Payment Resources (at bottom of page) > Remittance forms (monthly) or (quarterly) > PD7A Statement of Account for Current Source Deductions; or
- Payroll > Payroll Tax > Payment Resources (at bottom of page) > Remittance forms (monthly) or (quarterly) > PD7A Statement of Account for Current Source Deductions.
Tip
Once you've viewed the form and submitted it online, don't forget to archive the report because QBO doesn't seem to let you go back and view prior PD7A reports.
6. Transfers and Journal Entries Workflows
Transfers
- Transfers are found under the "+ New" icon at the top left hand corner of the screen under the 'Other' column. It's best to use the transfer feature only to move money between bank accounts. As of February 2024, Intuit will no longer suggest 'record as a transfer' when you are in the bank feed.
- Do not use this feature to make a loan payment for example.
- It's okay to use 'Pay Down Credit Card' or 'Record as a Credit Card Expense' which is a type of transfer between a credit card and a bank account. If you have more than one business credit card, make sure you select the right card to apply the payment to.
- When you are in the bank feed and see "Paired to Another Transaction", this is a type of QBO transfer. QBO artificial intelligence can see the bank transfer and lets you know. QBO will suggest you record this as a transfer. It's okay to click okay for this.
Journal Entries
Journal Entries are a powerful tool for adjusting your books, so they should be used sparingly to ensure they don't mess up the usefulness of your QBO data.
- 'Journal Entry' is found under the "+ New" icon at the top left hand corner of the screen under the 'Other' column.
- Before using a journal entry, you need to see if the adjustment can be made at the transactional level or list level first.
- Journal entries should not be used for accounts receivable (use a credit memo), accounts payable (use a supplier credit or credit card credit), undeposited funds (use bank deposit), inventory if you are using inventory items (use inventory quantity adjustment), QBO payroll (look at payroll preferences - you may need to call tech support), sales tax (in Canada, adjustments are made on the sales tax form under 'Prepare Report').
See the information box below for more about using journal entires in QBO
When To Use Journal Entries in QBO
Here are some key points small business owners should know about using journal entries in QBO.
Purpose of Journal Entries
- Adjustments: Journal Entries are primarily used for making adjustments to accounts that cannot be easily made through standard transactions.
- Corrections: They can correct errors made in the recording of transactions.
- Reclassifying: Can be used to reclassify expense or revenue amounts between different accounts.
- Unlike the way old DOS accounting programs worked, they are NOT for entering day-to-day bookkeeping entries; that is what the modules are for.
Basic Structure of a Journal Entry
- Debits and Credits: Every journal entry must balance, meaning the total debits must equal the total credits. This ensures the accounting equation remains balanced (Assets = Liabilities + Equity). QBO will not let you post a journal entry that is not balanced.
- Accounts Involved: Specify which accounts are affected by the transaction. Each entry typically involves at least one debit to an account and one credit to another.
- Date: Ensure the date of the journal entry matches the period you want to adjust.
- Memo/Description: Always include a memo or description to explain the reason for the entry. This will help if you need to reference it later, especially during year-end or during an audit. Trust me, in 6 months or 3 years later, it won't be self-evident and you won't remember if you haven't entered a memo description.
More >> The Bookkeeper's Cheat Sheet
Common Uses of Journal Entries
- Accruals: Record expenses incurred or revenues earned that have not yet been entered via traditional expense or sales forms.
- Prepaid Expenses: Adjusting for prepaid expenses over the usage period.
- Unearned revenue: Adjusting revenue for customer prepayments.
- Depreciation: Record depreciation of fixed assets.
- Loan Payments: To allocate principal and interest portions if not done automatically through a connected loan setup.
More >> About Adjusting Entries
When to Avoid Using Journal Entries
- Customer Invoices and Payments: Use the built-in invoicing features instead of journal entries to keep customer records and aging reports accurate and track sales tax reporting correctly.
- Supplier Bills and Payments: Utilize expense, cheque (check), or bill payment features to correctly track supplier transactions and sales tax.
- Payroll: Generally, it is better to use a QBO payroll subscription or other third party payroll services for accurate employee and tax records rather than manually created journal entries. If you have (i) a small payroll, (ii) have a thorough understanding of the entries required to book payroll by journal entry, and (iii) willing to keep up-to-date on payroll rates and changes, then go for it. Personally, I find it exhausting to keep up-to-date with payroll updates.
More >> Basic Manual Payroll Entries
Best Practices for Using Journal Entries
- Double-Check Entry: Double-check your debits and credits before saving an entry.
- Monthly Reconciliation: Regularly reconcile accounts to ensure your journal entries and other transactions align with your bank statements.
- Consistent Review: Periodically review all journal entries for unusual or incorrect entries, especially at month-end or year-end closures.
- Professional Guidance: Consult with an accountant or a certified QuickBooks Pro Advisor if you are uncertain about creating a journal entry.
- Small Business Owners: Most small business owners will never need to do a journal entry. Your bookkeeper or accountant will use this feature to create adjusting entries in accordance with GAAP (ASPE).
Security & Permissions
- User Roles: Limit who can create and approve journal entries by setting appropriate user roles and permissions within QBO to prevent unauthorized changes. Normally journal entries are prepared by your accountant.
Audit Trail
- Tracking Changes: QBO maintains an audit log that tracks changes, including journal entries. This helps in maintaining transparency and accountability.
Practical Example of a Journal Entry
Let's say you purchased a premium insurance policy for $1,200 on January 1st for the whole year, but want to expense it monthly:
- Initial Entry:
--- Debit: Prepaid Insurance (a current asset account on your balance sheet) $1,200
----- Credit: Bank Account (a current asset account on your balance sheet) $1,200
Memo: To setup prepaid insurance - Monthly Adjustment (for January):
--- Debit: Insurance Expense (an expense account on your income statement) $100
----- Credit: Prepaid Insurance (a current asset account on your balance sheet) $100
Memo: To expense prepaid insurance monthly
By carefully using journal entries in QBO, small business owners can ensure their financial statements accurately reflect their business activities. However, due to the complexity, it’s frequently best to ask your certified professional bookkeeper or accountant when handling more complicated adjustments.
7. Workflow Tips Integrated into QBO
As with any new procedures or system changes, learning how to use QuickBooks Online comes with a learning curve that will initially slow you down. Time is a scare resource when you are a small business owner. Keep your goal at the forefront of your mind which is to make your financial management both efficient and effective. Optimize both data entry and your overall workflow within QuickBooks Online by taking advantage of these workflow integration tips once you've got the basics down:
- Recurring Transactions: Set them up to automate repetitive tasks like monthly bills or fixed pricing client invoices, which saves time and reduces manual errors.
- Cash Flow Planner: Utilize this tool to predict your cash flow, allowing you to make more informed financial decisions and avoid potential cash flow issues.
- QBO Desktop App: The QBO Desktop App can improve your workflow by providing a faster, more stable experience without the need to deal with browser issues and helps with multiple windows management. Some people like it, some people don't. Try it to see which side you are on.
If you use 'Desktop View' in the desktop app, you will get the nice flowchart you find when working in the QBD. The QBO App also has the 'split screen' feature or the ability to use multiple company files at the same time.
If you are coming to the QBD environment, the QBO Desktop App will help you feel a bit more comfortable while learning how to use QuickBooks Online. - Keeping Track of the Apps Dashboard: Regularly check the Apps Dashboard for any syncing issues to ensure all integrated apps work correctly, preventing data discrepancies.
- Mobile App: While not always needed, it can be useful for scanning receipts and managing finances on the go, increasing flexibility.
- Using Undeposited Funds: Use this to manage multiple payments before making combined deposits to match your bank statement, simplifying your bank reconciliation.
- Install Browser Extensions: Play with the use of browser extensions to improve your QBO workflow.
- Spreadsheet Sync: Sync spreadsheets if you need complex data manipulation or prefer analyzing data outside QBO. Tools like Google Sheets add-ons can automate this sync.
- Invoice Reminders: Set up automated invoice reminders to ensure timely payments without needing third-party apps, aiding in better cash flow management.
- Tags: Use tags cautiously to add another layer of categorization for transactions. Tags can enhance reporting but avoid overcomplicating your bookkeeping system.
1. Generating Reports To Gain Insights
WHAT'S COVERED
- Running Standard Reports
- Customizing and Saving Reports
- Using the Dashboard for Business Insights
- Classic vs Modern Reports
When learning how to use QuickBooks Online, make sure you take time to explore all the standards reports that comes with QBO and learn how to customize reports tailored to your informational needs.
Running Standard Reports:
- Navigate to 'Reports' on the left-hand navigation bar. It will open to the 'Standard Reports' tab.
- Choose a report. QBO offers various reports like Profit and Loss, Balance Sheet, Cash Flow Statements, Accounts Receivable, and Accounts Payable.
Customizing and Saving Reports:
- Customize the report by date range or other filters, and then click 'Run Report'.
- If you are going to use these filters on a regular basis, 'Save' the customization. You will now find these reports under the 'Custom reports' tab.
- As you work with standard reports, you will find you have certain reports you use a lot. For those, click on the 'Favourite' (⭐). The star icon is used to mark reports or other items as favourites for quick access later. You will generally find it next to report names or other items that you can mark as favourites for easy retrieval. 'Favourites' move to the top of the 'Stand Reports' page.
- Some ideas on what to mark as favourites are Sales by Customer, Open Invoices, Unpaid Bills, Expenses by Supplier, GST/HST Summary.
- The Report module has a 'Search' (🔍) feature that is useful. For example, key in 'Supplier' and all the reports with supplier in the title will be listed.
- Under the 'Management Report' tab, I suggest you take the time to create your month-end reporting package. To start, I suggest it contain Profit and Loss, Balance Sheet, Cash Flow Statements, Aged Accounts Receivable Summary, and Aged Accounts Payable Summary.
Using the Dashboard for Business Insights:
- Don't forget the dashboard gives you instant insights into your income, expenses, and profitability. This is gold when trying to run a profitable and growing business! To use this feature, you need to have up-to-date bookkeeping.
QuickBooks Online News
QuickBooks Online Classic Reports End Date 2024
Intuit has announced that they will be removing the Classic View of QuickBooks Online reports by the end of November 2024. They will be replaced with Modern View reporting. No classic view reports will be removed until a modern view report is available. The least used reports will be removed first gradually moving to the most commonly used ones.
Intuit is making the switch due to a new reporting platform that will provide "a user-friendly interface, improved functionality, better load times, and faster development of new reports".
More >> QuickBooks Online Migration to Modern View Reports
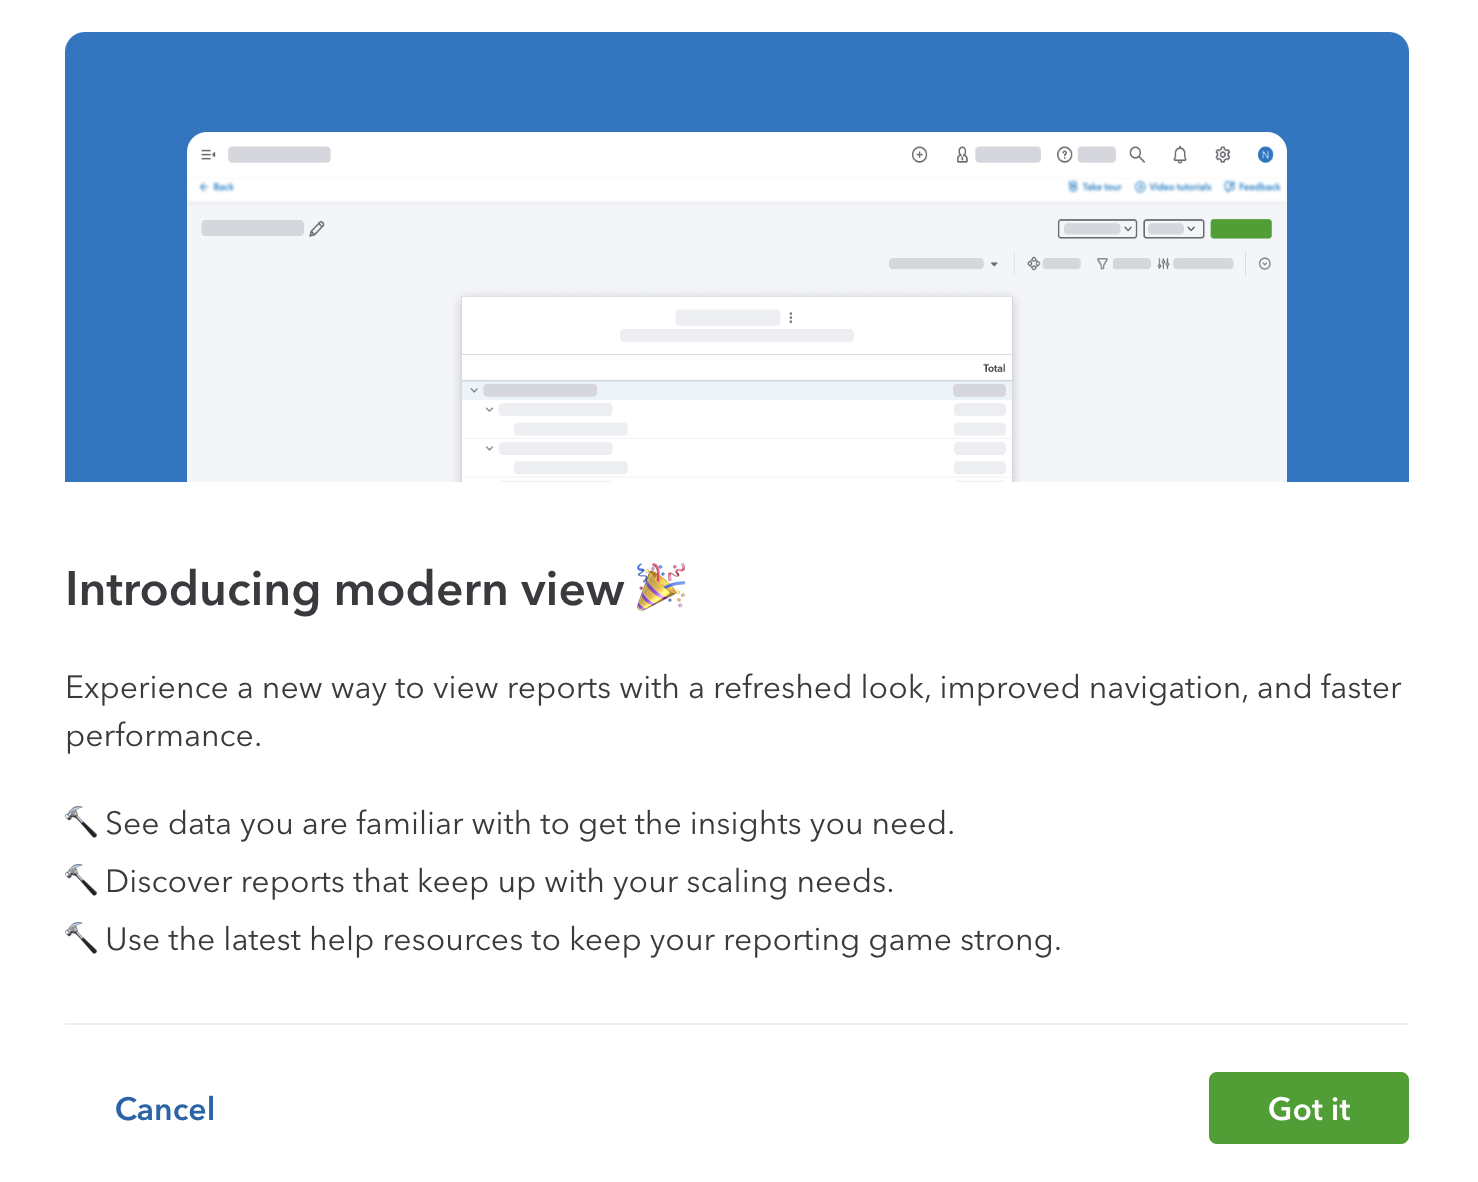 Popup message when a report opens in modern view the first time.
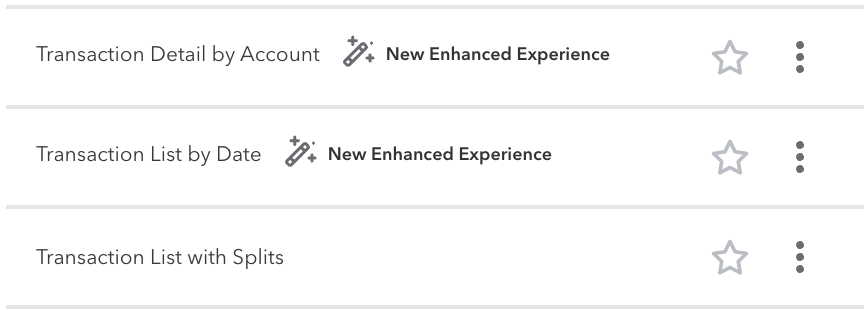 "New Enhanced Experience" means the report will be presented in Modern View.
What you need to do now:
- Begin using the Modern View so you are familiar with it. Don't wait until the Classic View is gone.
- If you have any custom reports, revamp and save them in the Modern View so you don't lose access to them and have to recreate them from scratch. I run quarterly reports. My custom quarterly reports worked for the second quarter of 2024 but are gone for the third quarter of 2024. All that is left is a placeholder so I know what reports I had (which I'm very thankful for!). There is no data in any of my customer reports so I will be spending time this quarter recreating my custom reports. Not a huge deal as many of my custom reports are presentation preferences I make to the standard reports.
- Keep in mind when using QuickBooks Online, that it is always changing, unlike the old days. Sometimes it's tough to keep up with the changes especially when if feels like it is cosmetic and all they are doing is moving stuff around ... sort of like how frustrating it can be in a grocery store when they keep moving things around.
2. Taxes and Compliance
WHAT'S COVERED
- Setting Up Sales Tax
- Setting Up Default Sales Tax Codes
- Filing and Paying Taxes
- Tracking Tax Liabilities
When learning how to use QuickBook Online, don't rush setting up your sales tax as some things during setup cannot be undone.
Setting Up Sales Tax:
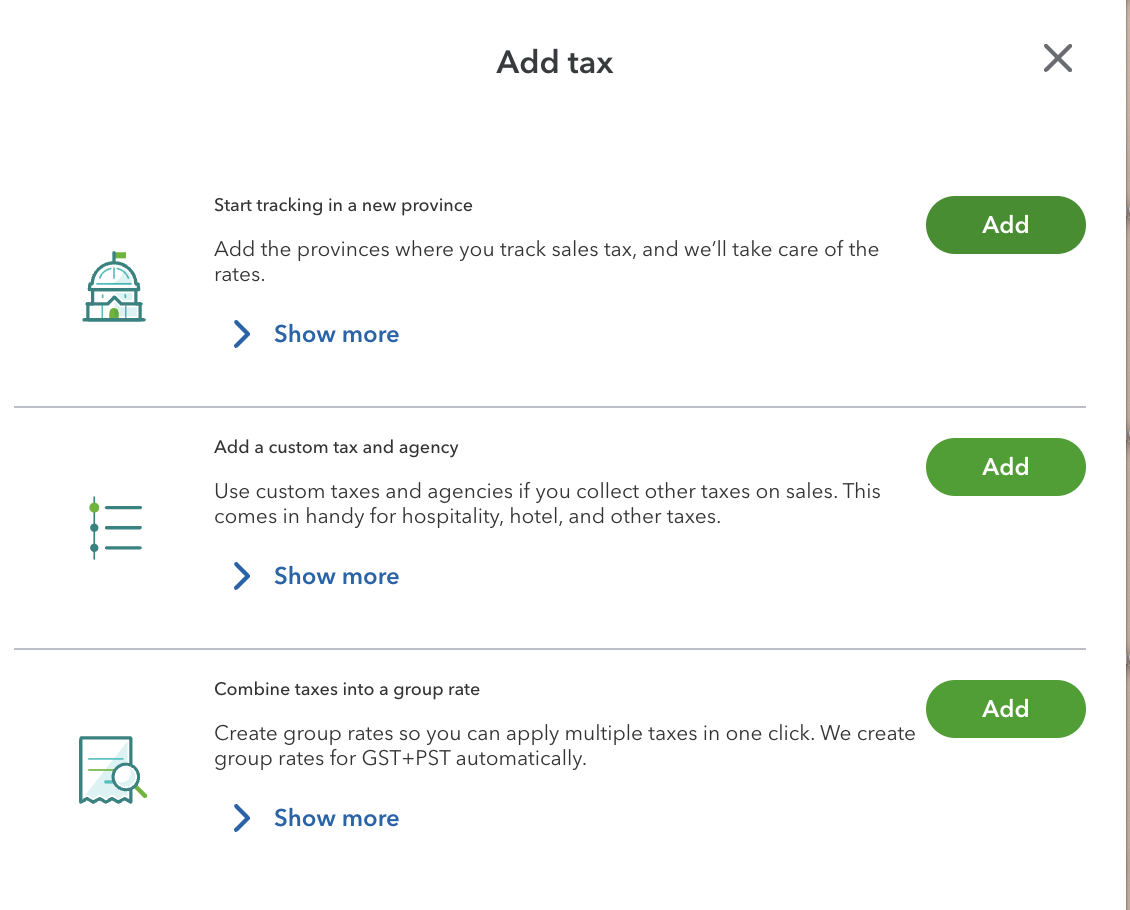
- Go to the 'Taxes' tab, select 'Sales Tax', then click on 'Manage Sales Tax' button.
- Click on the 'Add Tax' button.
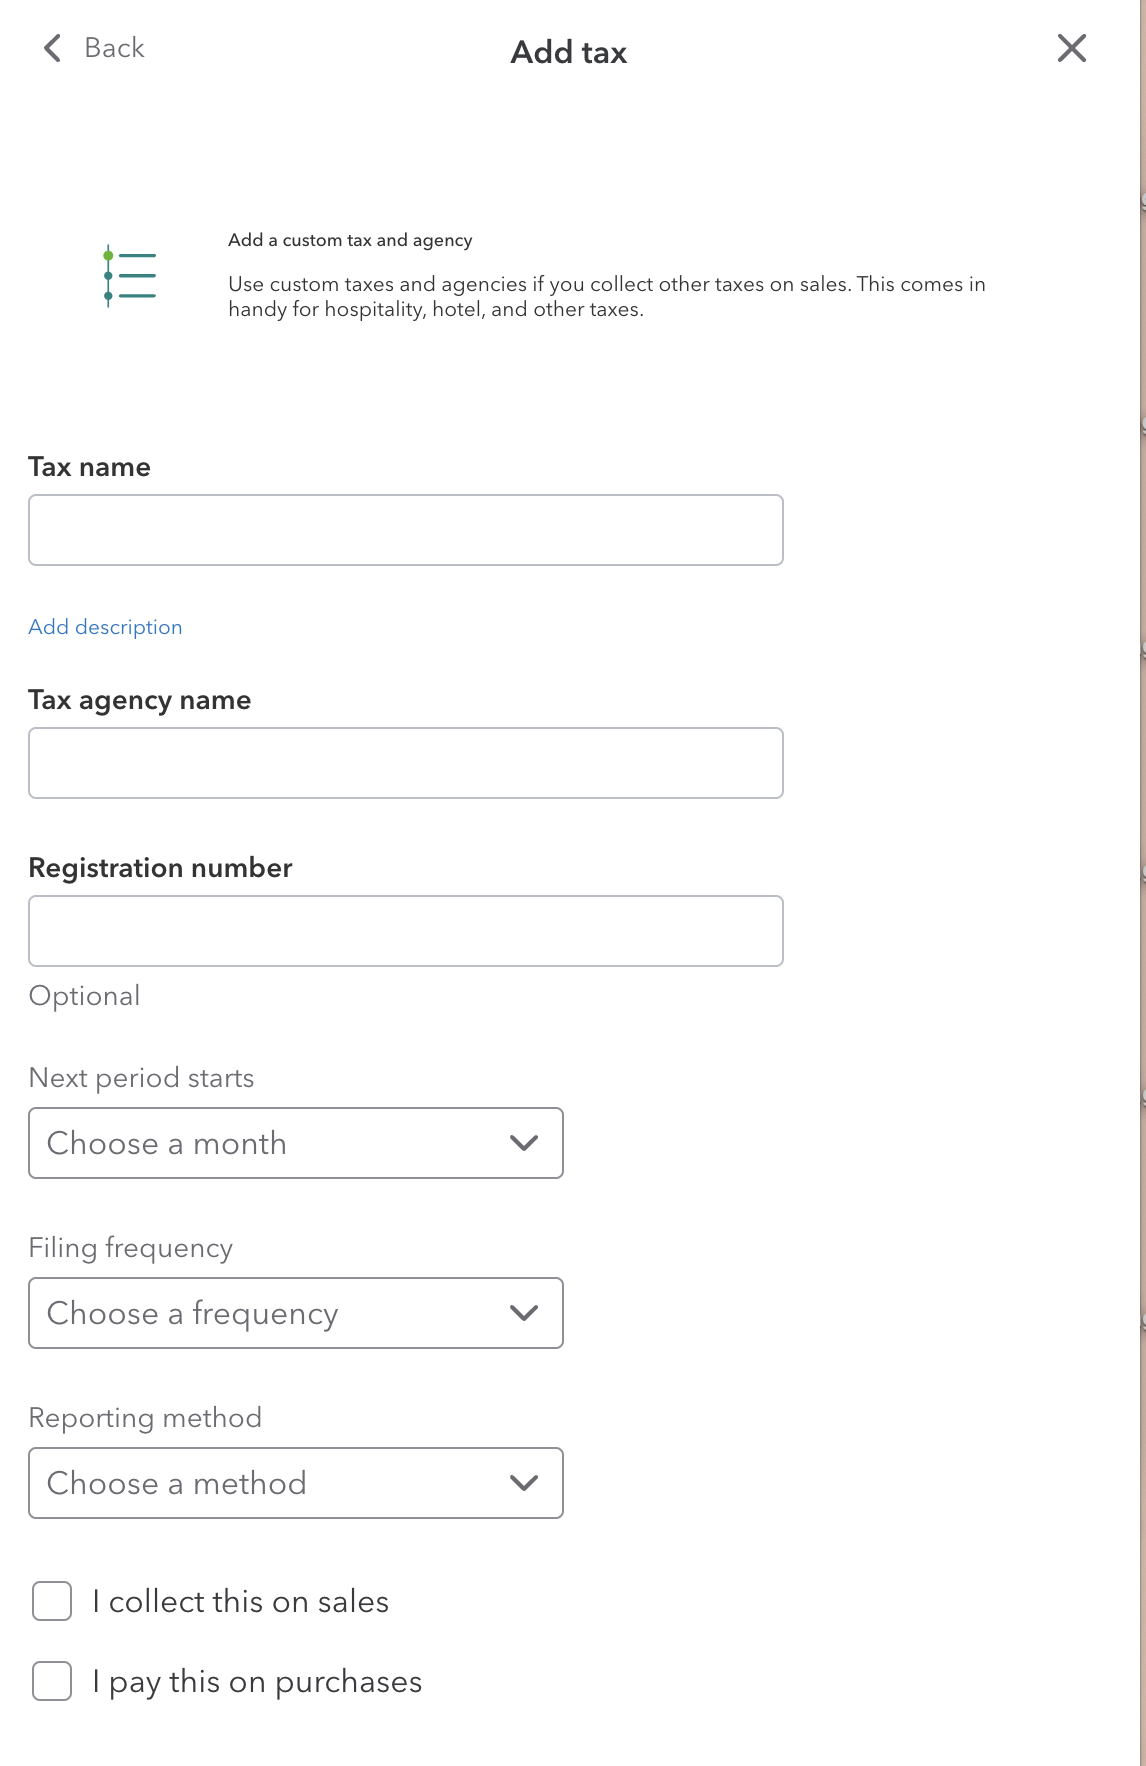
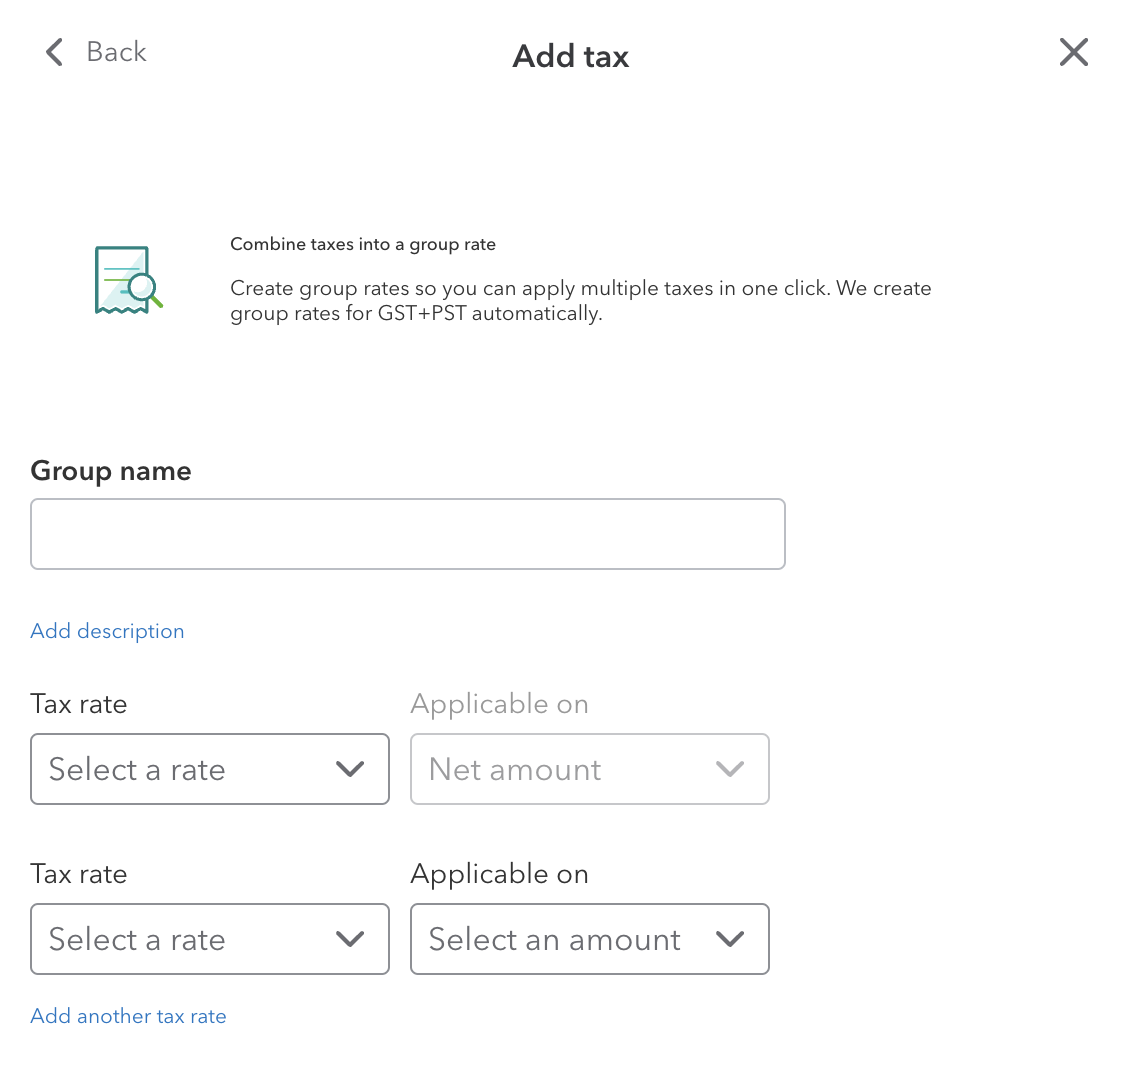
- Select what you want to do: (i) Start tracking in a new province - you literally only need to select the province and it's done. (ii) Add a new custom tax and agency - requires choosing starting period, a filing frequency, and reporting method. (iii) Combine taxes into a group rate - for example if you want to setup a 'Meals and Entertainment' tax group.
Here are some screenshots of what you'll find under 'Manage Sales Tax'.
Setting Up Default Sales Tax Codes:
When learning how to use QuickBooks Online (QBO), setting up default sales tax codes is crucial for ensuring that taxes are handled correctly in various transactions. When I first transitioned to QBO from QBD in 2013, I really missed being able to set default customer sales tax codes and default supplier sales tax codes. What's great is Intuit, the company behind QuickBooks, frequently updates its software with new features and improvements, including enhancements to tax handling making the product more robust as each year passes.
By carefully using QBO's different default sales tax settings, you can manage sales tax across various aspects of your business transactions effectively. Always take the time to ensure that these settings are correctly configured because we all know garbage in - garbage out!
When creating invoices or bills, you can manually select or change the sales tax code applicable to each line item based on the products or services being sold or purchased. But it's a pain. It's better to setup some global sales tax default codes for more consistent and accurate books.
In Canada QBO, you can set up default sales tax codes in several places within the platform. Here's how you can do it:
1. Chart of Accounts:
- Go to the ‘Transactions’ menu on the left-hand side and click on ‘Chart of Accounts’.
- Select which accounts you want by clicking on the boxes on the left hand side.
- Under 'Batch Actions', select 'Set default Tax Code'.
- A window pops up for you to enter the default sales tax code. Enter it and click 'Apply'.
TIP
You can also setup a default sales tax code at the time you initially setup an account. An example would be setting the bank charges account or insurance expense to default to 'exempt' status. Doing this will help reduce sales tax coding errors so it's worth your time. You can also 'edit' any individual account but I find the batch feature quicker.
More >> Understanding Taxable, Zero-Rated, Exempt and Out-of-Scope Supplies
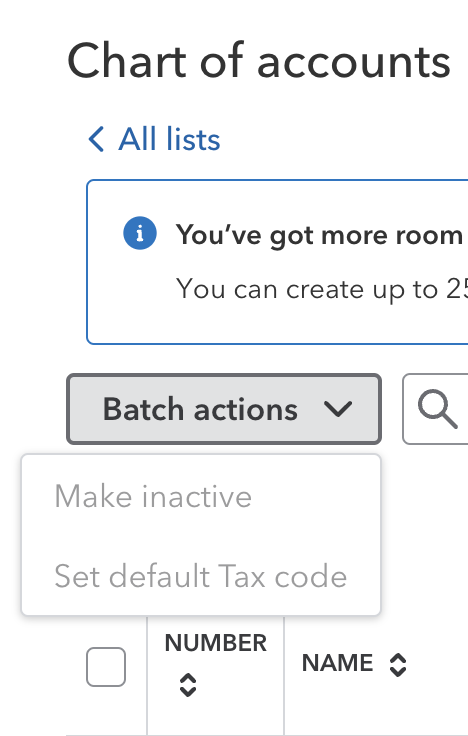 Where you find global setup of default sales tax codes in Canada
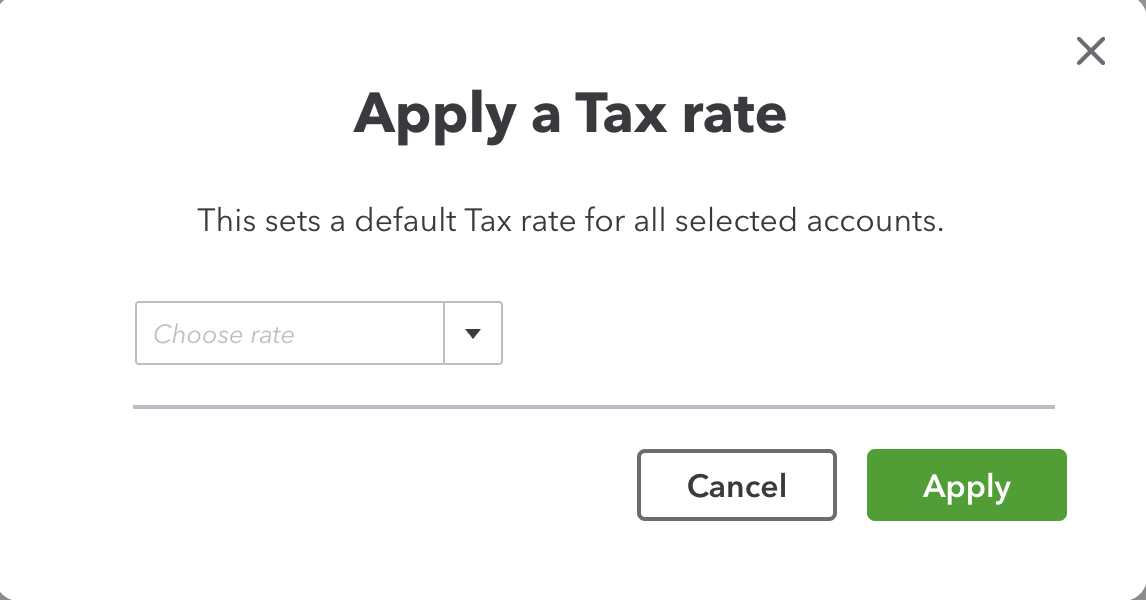 Apply the default sales tax code to selected accounts.
2. Products and Services:
- Navigate to the ‘Sales’ menu on the left sidebar and select ‘Products and Services’.
- Find the product or service you want to edit and click ‘Edit’ under the ‘Action’ column on the right hand side.
- In the product/service information, go to the sales tax section near the bottom and select a default tax rate for that product or service. If you also purchase this item, you can select a default sales code for the purchase.
TIP
This feature is great if a product is always shipped to another province. In the example below, the business purchases the product in Alberta with a GST default sales tax code but sells it customers in British Columbia that has GST and PST sales tax.
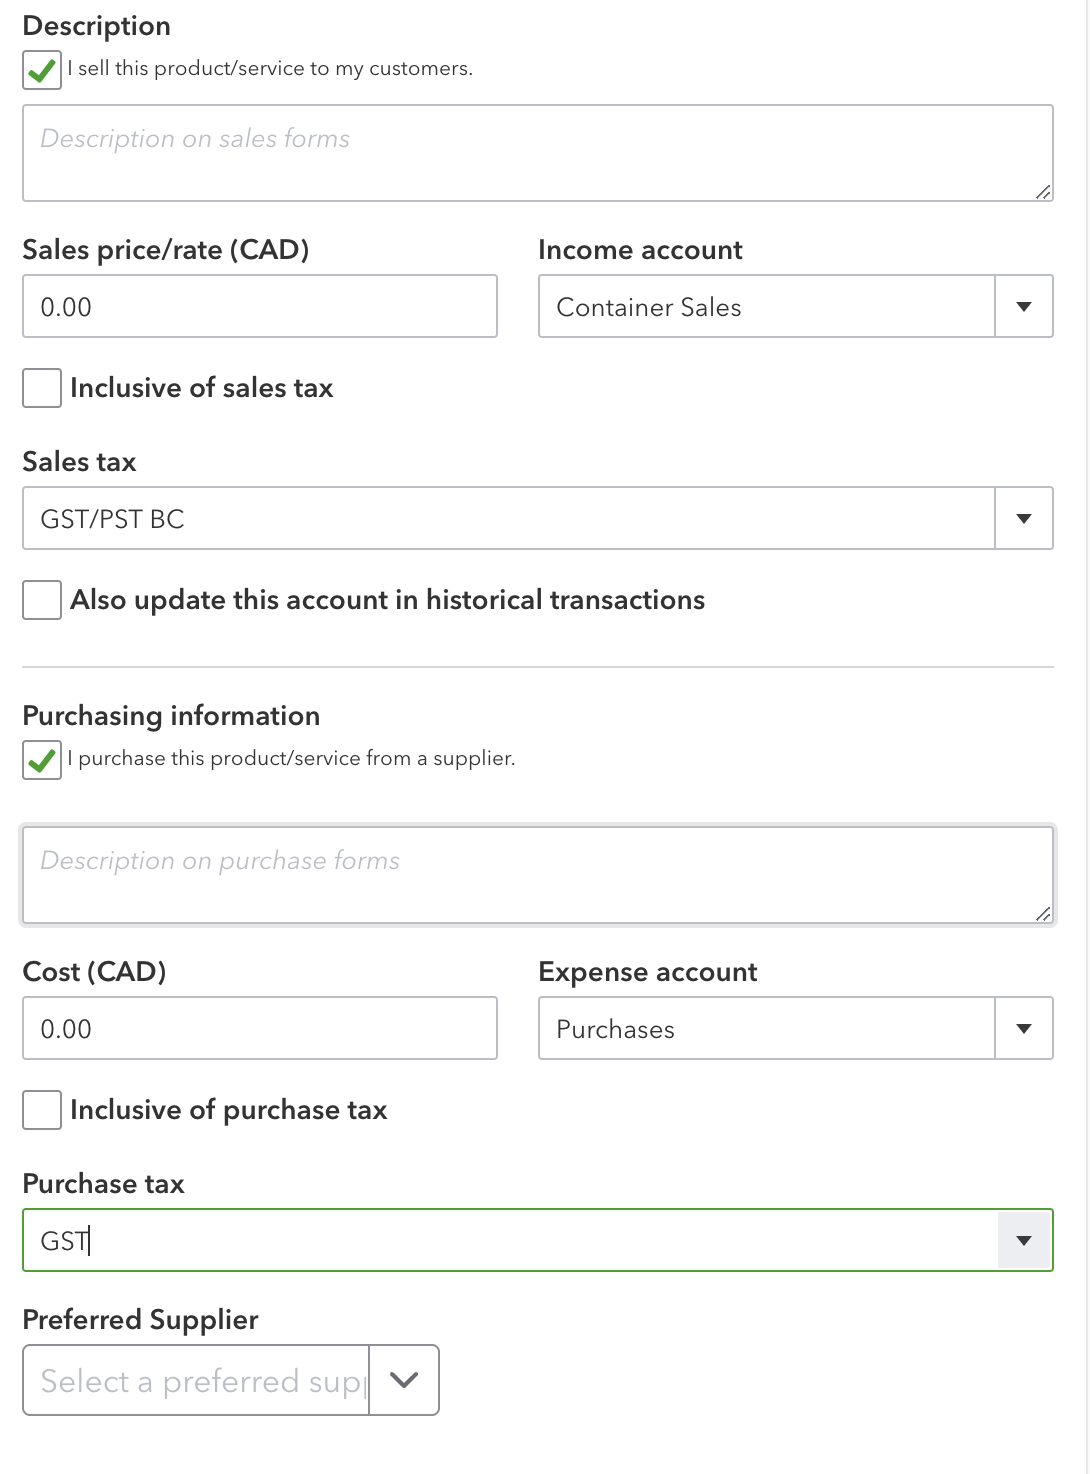 Apply default sales tax codes when you initially setup a product or service to reduce coding errors.
3. Customers:
- Go to the ‘Sales’ menu, then select ‘Customers’.
- Choose the customer you want to assign a default sales tax code to and click ‘Edit’ in the ‘Action’ column.
- In the customer details window, find the ‘Tax Info’ section and select the appropriate default tax rate.
- Once you've set this rate, it will override the sales tax rate setup in your Chart of Accounts or Product and Services.
TIP
This feature is great when you sell to out-of-province customers. Place of supply rules dictate you charge the tax rate based on where the goods are delivered not the location of your business.
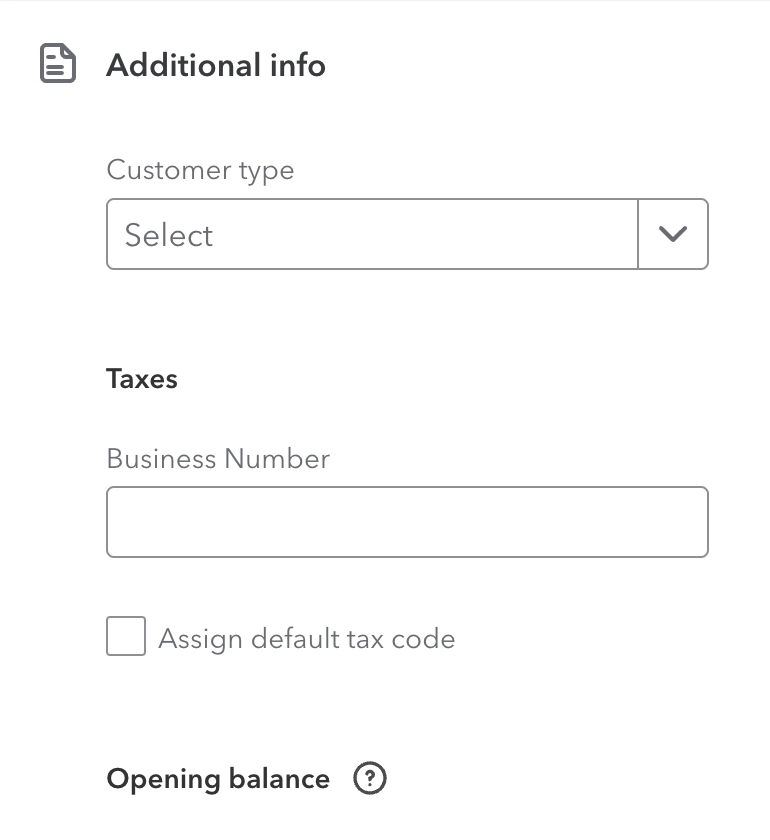 Find the 'Assign sales tax code' feature under 'Additional Information'.
4. Suppliers:
- Click on the ‘Expenses’ menu and choose ‘Suppliers’.
- Select the supplier you wish to edit and click on ‘Edit’.
- In the supplier's details, you can't specify any necessary default tax information but you can set a 'default expense category'. Just scroll down to the 'Accounting' section. Setting up this default is a huge timesaver if you want audit ready books that are accurate and consistent.
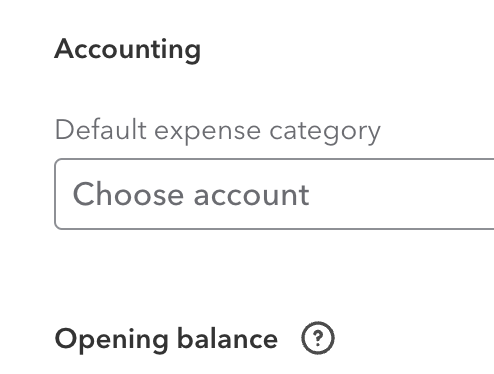 Setup a default expense category for suppliers for audit ready books.
Key Takeway - Default Sales Tax Code Setup
Taking the time up front to setup your default sales tax code assists in reduce coding errors. It will help you have smooth sales tax audits in the future as well as increasing your efficiency and productivity.
Filing and Paying Taxes:
- Use the 'Taxes' tab to file and pay your sales and payroll tax liabilities directly from QuickBooks.
Tracking Tax Liabilities:
- Monitor your sales tax liabilities from the 'Taxes' tab. You can also view various sales tax reports in the 'Report' module.
- I would like it if Intuit added a GST/HST widget to the dashboard to help small businesses monitor their GST/HST owing. It might deter the owners dipping into the cash drawer and spending money that should be set aside to pay their GST/HST owing.
More >> Payroll taxes was discussed earlier in Payroll Workflow
3. Best Practices
WHAT'S COVERED
- Establish Regular Bookkeeping Habits
- Data Backup and Security Protocols
- QuickBooks Support Resources
Here are some best practices when learning how to use QuickBook Online:
- Establish Regular Bookkeeping Habits: Reconcile your accounts regularly. Review your financial reports as well as your custom internal management analytical reports to keep track of your business health.
As bookkeeping works on daily, weekly, and monthly cycles, you need to create a schedule. A schedule will help you establish a workflow so you have a predicable method of working on your books every day, every week, every month. Establishing the workflow will help you get and stay organized eventually settling into a familiar routine. - Data Backup and Security Protocols: QuickBooks automatically and constantly backs up your data on a secure server, but implement additional security measures such as two-factor authentication and user permissions if you aren't the only one using the system.
QBO auto backup is different than backing up in QBD. It is a global system backup that recover your data if Intuit's system or servers fail. You cannot call up Intuit and request to download or restore a selective data backup copy. In addition, Intuit's Terms of Service states "Intuit is not responsible for any of your Content that you submit through the Services." It is up to you to archive your data frequently.
The QBO auto backup is not available for recall on an individual company basis. Some backup options are to:
(i) Subscribe to a third party app like Rewind Backups For QuickBooks Online.
(ii) Manually export company data to Excel (or PDF) to create a local backup - this would not be a complete backup. You can implement and integrate this option by downloading your month-end reporting package in PDF (or Excel) format. You should include your General Ledger and Journal Entries in this package.
(iii) Consider an QBO Advanced subscription that has a 'Back Up Company' tool. I think it's unfortunate this feature is not available to all QBO users regardless of subscription level in this day and age of online cybersecurity issues. I'm hoping Intuit will introduce this feature to other subscription levels in the future.
More >> Research the 3-2-3 backup rule on your own. The backup rule to enable disaster recovery in two different ways (offline and online) is:
(i) to keep at least three (3) copies of your data
(ii) store your information on two (2) different storage media
(iii) with at least one (1) of them located physically offsite plus (2) stored in the cloud in different geographical areas. - QuickBooks Support Resources: Utilize QuickBooks tutorials, webinars, and the help centre for continuous learning.
4. Productivity Tips
WHAT'S COVERED
- Best Browser for QBO
- QBO Mobile App
- Useful Keyboard Shortcuts
- Attaching Source Documents
- Recurring Transactions
- Custom Fields in Sales Invoices
- Invoice Reminders
- Undeposited Funds
- Favourite Reports
- Class & Location Tracking
Bookkeeping isn't most small business owners favourite task. I am assuming that one of the reasons you are learning how to use QuickBooks Online is for some productivity gains. Here are some productivity tips on doing your bookkeeping work efficiently:
- Best Browser for QBO:
QuickBooks Online was designed to work best with Google Chrome because of its speed, compatibility, and ability to handle multiple tabs efficiently. It also supports extensions that can enhance productivity. In addition, Firefox and Safari now also play nicely with QuickBooks Online. Other browsers work but your experience may not be as efficient.
More >> Setting Up Chrome for QBO - Install the QBO Mobile App For Out of the Office Convenience:
The mobile app lets you manage your finances, send invoices, and capture expenses on the go, which is great for busy freelancers and business owners. Chrome and Safari browsers work best here. - Learn These Useful Keyboard Shortcuts:
(i) Shortcut to Creating Transactions - Use `Ctrl + Alt + I` to open the invoice transaction window or `Ctrl + Alt + X` to quickly create new expense transactions. Shortcut keys save time navigating through menus.
(ii) Search Bar - `Alt + /` brings up the search bar instantly to quickly find transactions or information.
(iii) Take the time to learn the keyboard shortcuts for entering dates. HUGE timesaver!
More >> QuickBooks KeyBoard Shortcuts For Entering Dates - Attaching Source Documents for Audit Ready Books:
Attach receipts, invoices, and other documents directly to transactions for easy reference and stronger audit trails. Just remember the 3-2-3 backup rule for your supporting documents. QBO should not be the sole place you store your support documents.
If you want to locate your attachments at a later date there are two ways:
(i) Go to the 'Gear' (⚙️) icon and navigate to Lists > Attachments. Here you will find a list of all the attachments uploaded. You can add, edit, download, or export you attachments as well as see the transactions linked to a particular document.
(ii) Go to the 'Expenses' tab and click on the 'Filter Gear' (⚙️) icon. Under 'Columns', click the 'Attachments' checkbox. You'll now be able to see which transactions have a document attached. Use this feature to help determine how audit ready your books are. - Recurring Transactions Efficiency:
Setting up recurring transactions for regular monthly expenses (like rent or subscription fees) automates repetitive tasks. It's also great for invoicing subscription or contract based revenue billing.
However, always review these transactions to avoid errors if there are unexpected changes. This means be selective on which transactions post automatically (i.e. without review before posting). I like to set reminders to go in about a week before the recurring item is due to post and check to make sure all the data is still correct. - Custom Fields in Sales Invoices:
Adding custom fields to your sales invoices and receipts helps track additional information relevant to your business, which can help in better reporting and customer communication. For example you could include information about your sales rep, customer type, supplier IDs, PO numbers, Project Managers, or customer's reference number. - Improve Cash Flow with Invoice Reminders:
Automating invoice reminders helps ensure clients pay on time, improving your cash flow without using hands on follow-up collections procedures. You can schedule these reminders up to 90 days before or after the invoice due date. - Make Bank Reconciliations Easier Using Undeposited Funds:
Posting received payments to Undeposited Funds before making a bank deposit entry that includes multiple customer payments ensures you match your bank deposits exactly to the bank statement amount, reducing reconciliation errors. - Save Your Favourite Reports for Quick Access:
Save frequently used reports to have quick and easy access to critical business data, improving decision-making speed. - Class & Location Tracking To Segment Income and Expenses:
Use class and location tracking to segment income and expenses by store, department, or geographic location. This feature provides detailed insights into different parts of your business and is only available in QuickBooks Online Plus and QuickBooks Online Advanced.
4. Troubleshooting and Support
When learning how to use QuickBooks Online, take advantage of the resources Intuit offers.
- Common Issues and Solutions: Use the QuickBooks Community Forum to find solutions to common problems.
- Accessing QuickBooks Support: Contact QuickBooks support through phone, chat, or online resources.
- Community Forums and Additional Resources: Engage with other users in community forums and leverage instructional content available online.
1. Payroll and Employees
The payroll module requires an add-on subscription in QBO. The following payroll areas were covered under the Payroll Workflow discussion:
- Setting Up Payroll: Navigate to Payroll > Employees and follow the prompts to set up payroll services.
- Processing Payroll: Run payroll regularly and ensure all employee information is up-to-date.
- Payroll Tax Compliance: Go to Payroll > Payroll tax to record payroll tax payments and payroll tax filings.
- Tracking Employee Time and Expenses: Use the 'Time' feature to track hours worked and expenses incurred by employees. This feature is only available to QuickBooks Online Essentials, Plus, Advanced, Accountant subscribers or QuickBooks Online Payroll Premium or Elite subscribers.
Intuit has recently revamped their payroll module. Personally, if your payroll are needs are very simple, I would subscribe to the Payroll Core tier as well as take advantage of the direct deposit option offered. When learning how to use QuickBooks Online, taking the burden of manually calculating payroll is a benefit and timesaver.
2. Inventory Management
Inventory features are available for QuickBooks Online Plus and Advanced. Inventory in QBO uses FIFO (first in-first out) to calculate your inventory costs. QBD (QuickBooks Desktop) used average cost. QuickBooks Enterprise (available on as a QBD option) can use either method. ASPE permits the use of either method.
More >> Inventory Costing Approaches: FIFO and Weighted Average
More >> Common Challenges with QuickBooks Inventory Management
Here are some QBO Inventory features that are great if you have very simple real time inventory tracking needs:
- Setting Up Products and Services: Go to the 'Sales' tab and select 'Products and Services' to add items with their details.
- Tracking Inventory Levels: Monitor inventory levels and receive notifications when stock runs low.
- Managing Suppliers: Use the 'Expenses' tab to manage supplier details and transactions.
Tip
If you have very simple inventory needs and don't required real time tracking, using periodic inventory reporting may be sufficient for your needs rather than QBO's perpetual inventory system. Keep in mind when learning how to use QuickBooks Online, there may be a way to enter the inventory transactions you require to meet ASPE manually.
More >> How Periodic Inventory is Recorded
3. Advanced Features
Just so you know what's available, here are just a few advanced features and integrations available in QBO. These features are not available at all subscription levels. Keep in mind, when you first start learning how to use QuickBooks Online, you may not need them at all.
- Projects and Job Costing: Track project expenses and profitability under the 'Projects' tab. This feature is available in QBO Plus and Advanced plans.
- Multi-Currency Transactions: Enable multi-currency in 'Account and Settings' to handle transactions in various currencies. It's important to note that once you turn it on, you cannot turn this feature off or change your home currency. You also will not be able to downgrade to plans that do not use this feature once you have turned it on. This feature is available in QBO Essentials, Plus and Advanced plans.
More >> How to Record Foreign Deposits
Tip
If you only need to record occasional multi-currency entries, you can do so manually which means you may not need the full-blown multi-currency module available in QBO.
More >> How to Record Occasional Foreign Exchange Transactions
4. Integrating Third-Party Apps
This guide has been all about how to use QuickBooks Online. Once you are up and running, and comfortable with the basic accounting program, explore the App Center to find and integrate third-party applications that enhance QuickBooks functionality. When first starting out using QBO, strive for simplicity and existing QBO features before reaching out for all the bells and whistles included in third party apps.
- QuickBooks Online offers an extensive range of features tailored for small to medium-sized businesses, making financial management easier and more efficient.
- As you grow more comfortable with the basics, explore advanced features and consider certifications to deepen your knowledge.
- Make use of Intuit's extensive training materials included with your subscription. They include QuickBooks Online webinars and in-depth tutorials, QuickBooks Community forum and help centre.
This beginner's guide to learning QuickBooks Online aims to set the foundation for mastering this robust accounting software. As you become more proficient, don't hesitate to delve into the advanced features to fully leverage all that QuickBooks Online has to offer. Happy bookkeeping!
QuickBooks® is a registered trademark of Intuit Inc. Screen shots © Intuit Inc. All rights reserved.
Click here to subscribe to QuickBooks Online Canada. I do not receive any commissions for this referral.

