- Home
- Accounting System Setup
- Learning How To Use QuickBooks Online

Learning How To Use QuickBooks® Online

by L. Kenway BComm CPB Retired
Published October 14, 2024 | Updated October 31, 2024
WHAT'S IN THIS ARTICLE
Creating Custom Internal Control Reports | Performing Period End Closing Entries | Tracking GST/HST as a Registrant | Tracking GST/HST as a Non-Registrant
NEXT IN SERIES >> More QBO Tips About Learning How To Use QuickBooks Online
Highlights of This Post
Today I'll also chat about learning how to use QuickBooks Online to create three very handy and useful custom internal control reports. These reports will harvest data you've been entering to help run your business efficiently. I'll look at how to track:
- top customers - purpose: monitoring concentrated credit risk
- customer deposits / customer prepayments - purpose: monitoring special transactions that affect your cash flow
- construction holdbacks - purpose: monitoring special transactions that affect your cash flow
- track cheques issued (or invoices issued) by number - purpose: internal control
I'll also be touching upon:
- how to close an accounting period in QBO - purpose: to prevent changes to a closed period
- tracking GST/HST for registrants
- tracking GST/HST for non-registrants
You can find information in the QBO Beginner's Guide about:
- the difference between QBO and QBD
- classic view reporting vs. modern view reporting in QBO - what's changing in 2024 and why
Introduction
We'll begin by taking a look at how to customize reports in QuickBooks Online to meet your managerial information needs for special types of transactions. We'll end the chat with QBO closing procedures and how GST/HST is handled for registrants and non-registrants.
While you don't have to have formal bookkeeping training to use QuickBooks Online, you do need to have a basic understanding of accounting principles to ensure you have accurate data ... and there are certain procedures you must follow to ensure you have captured all your data properly. If you don't follow the procedures, you could end up double counting revenue or expenses.
I have found over the years that the more input accountants have had in this product, the less user friendly it has become ... but for good reason. So like you, I can get frustrated learning how to use QuickBooks Online each time a new version comes out. As with most things, the frustration goes away as I climb up the learning curve.
Learning how to use QuickBooks Online requires patience especially if you have been using QuickBooks Desktop for years and are extremely proficient in it.
JUMP TO >> Create Custom Internal Control Reports
“QuickBooks is easy? I agree! So is a pencil. But if I sit you down at a drafting table does it make you an architect?”
Sara Laidlaw Woodruff
Advertisement
12 Part QuickBooks® Primer
QuickBooks® is a registered trademark of Intuit Inc. Screen shots © Intuit Inc. All rights reserved.
Click here to subscribe to QuickBooks Online Canada. I do not receive any commissions for this referral.
When learning how to use QuickBooks Online, make sure you take time to learn how to customize reports tailored to your informational needs. Here are four that might come in handy.
- Top Customers
- Customer Deposits or Customer Prepayments
- Construction Holdbacks
- Track Cheques Issued (or Invoices Issued) by Number
More >> Do Your Current Reports Meet Your Needs? 4 Secrets
Customizing Bookkeeping Reports
1. How to Use QuickBooks Online To Track Your Top Customers
Purpose: Monitoring Concentrated Credit Risk
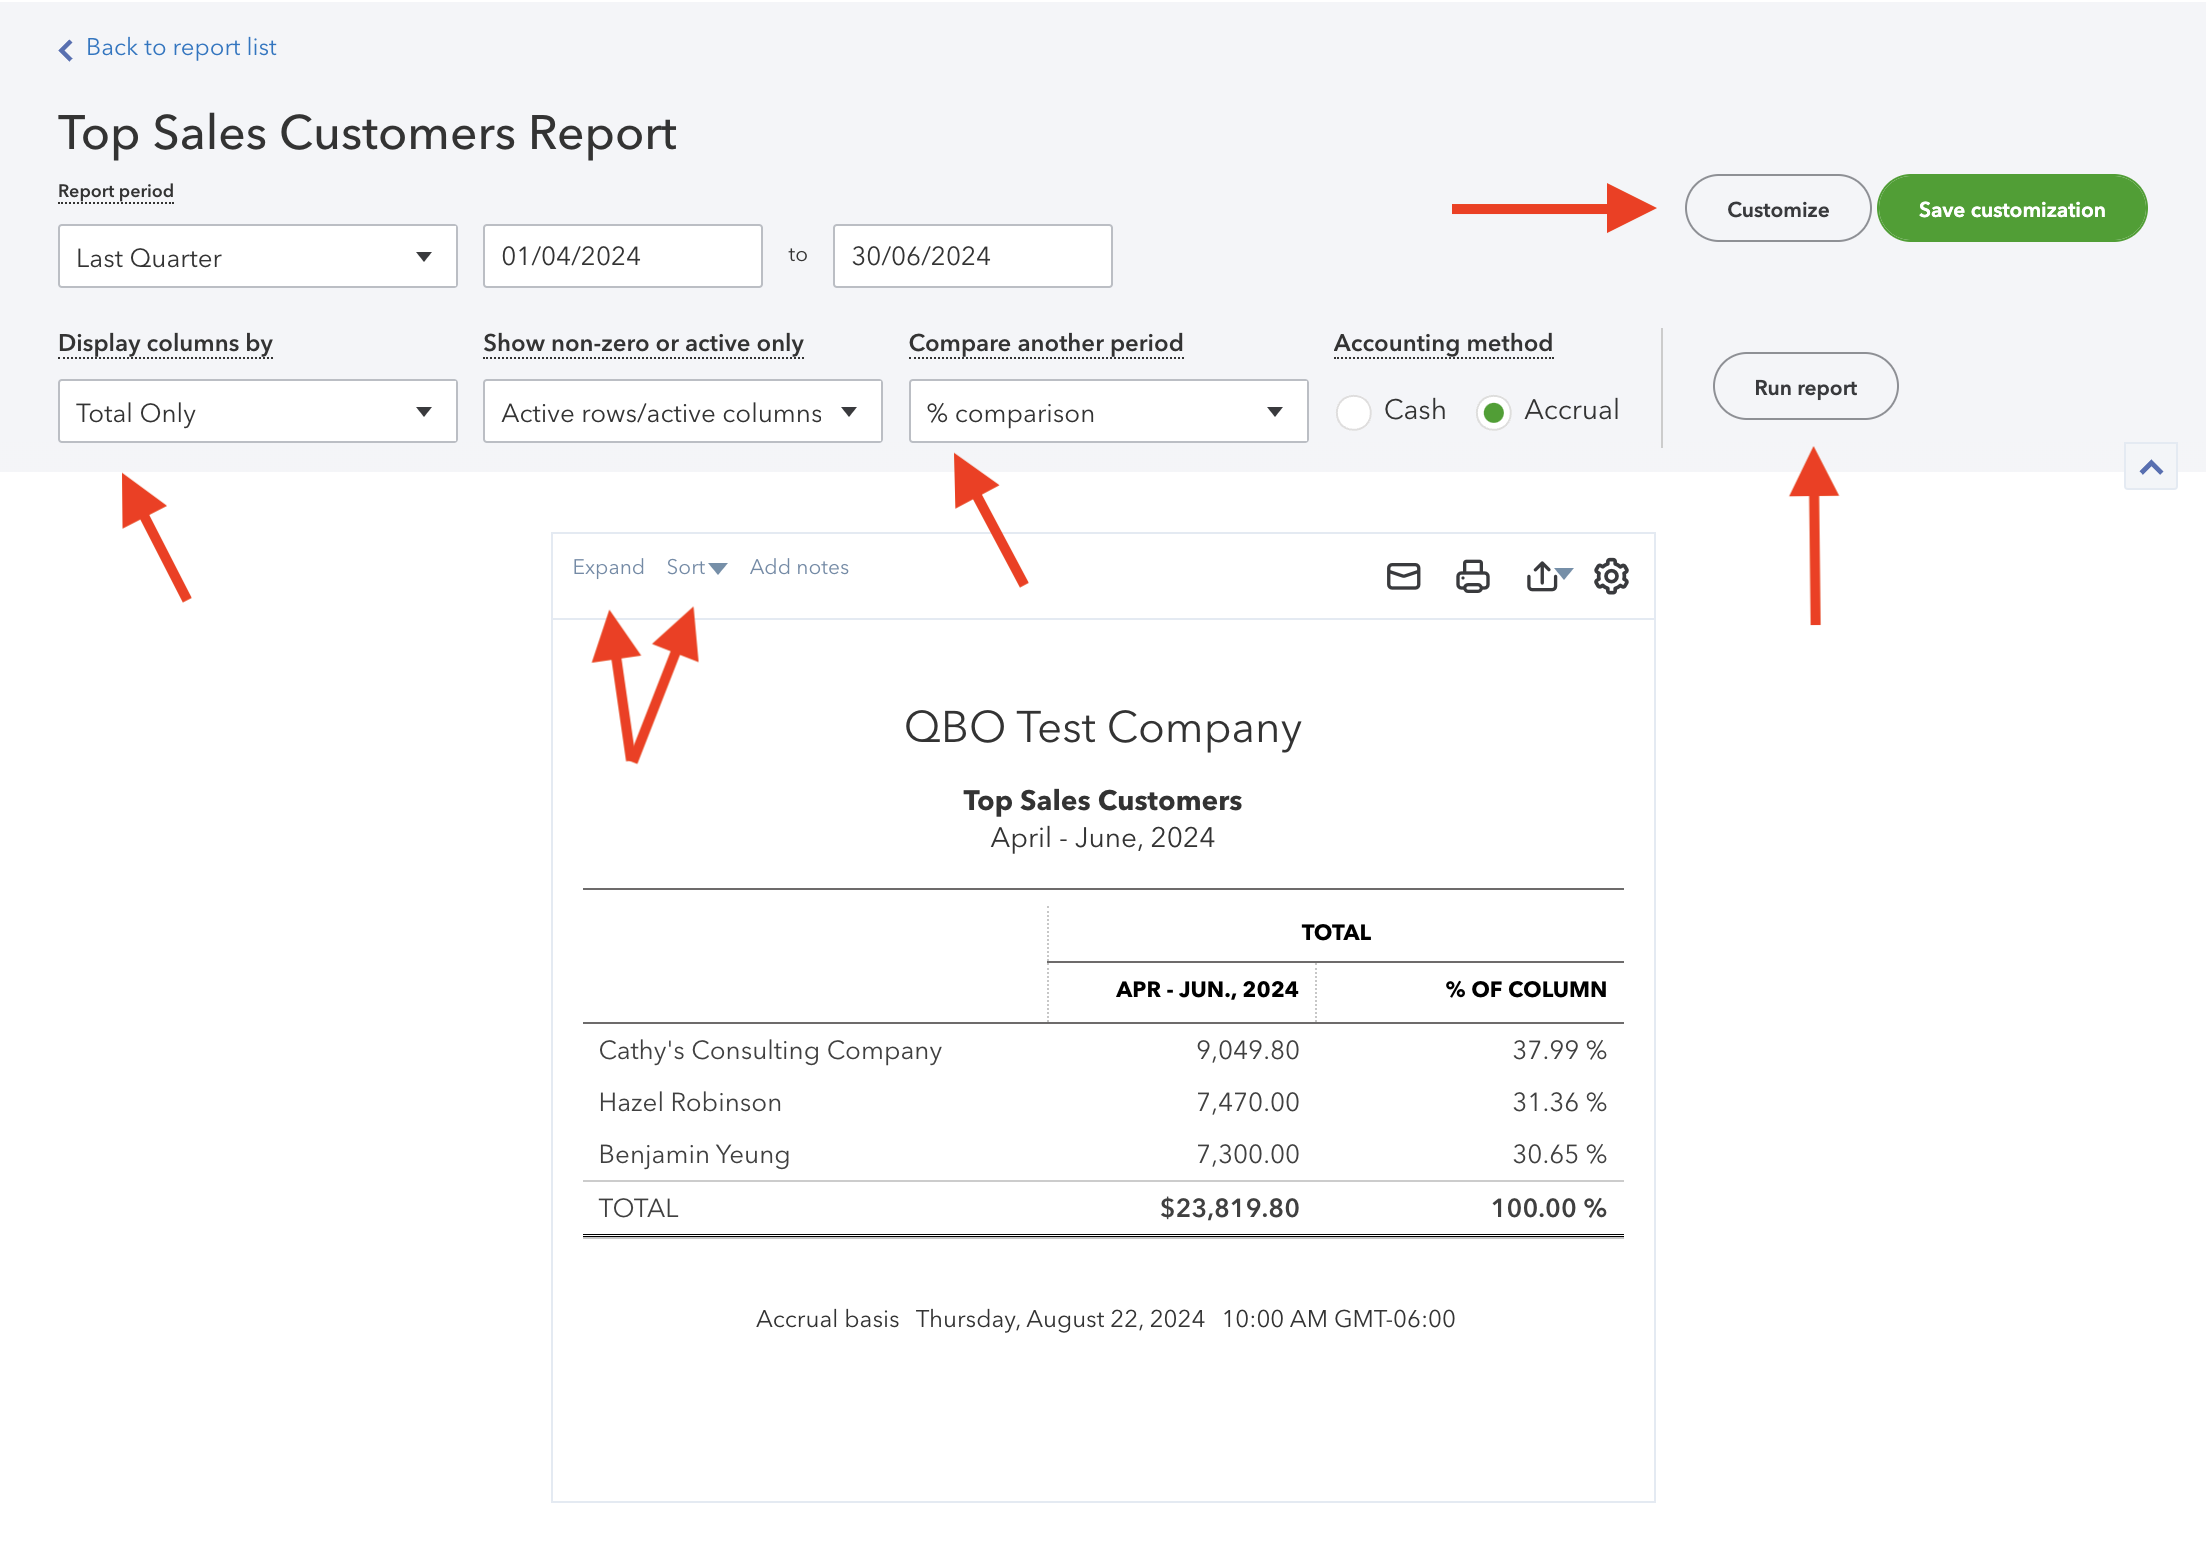 Figure 1 - Customized Report in QBO
How To Use QuickBooks Online Reports
1. How to produce a top customer report in QBO
How To Use QuickBooks Online Reports
1. How to produce a top customer report in QBO
The Sales by Customer report shows you where your revenue comes from and who your top customers are with a bit of customizing. You can use it to determine if you have any concentrated credit risk.
Top Customers Report in QBO
See Figure 1 above
- Click on Sales and Customers under the Report menu.
- Now select Sales by Customer Summary ... how hard is that?
- Set the reporting period to the one you wish to look at.
- Click on "Compare another period" and select % of column.
- The "display columns by" should default to Total Only, which is what you want.
- Click on the "Run Report" icon.
- Sort the information in descending order. You'll find this option in the section just above the report (i.e. not in the setup section).
- Shorten the report by clicking on the collapse button in the section just above the report . This hides the job information.
- Feel free to change the report heading to something else if you want by clicking on the "Customize" icon in the upper right hand corner.
- Memorize the report to save your customizing and for future use. Set a default date for when you most often want the information. I suggest "Last Quarter" if you are using it as a strategic management tool. Call it something like "Top Customers".
Key Takeaway
Consider how to use QuickBooks sales information to improve your customer relations and grow your business by finding creative ways to utilize the information.
More >> How to use your Top Sales Customers information to grow your business
How To Use QuickBooks Online Reports
2. Is there a way to just show the top 10 customers?
How To Use QuickBooks Online Reports
2. Is there a way to just show the top 10 customers?
Yes there is. As with most things in QBO, there is more than one way to get a similar place or outcome.
If you want to refine the QBO report to just include your top 10 customers, you will need to perform an extra step. Let's talk a look at your second option.
Top Customers in Excel Download
See figure 2 & 3 below
- Perform steps 1 -3 from option one above.
- In the section just above the report (i.e. not in the setup section), click on the icon in the upper right hand side with the box with an up arrow (second icon in from the right). From the drop down menu, select Export to Excel.
- Go to your section on your computer where your downloads go. Click open the Excel file just downloaded by QBO. See figure 2 below.
- In Excel, you cannot filter on columns with centering format present, so select just the rows with the data; include the row with the column headings but exclude the row with the totals. Then click on the Sort & Filter icon on the Home ribbon. On the drop down menu, choose Filter. You have some arrows appear at the top of column in the range you selected.
- In column C, sort the information in depending order. I had to fix the formula first by adding a "$" to cell that has the total amount. It looked like this: =IF(B$30=0,"",(B11)/(B$30)). Then I filled down.
- In column B, click on the arrow for the filter window to pop open. On my version of Excel, I would select Top 10 from the "Choose One" field. See figure 3 below.
- You can now print your Excel report.
- It should be noted that the TOTAL in figure 3 represents the Total Sales, not the Top 10 Total Sales.
Key Takeaway
QuickBooks usually has more than one way to get something done.
How To Use QuickBooks Online Reports
3. Why does a small business owner want to run a top customer report on a regular basis? How can a small business owner use this information to run their business?
How To Use QuickBooks Online Reports
3. Why does a small business owner want to run a top customer report on a regular basis? How can a small business owner use this information to run their business?
As an Advanced QuickBooks Online Pro Advisor, I like to explain to small business owners that running a top customer report on a preset regular basis is important for several reasons:
1. Revenue Analysis
- Identify Top Revenue Sources: It helps you identify which customers contribute the most to your revenue. As the economy changes, your top customers may change too. This can help you prioritize services and tailor marketing efforts towards them.
- Sales Trends: Understanding sales trends over time with your top customers allows you to predict future revenue more accurately which helps keep your cashflow healthy.
2. Customer Relationship Management
- Enhanced Customer Service: By knowing who your top customers are, you can ensure they receive the best service, ensuring their loyalty and continued business.
- Personalized Communication: Tailor your marketing and communication strategies to the needs and preferences of your top customers.
3. Strategic Planning
- Resource Allocation: Helps you allocate resources more effectively, creating procedures that focus efforts on high-value customers while still servicing your other customers.
- Product/Service Improvement: Insights from your top customers can drive improvements in your product or service offerings.
- Customer Acquisition: Focus on growing your customer base consistently through targeted marketing and sales efforts while implementing contractual safeguards and payment terms that protect your business interests.
- Risk Management: Experts recommend that small business owners should aim to keep a single customer's contribution to below 15% of your total sales and the combined contribution from your top five customers to less than 50% of your overall sales.
- Growth: Consider whether these customers reduce your ability to reach and serve a broader customer base and if that is good or bad for your business. For example, would maintaining a diversified customer base allow you to increase your financial stability, reduce your risks, and create opportunities for sustainable growth?
4. Risk Management
- Monitor Receivables: Ensure that your top customers are paying their invoices timely; large outstanding amounts can impact cash flow significantly.
- Credit Risk Management: Identify and mitigate any risks associated with relying heavily on a few customers such as what happens if they (i) leave, (ii) don't pay their bills on time, (iii) go bankrupt, or (iv) incur cashflow issues during an economic downturn. What will these customers do if a shift occurs in the industry due to technology or some other factor?
- Operational Risk Management: Over-allocation of resources to service these top customers can limit your ability to attract and serve new clients. This could be okay if you are consciously making the choice to take on this risk as part of your business plan.
5. Marketing Insights
- Targeted Campaigns: Develop strategies to maintain a healthy, balanced portfolio of clients without over-reliance on a few.
- Retention Strategies: Implement strategies specifically aimed at retaining these high-value customers but also run regular customer reports and analytics to monitor and adjust your reliance on top customers.
6. Profitability Analysis
- Cost-Benefit Evaluation: Evaluate the profitability of serving each customer. Sometimes, top customers might generate high revenue but also incur high costs.
- Performance Benchmarking: Compare the performance of your top customers over different periods to understand growth patterns and set benchmarks for future sales efforts.
Key Takeaway
Running a top customer report on a predetermined schedule gives you a clear picture of your business health in terms of customer contribution and equips you with valuable insights for making informed strategic decisions including what direction you want your business to go.
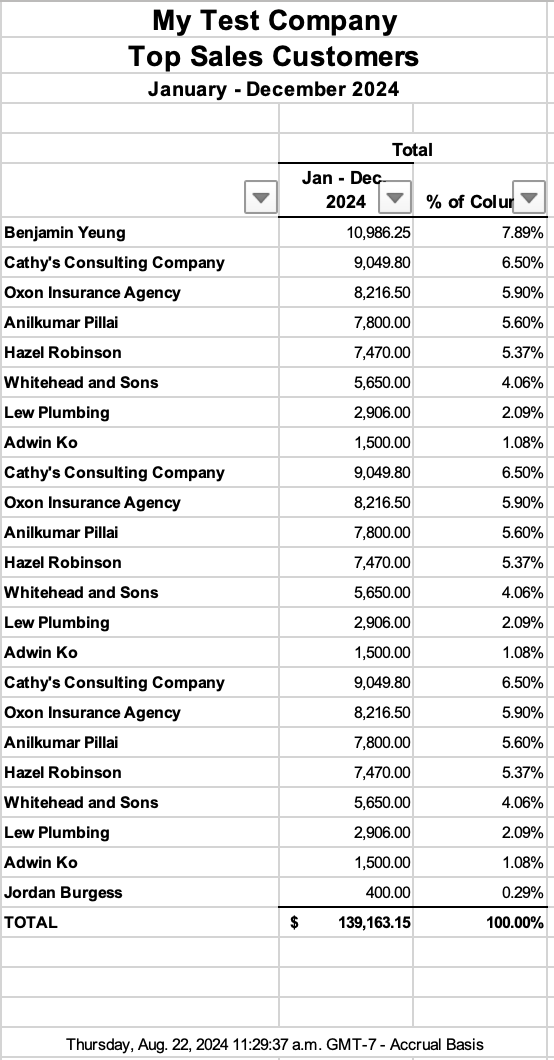 Figure 2 - QBO Top Customers Excel Download Unfiltered
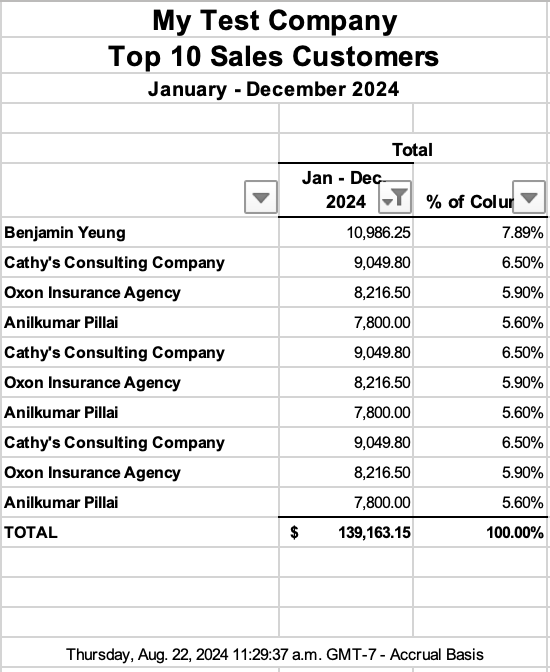 Figure 3 - QBO Top Customers Excel Download Filtered
Customizing Bookkeeping Reports
2. How to use QuickBooks Online to Track and Reconcile Customer Prepayments
Purpose: Tracking Special Types of Transactions
When customers pay a deposit in advance of receiving service or a product, the deposits have to be recorded differently than if you received payment on a customer invoice. Guess what? There are two methods to book customer deposits. Customer deposits are also often referred to as customer prepayments, or if you are in a service profession, retainers.
Just a quick note that the Deposit Detail report which is a standard report in QBO will not give you the information you need to easily track and reconcile your prepayments on account. The customized QBO report will, so read on.
Here's how to use QuickBooks Online to create a report that tracks just customer deposits using the GAAP liability method of reporting. It's requires a bit of setup the first time you walk through the process.
QBO One Time Setup Requirements:
- Create an other liability account called "Customer Deposits" or "Customer Prepayments" in your Chart of Accounts (COA). Sales tax should be set to "out of scope" because sales tax does not apply on a deposit.
- Create a customer deposit item by selecting " New > Other > Add product / service > Service. Give the item a name like Prepayment on Account. Under income, select the liability account you created in step one.
Here is how to use QuickBooks® Online to create your customized Customer Deposits report:
- Run a Balance Sheet report found under Reports > Standards.
- Click on the Customer Deposits or Customer Prepayments account information to drill down to a detail report. You should find the account under your Current Liabilities.
- Customize the report by clicking on the Customize button in the top right hand corner of the report.
- I prefer to see debit and credit columns rather than the amount column so I added the debit and credit columns by clicking on the Change columns link. Then I removed the following columns: Adj, Name, Account, Split, Amount as well as the revaluation columns and unrealized gains (loss) columns. I reordered the columns to my preferences by holding my mouse down on the dots and sliding it up or down.
- Expand Rows/Columns by clicking on the arrow to the left. Look for the Group by box. Select Customer.
- Next, expand Filters by clicking on the arrow to the left.
- Under the Distribution Account, select Customer Deposits.
- Expand the Header/Footer section.
- Change the Report Title to Customer Deposits.
- Click on Run report.
- Click on the Save Customization button to save the report for easy use ... This adds it to the Custom reports tab of the Reports module.
Here is an example of what the report would look like.
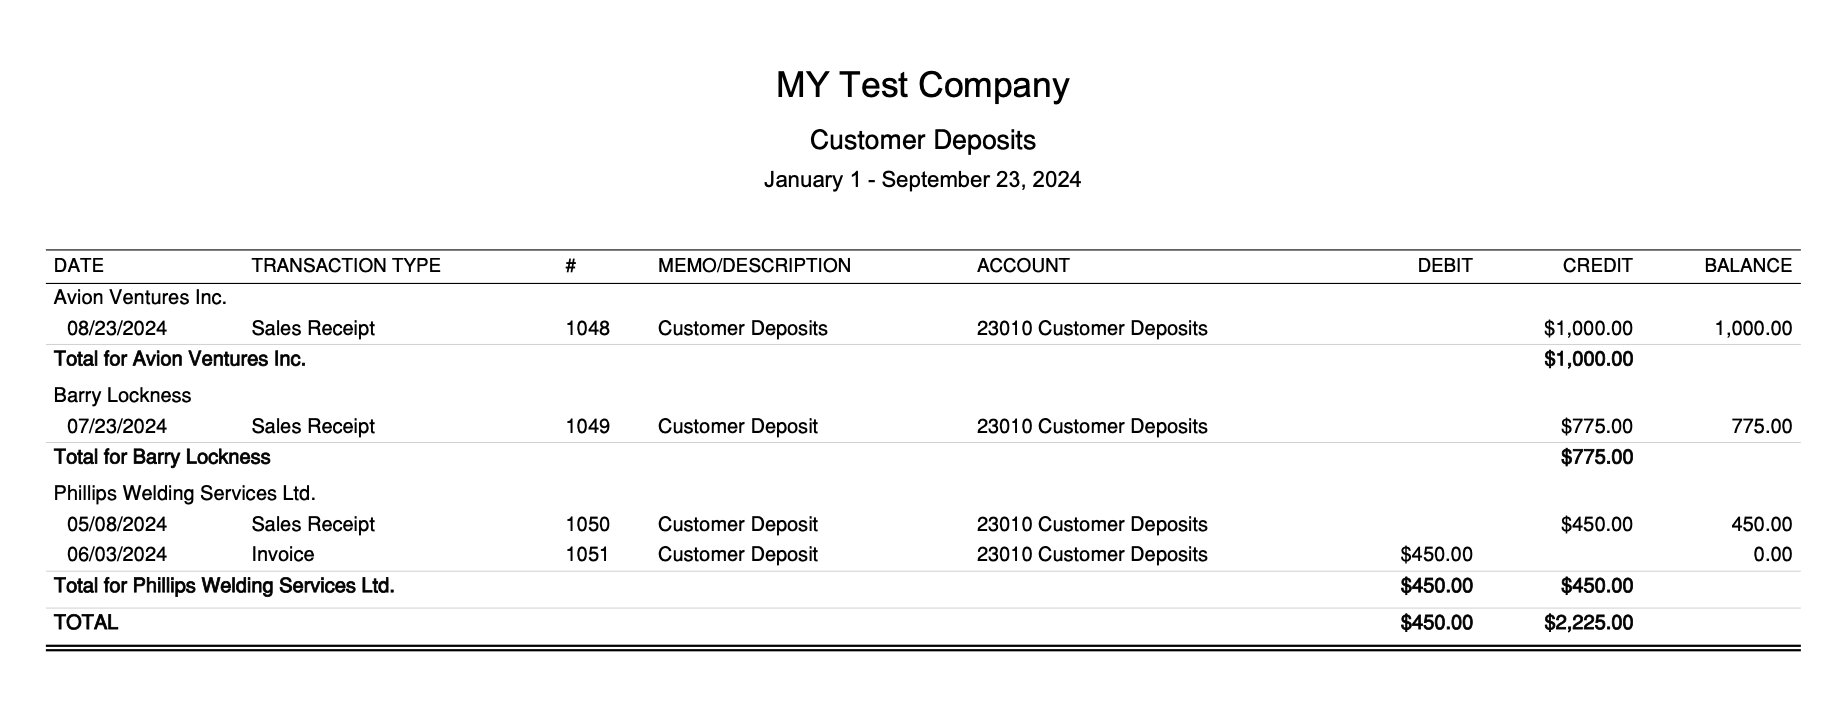
After customizing, the report shows your customer deposit transactions so that you can track who still has an unapplied or unused deposit. A customer deposit account should show a zero balance once the full deposit has been applied to an invoice or several invoices.
If you print a QBO standard Sales by Customer Detail (or by item), the deposit transactions will show up there as well, but not as nicely as this customized report. It is difficult to see the status of the prepayment in this reporting format. Here'a an example for your comparison.
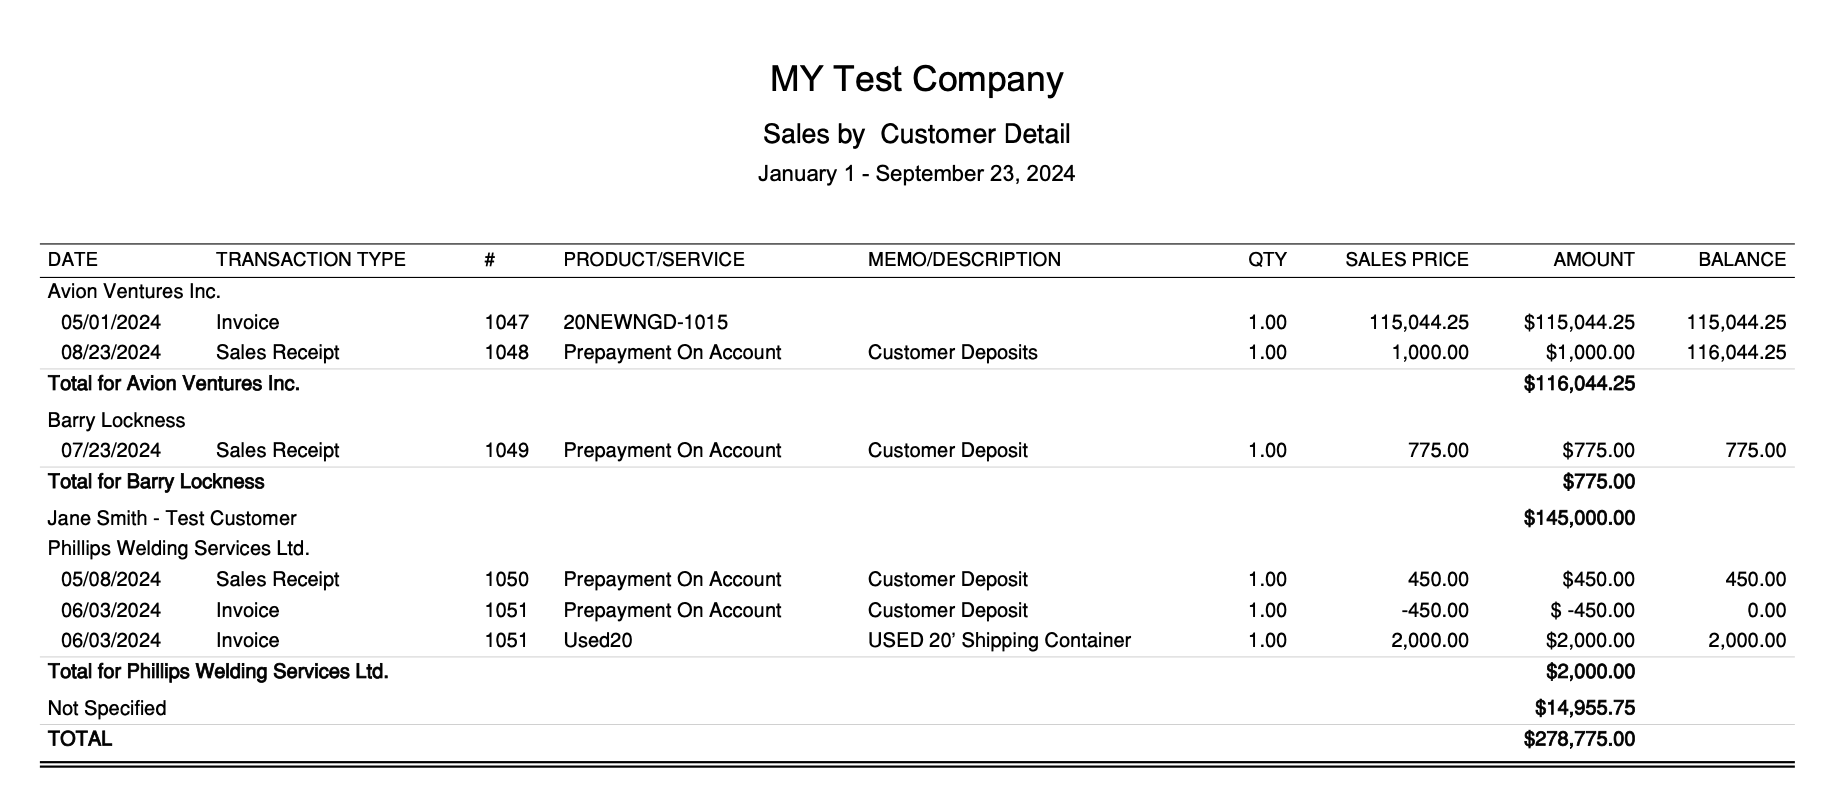
This is an excellent example showing how customizing your reports in your QuickBooks® Online accounting system will help you make good business decisions based on solid information.
Audit Ready
It important to use this report to reconcile the Customer Deposits or Customer Prepayments account each quarter at a minimum. If you have a lot of activity in this account, it should be reconciled more frequently.
Customizing Bookkeeping Reports
3. How to Use QuickBooks Online To Track Construction Holdbacks
Purpose: Tracking Special Types of Transactions
Holdbacks are not revenue ... and not subject to tax until the holdback amounts are billed. So it's important when accounting for holdbacks to have a way to track and monitor them.
Here is how to use QuickBooks Online to track and bill construction holdbacks.
QBO One Time Setup Requirements:
- Begin by setting up an other current liability account named "Holdbacks" in your Chart of Accounts (COA).
- To facilitate invoice preparation, create two Service items named "Holdbacks" and "Holdbacks Released". Under income, code both items to the current liability account you created in step one above.
How to prepare an invoice when a holdback is required:
When you invoice your customer, show your customer the holdback by selecting the Holdback item in your drop down list. Enter your holdback amount as a negative amount. For example if your percentage of work completed to date is $5,000 with a 10% holdback, enter -500.00 as your holdback amount.
On your final invoice to bill your customer for the completion of the job, select the Holdback Released item ... but this time ... enter the amount as a positive number. This will clear out your holdback account and reclassify it to sales where it now becomes taxable.
Finally, setup up your QuickBooks® accounting system to create a customized report so you can easily keep track of the status of the holdbacks. I think these instructions will work but there are so many versions now, you may have to modify the instructions slightly to accommodate your version of QBO.
Here is how to use QuickBooks Online to get your customized Construction Holdbacks report:
- Create a Transaction Detail by Account report found under Reports > For My Accountant.
- With the report open, customize the report. Begin with a click on Modify Report.
- Look for Group By in the columns section. Select Customer.
- Click on Filters tab.
- Filter the report by account and select the Holdback account in the liability section.
- Under General Options, click and format the way you want your number presentation. I prefer to have negative numbers show in brackets rather than the default of a - sign.
- Click Columns and remove or add them. I usually customize the columns to be Customer, Account, Date, Transaction type, #, Name, Memo/Description, Amount, Balance.
- Resize the columns so all the information is readable and not cutoff.
- Click on the existing report title (there is a "pencil" beside it for editing). Change the Report Title to Construction Holdbacks.
- Click on ok.
- Click on the Memorize button to save the report for easy use ... consider adding it to your icon bar by going to the View drop down menu.
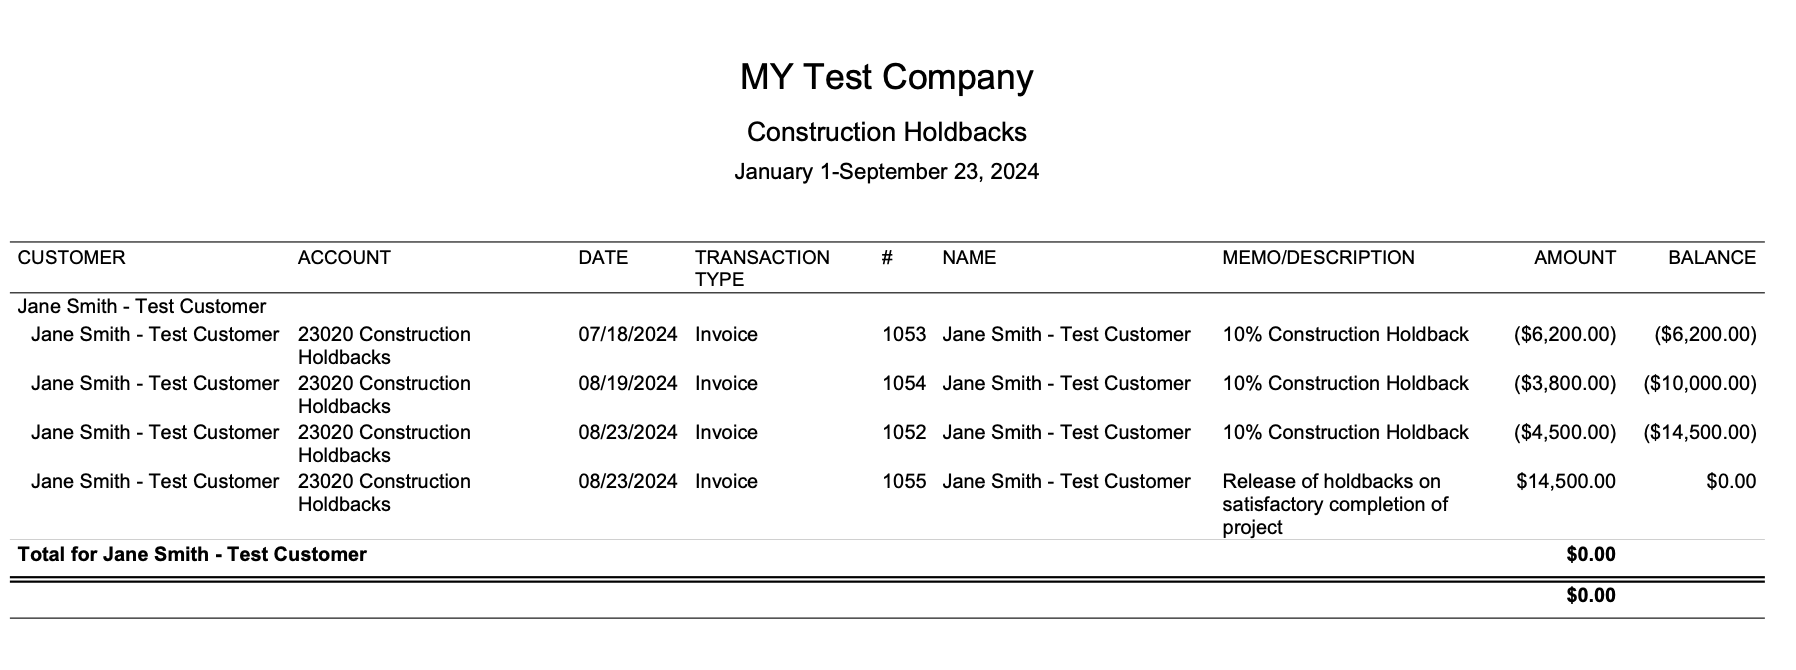
If you have done everything correctly, the report should look very similar to the example report shown below.
Good To Know

A useful resource for you if you are working with construction holdbacks, and learning how to use QuickBooks Online to report it, is the CRA publication GST Memoranda G300-6-7 Partial Payments (GST 300-6-7). It explains the general rule for when GST/HST is payable:
The general timing of liability rule, under subsection 168(1) of the Act, is that tax is payable by the recipient of a taxable supply on the earlier of the day the consideration for the supply is paid and the day the consideration for the supply becomes due. Tax is generally collectible by the supplier at the same time that it is payable by the recipient.
[...]
Under subsection 152(1) of the Act, consideration, or a part thereof, for a taxable supply, is deemed to become due on the earliest of the following days:
(a) the day that the supplier first issues an invoice in respect of the supply for that consideration or part and the date of that invoice;
(b) the day the supplier would have, but for an undue delay, issued an invoice in respect of the supply for that consideration or part; and
(c) the day that the recipient is required to pay that consideration or part pursuant to an agreement in writing.
Customizing Bookkeeping Reports
4. How to Use QuickBooks Online To Track Cheques Issued
Purpose: Internal Audit Control
Have you been wondering how to use QuickBooks Online to track the cheques issued during the month in your QBO accounting system?
This report isn't as useful as it once was as the use of cheques in Canada has decreased sharply since the pandemic. We now make the majority of our payments using online transfers such as Interac e-transfers or PayPal.
What I'm really hoping for is for Intuit to create a Bank Register report that summarizes payments made by online transfers such as Interac and deposits received by Interac.
Learn how to use QuickBooks MODERN VIEW
QBO doesn't actually seem to have any banking reports like QBD. It did have an Cheque Detail report (under the Expenses and Suppliers section) but I didn't find it useful because I couldn't collapse the "cheque detail" as a group. It would have to be done individually by cheque. The group collapse collapsed it by account instead of cheque. I guess they need to create a Cheque Summary.
I was able to create my Cheque Register report in Modern View to provide the same information as I had in Classic View. I create this report as an internal control measure (because I like to make sure that all cheques are accounted for ... even voided ones). Here's what I did:
- Go to Transaction Detail by Account Report under the For My Accountant section.
- Set Report Period to 'All Dates' or just the period you are reviewing and the Accounting Method to 'Accrual'.
- Click on Group By and select 'Account' if it is not showing in the selection field.
- Under Filter, (i) set Transaction Type equals 'Cheque' and (ii) Account equals the bank account you want the cheque register for. You have the option to select more than one account if necessary. The Modern View does not have 'All Bank Accounts' option.
I didn't include it my example, but it would be wise to also select 'Bill Payment (Cheque)' in addition to 'Cheque' so your report includes cheques issued to pay bills. The downside here is Interac bill payments will show up as well as QBO records all bill payments as cheques. I haven't figured out how to filter to not include Interac payments from my Cheque Register. - Under General Options, I like to change the negative number presentation from -100 to (100). That's just my personal preference.
- Under Columns, you can customize the columns displayed. I chose Date, Transaction Type, #, Name, and Amount for this report. I placed them in the order I wanted them to show by dragging the icon at the far end of the column.
- Next, change the title of the report from 'Transaction Detail By Account' to 'Cheque Register'. To do this, you have to click on the 'pencil' at the top of the report header.
- Set sort by to 'Default' ... in ascending order. You'll find this feature to the left of the report title. You can also sort columns right in the report by double clicking on the column header. So I also clicked on the '#' column and sorted it by ascending order.
- Before saving, I adjusted the column size to ensure everything was showing in the column and not cutoff from view. You do this by hovering over the column marker in the headers until you get the tow bars ... then drag it to the size you need.
- I then clicked on 'Save As' to save my custom report. Once saved, a customized report is found under the Custom Reports tab.
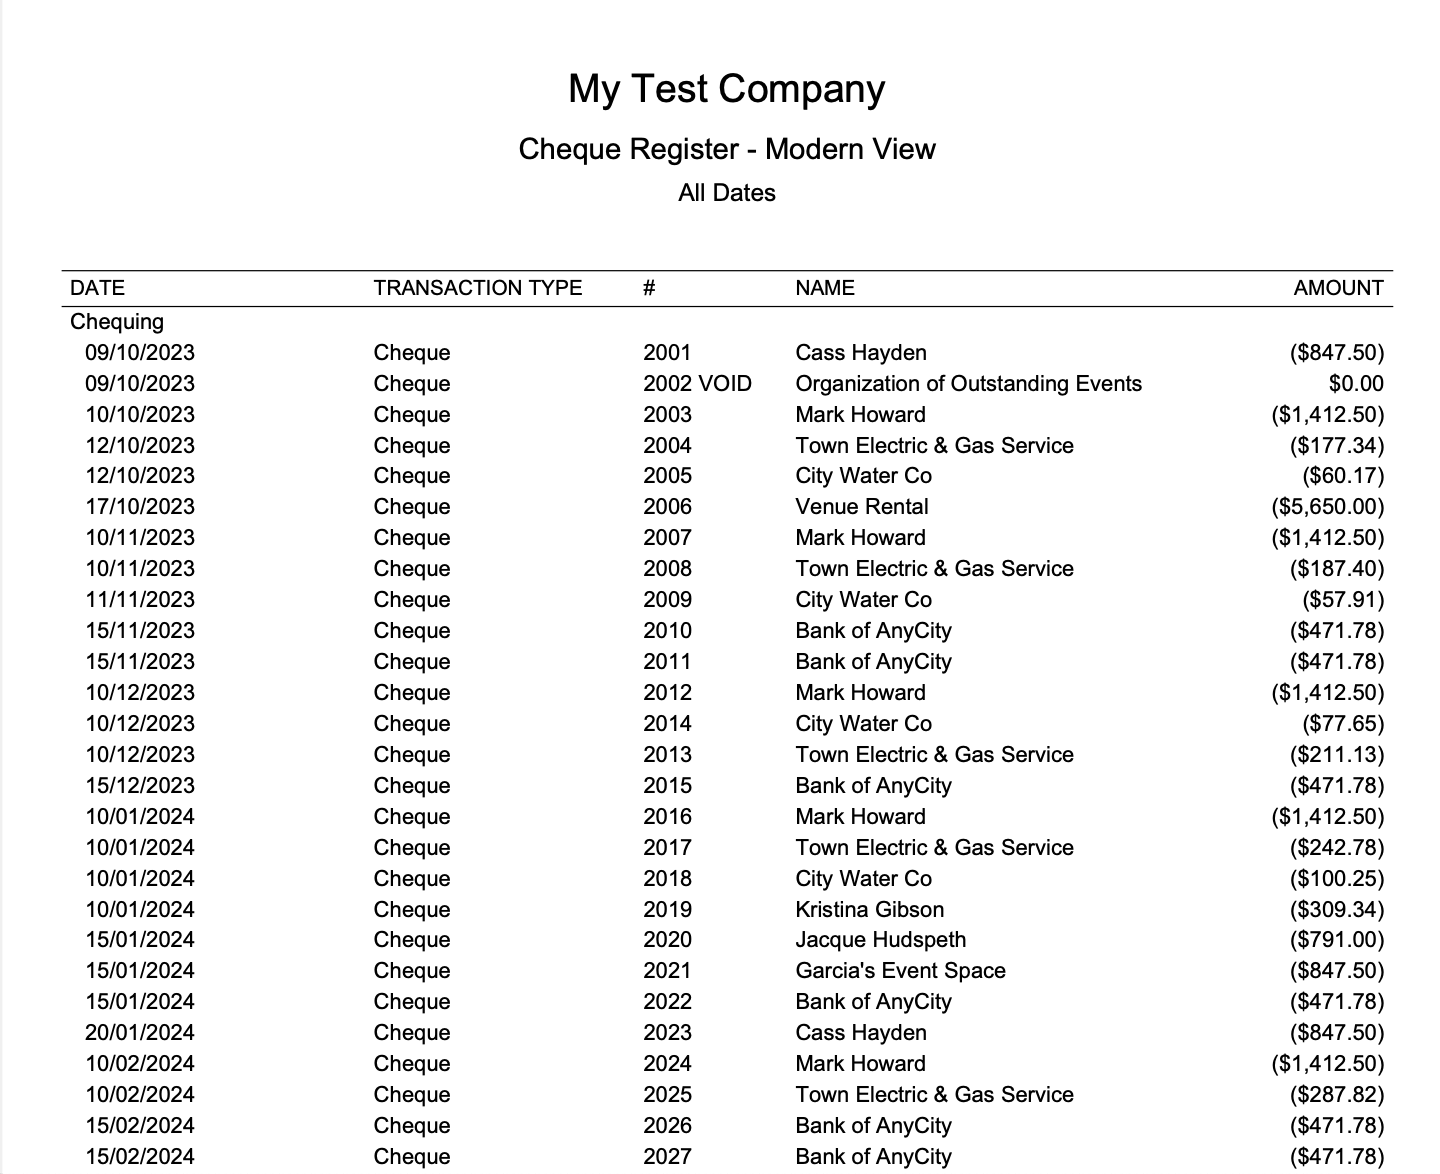 Modern View - includes voided cheques
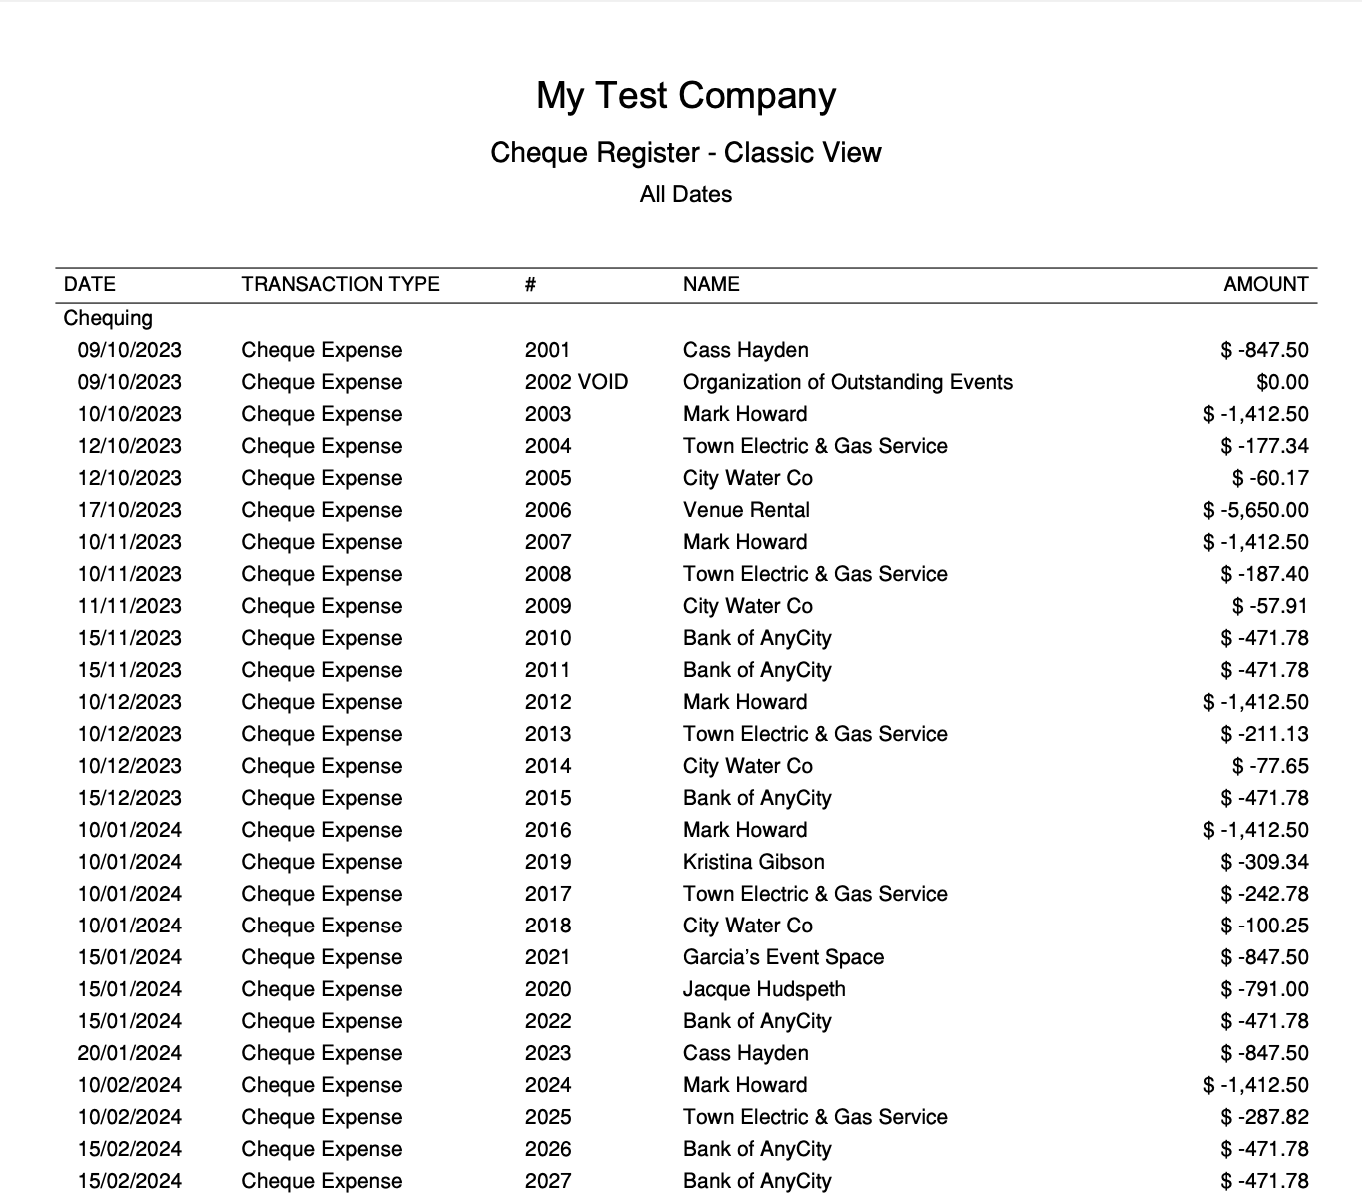 Classic View - includes voided cheques
Learn how to use QuickBooks CLASSIC VIEW
When I was using QuickBooks Desktop, my starting point for this report was the 'Missing Cheques' report. QBO doesn't have a report like that so I created a custom report in QBO. I like to have this report as an internal control report when a business writes a lot of cheques (checks).
I've provided an example of the Classic view custom report so you can compare it to the Modern View. They are identical except for (1) the transaction type description, and (2) the negative number presentation. This feature didn't work in Classic View but it does in Modern View which is awesome.
Here's how I created my Classic View Cheque Register report:
- Going to Transaction Detail by Account Report under the For My Accountant section.
- Click on Customize.
- Set Transaction Date to 'All Dates' or just the period you are reviewing.
- Leave the default setting to the accrual accounting method but change Rows/Columns Group by to 'Account'.
- Under Filter, set transaction type to "Cheque Expense" and distribution account to the bank account you want the cheque register for or you could set it to "All Bank Accounts".
- Under Header/Footer, change the title from "Transaction Detail by Account" to "Cheque Register".
- If you don't like the default columns displayed, you can click on the "Change Columns" button and customize it to your preference. I always change the negative number presentation from -100 to (100).
- Set sort by to "#" ... in ascending order. You'll find this feature on the upper left hand side of the report content.
- I then saved my customizations. A customized report is found under the Custom Reports tab.
Track Your Invoice Numbers
I used to create a similar report to track my invoice numbers ... because again I want to ensure all numbers are accounted for ... even voided invoices. This means I never delete an invoice because I want the numerical sequence accounted for. However, QBO has a standard report here that does the job called 'Invoice List by Date'. I just customize and save it to sort by '#' instead of 'Date'. I also revise the title to "Invoice List by Number'.
Audit Ready
You already know I'm going to tell you that I investigate all missing or duplicate numbers shown in the Cheque Register or the Invoice Listing.
The whole point to the exercise when learning how to use QuickBooks Online data that you've painstakingly entered is to:
- manage and monitor your financial health;
- help you make better business decisions ... and;
- to safeguard your business assets.
QuickBooks Online Closing Procedures
Good to Know
Learning how to use QuickBooks Desktop short cut keys will make your data processing more efficient. Huge, huge time savers!
Closing the books is an important practice for any small business owner. Learning how to use QuickBooks Online to close your books is much simpler than many other accounting programs.
By adhering to the following practices, a small business owner can ensure that their financial records are well-maintained, accurate, and ready for any required reporting or analysis.
Here's the why, when, and how to close the books in QuickBooks Online (QBO).
1. Why Do You Need To Close the Books in QBO?
Let's look at some reasons why you don't want to forget to close the books after month-end, quarter-end, or year-end are complete:
- Accuracy: Ensures all financial transactions for a particular period are complete and accurate before starting a new period.
- Prevents Changes: Protects finalized financial data from alterations. This is crucial for maintaining the integrity of historical financial information especially if you filed your compliance or tax returns based on the information.
- Compliance: Helps with regulatory and tax compliance by having clear financial boundaries for reporting periods. Future audits will go more smoothly.
- Reporting: Provides a clear cut-off for generating financial statements, making period-end reporting and analysis easier and more reliable.
- Audit Trail: Establishes a transparent audit trail that can be critical in case of an audit.
TIP
The "close the books" feature in QBO allows you to always have access to prior years' data right down to the transaction level. It also allows you to create accurate comparison reports.
2. When Do You Close the Books in QBO?
Let's look at some business events that should trigger you to close the books in QBO:
- End of Financial Year: Typically done at the end of the fiscal year to finalize the annual financial statements and prepare for tax filings.
- End of Accounting Period: Can also be done at the end of each accounting period, such as monthly or quarterly, to ensure more frequent accuracy and control.
- After Major Adjustments: Once all adjusting entries have been made (e.g., depreciation, accruals, corrections), it’s wise to close the books.
- After Filing Compliance Reports: After filing a tax compliance report with a government agency, to prevent changes to the information filed.
3. How Do You Close the Books in QuickBooks Online?
Unlike when books were done manually, the QuickBooks Online accounting system does not require any period end entries to close the books. That is why it is important to set your closing date when you have completed your period-end procedures.
Here's the procedure to close the books in QBO once you have completed your bookkeeping and reconciliations for the period:
- Log In: Log in to your QuickBooks Online account if you aren't already signed in.
- Period-End Procedures: Perform your month-end procedures including reconciliations.
- Navigate to Settings: Click on the Gear icon (⚙️) at the top right corner. Under "Your Company," select "Account and Settings."
- Select the Advanced Tab: In the navigation bar, select the "Advanced" tab.
- Edit the Accounting Section: In the "Accounting" section, click on the small pencil (✏️) icon to edit.
- Set the Closing Date: Toggle the switch that says "Close the books" to "green". Enter the desired closing date. Sometimes, if I've pretty much completed a period, I will leave the last day of the period "open" until all my reconciliations are done and management reviews are complete. This allows me to still make adjusting entries to the period easily but not to the rest of the data in the period.
- Set a Password (Optional but Recommended): QuickBooks will prompt you to set a password to prevent unauthorized changes to the closed period. It’s highly recommended to set a password. Keep the default "Allow changes after viewing a warning and entering password". This way only people authorized to change data (like your accountant or senior bookkeeper) in a closed period can do so.
- Save Changes: Click on "Save" and then "Done" to finalize the closing.
TIPS
- Make sure you have set your user permissions to "Your Company". You determine who has the right to "close the books" or reopen a closed period.
- Be judicious in who receives the password to make changes in a closed period.
- Once you've closed a period, as an additional layer of protection, safeguard your data against accidental change by backing it up. I also like to download and archive PDF copies of the financial statements, trial balance, and general ledger and any other relevant reports for the closed period. This practice has saved my butt many times over the years.
4. What processes does QuickBooks Online do automatically at the end of a period?
The "closing" procedure is date driven and occurs based on the reporting dates of the financial reports you request. QuickBooks® automatically performs the following period end adjustments even if you haven't activated the "close the books" feature:
- The income and expense accounts are automatically zeroed out at each year end (or any reporting period you selected).
- The net income is automatically posted to the Retained Earnings account, which is created by QBO, for any reporting period.
Audit Ready
QuickBooks Online does not reclassify the equity account. YOU need to book the closing entry to clear the Owner's Draws and Contributions to the Owner's Equity account.
TIP
QuickBooks® has a great feature for common report time periods - This Month, Last Month, Year-to-Date, etc. that makes it quick and easy for you select your reporting period.
Tracking GST/HST in QuickBooks Online
Learning how to use QuickBooks Online to track GST/HST depends on whether you are a GST/HST registrant or not. We'll look at both. Please keep this in mind while learning how to use the QuickBooks Online sales tax module.
Learning How To Use QuickBooks Online Accounting System
Handling HST/GST If You Are NOT A Registrant With CRA
As a non-registrant, your bookkeeping process will be slightly different than CRA registrants since you don’t need to track GST or HST collected or paid. In this scenario, you will not be collecting GST/HST (since it's unauthorized for non-registrants) and you won’t qualify for input tax credits, making it unnecessary for your accounting system to track the sales tax you pay separately.
If you are not registered with the CRA for collection of GST/HST, do not activate the GST/HST sales tax module in QuickBooks Online (QBO). Your sales taxes will be automatically recorded as an expense when you enter your transactions.
When recording purchases or expenses with sales taxes, the tax amount should either be expensed (day-to-day operating costs) or capitalized (when you purchase assets). For instance, if you purchase printer toner for $150 before taxes in Alberta, you will record $157.50 as an expense in the Office Supplies account (GST is 5%). In Saskatchewan, the recorded amount would be $166.50 because GST is 5% and the PST rate is 6%.
Tip for GST/HST in Canada:
Though not mandatory, you might want to track the GST you pay. This can help you gauge the financial impact of not being registered for GST/HST. To manage this, create a separate expense account in your chart of accounts called "Sales Taxes" or "GST Paid." For each purchase, record the GST amount (excluding PST as it is not eligible for an input tax credit) in this account. Doing so can provide valuable management information to help make informed business decisions.
MORE >> Posting Expenses When Not GST Registered - Two Options
Learning How To Use QuickBooks Online Accounting System
Handling HST/GST If You ARE A Registrant With CRA
In the QuickBooks Online accounting system, it is not necessary to have three accounts like you do when you handle GST/HST manually. QBO Canada creates tho liability accounts automatically once the sales tax module is activated. One liability account called 'GST/HST Payable' tracks everything. A second liability account called 'GST/HST Suspense' moves sales tax amounts filed with CRA to the suspense accounts.
As long as you are properly booking your entries and managing your sales tax in the sales tax windows, the QuickBooks Online accounting system keeps track of your GST collected and input tax credits for you. When you need to determine the amounts to report to CRA, you run your sales tax report for the details.
Example of QBO Sales Tax Setup
Setting up sales tax in QuickBooks Online (QBO) for an Alberta business involves a few straightforward steps. Alberta (and the territories) is unique in Canada as it does not have a provincial sales tax, and businesses typically only deal with the federal Goods and Services Tax (GST). Here is an example of the sales tax codes setup in QBO Canada.
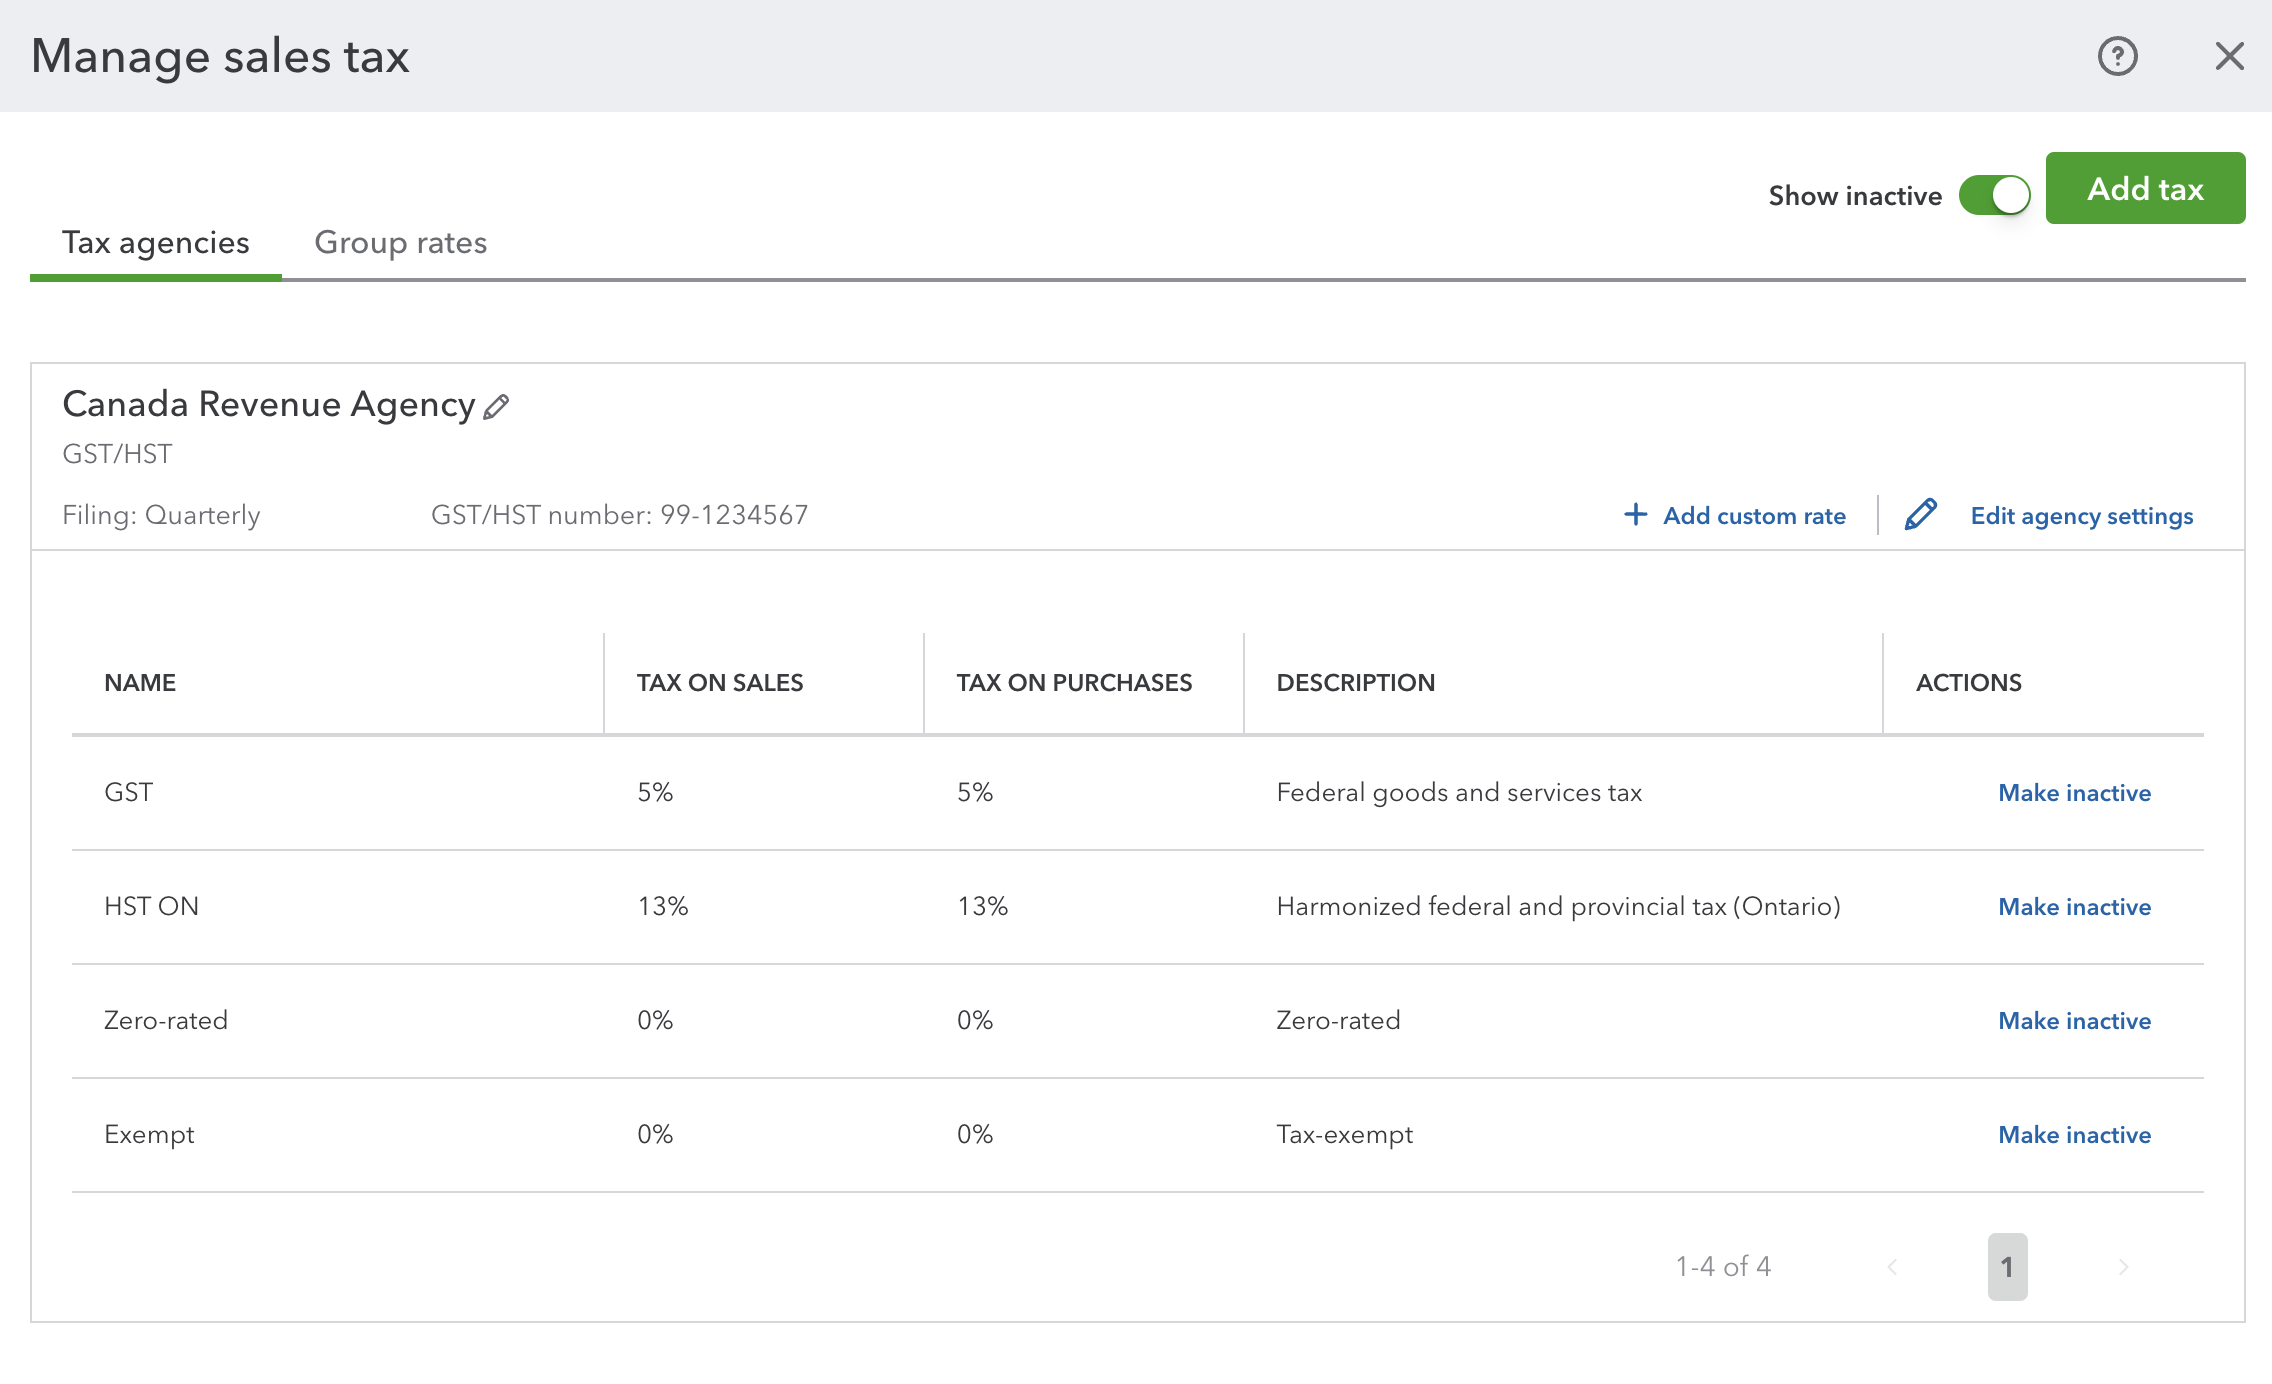 An example of sales tax code setup in QBO Canada for Alberta and Ontario.
Here’s how you can set up your sales tax for an Alberta business in QBO Canada:
- Sign on to QuickBooks Online: Log in to your QBO account.
- Navigate to the Taxes Setup: On the left-hand side menu, go to the 'Taxes' tab and select 'Sales Tax'.
- Set Up Sales Tax: If it's your first time visiting this module, click on 'Setup Sales Tax'.
- Start Tracking Your Province: Since you are in Alberta, choose Alberta as your province and save. QuickBooks Online understands Alberta's tax structure and will set up the tracking with just the click. QBO Canada will typically auto-populate GST information since Alberta businesses generally only need to account for GST. Ensure that GST at the rate of 5% is selected. This is the general tax for Alberta as of the latest known rates.
- Add The Tax Agency and Business Information: This step requires choosing starting period, a filing frequency, and reporting method. Provide your business number (BN - usually ends with RT001), the reporting method (accrual or cash - if you are unsure select accrual), and the filing frequency (monthly, quarterly, annually) when prompted. For your starting period, choose January if you are a sole proprietor. If you are a corporation, choose the start of your fiscal year. Once completed, click on 'Next' then 'OK'.
- Review and Make Changes: If you want to make any changes to your setup, click on the 'Manage Sales Tax' button. Your sales tax codes created by QBO will be listed here. In this example, you should see GST, Exempt (for bank charges, interest, insurance, etc.), and Zero-rated (for out of country customers). You can see what the screen looks like above. Review the tax settings shown, especially the tax rate, to ensure everything is correct. As QBO has done the setup for you, it is unlikely you will have to make any changes.
- Add Additional Provinces: If you have out-of-province customers, you will also have to setup the sales tax for those provinces / territories in the same way. You would click on 'Add Tax'. Don't setup all the provinces if you don't have customers (or suppliers) in those provinces. We will ignore this for this example.
- Create Custom Tax Codes (if needed): If your business needs custom tax codes (e.g., municipal taxes on specific goods, accommodation taxes, tourism levy, etc. ), this is where you may need to add them manually. I will ignore group tax rates in this example. However, for most businesses in Alberta, GST is the sole concern.
- Complete Setup: Once you’ve verified that all information is accurate, finalize the setup by clicking on 'Done'. Your sales tax setup is complete. QuickBooks will now handle tax calculations automatically for transactions. Your QuickBooks Online account is now configured to handle sales tax correctly for an Alberta business.
- Keep Updated: Intuit takes care of any changes in sales tax rates. However, you will want to regularly check with official sources like the Canada Revenue Agency (CRA) for any changes in tax rules that might affect apply and manage your sales tax.
This setup process should ensure your sales transactions in Alberta are correctly taxed in compliance with federal guidelines. If there are any peculiarities or complexities specific to your business, consulting with a local tax professional might be beneficial.
Filing and Paying Sales Tax To CRA
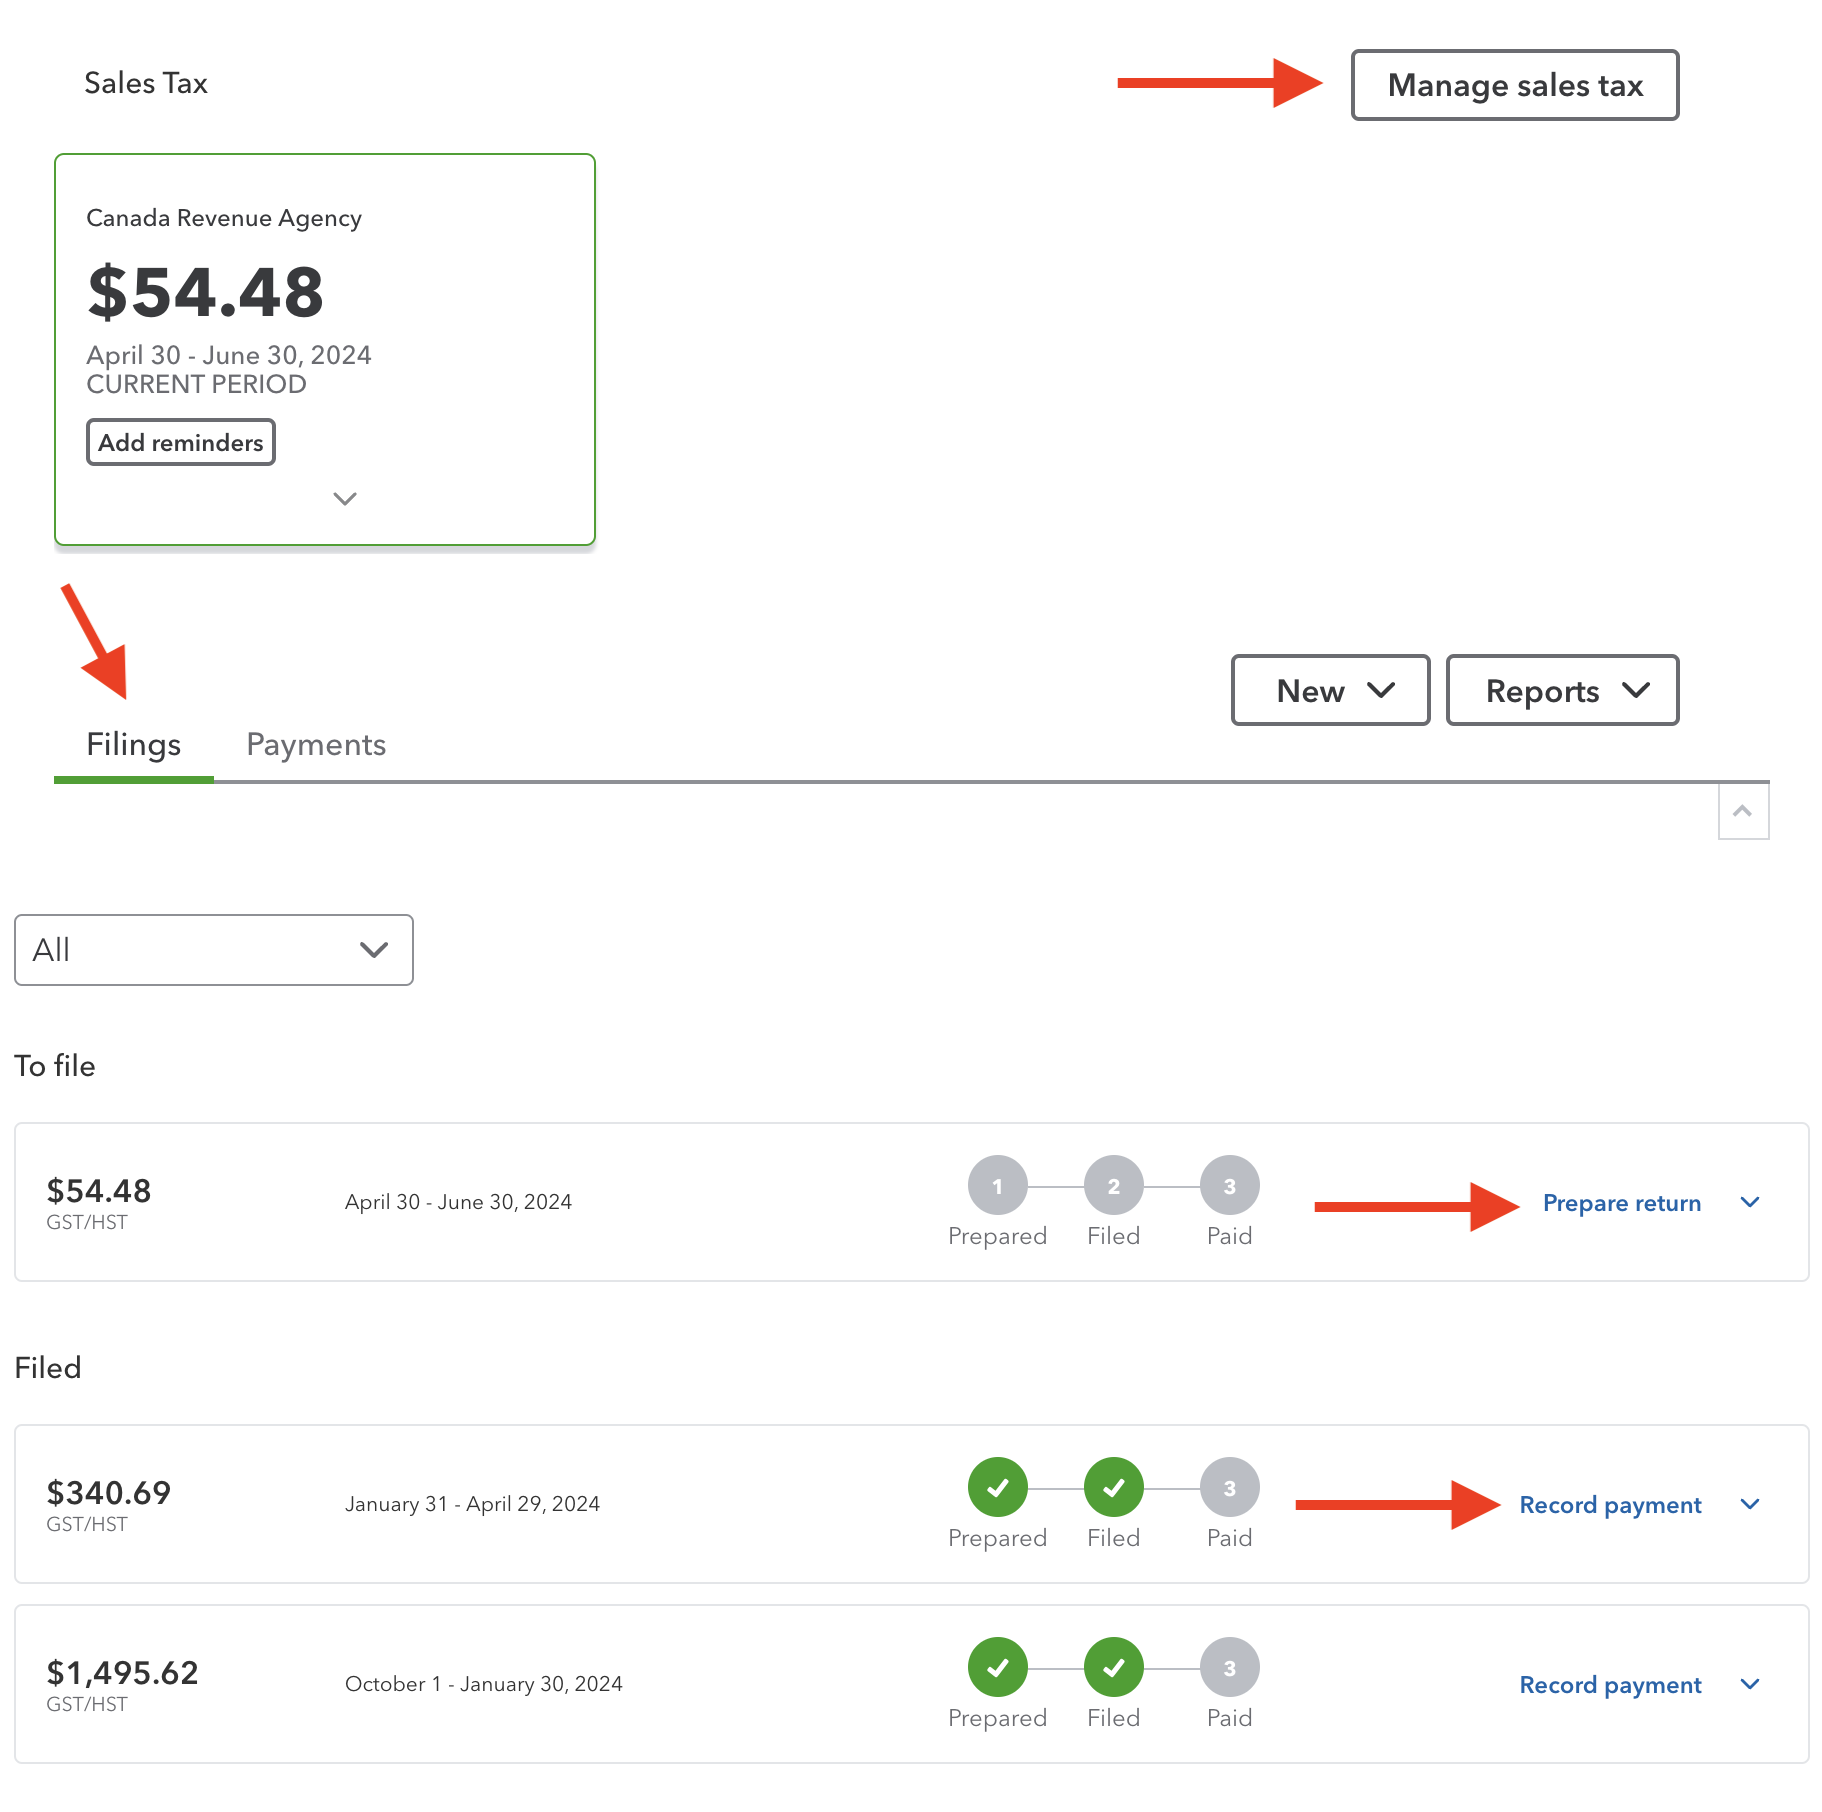 QBO Canada Sales Tax Filing Screen
 Find out how much GST/HST you owe by running your three standard GST/HST reports available in QBO Canada.
 At the bottom of the 'Sales Tax Payment' screen, there is a button to record any CRA interest and penalties owing.
When it's time to file and pay your sales tax, you will go to the 'Sales Tax' Filings tab.
- To find out what you need to report on from GST34-2 and how much you owe, run your sales tax liability reports.
- It's important to run the GST/HST Summary report, the GST/HST Detail report, and the GST/HST Exception report (shows what transactions changed to periods already filed). Keep a PDF copy of them for your records in the event you have to explain the numbers in your report filed.
- It's pretty intuitive but if you need help, go to the QuickBooks Support articles or use the Help feature in QBO.
TIP
Pay your sales tax to CRA using the Sales Tax module. It is very important to pay your liability through the sales tax window NOT expense, cheque, or pay bills windows. If you use any supplier module payment form, your liability reports will be incorrect.
Key Takeaway - QBO Sales Tax
- As long as you are entering your data correctly, the QuickBooks Online accounting system automatically tracks your sales taxes for you.
- A payable or receivable is automatically setup when you use the Sales Tax Filings tab> Prepare Return > Mark as Filed function.
- When you get your GST/HST refund from CRA, find the applicable period and use the Record Payment drop down menu under the Sales Tax tab to record your CRA refund deposit. (See the screenshot above.) Once you've done this, your bank feed should update to 'matched'.
- If you owe, use Record Payment drop down menu under the Sales Tax tab for the applicable period to record your GST/HST payment to CRA. (See the screenshot above.) Once you've done this, your bank feed should update to 'matched'.
- If you owe interest or penalty charges, there is a 'Add Interest / Penalty' button on the bottom of the Sales Tax Payment screen. You get to this screen by clicking on the Record Payment link. I setup an adjustment account called 'CRA Penalties and Interest', a sub account of bank charges as your tax preparer needs this information when filing your income tax return as they are not tax deductible expense. You should set the default sales tax code to 'Exempt'.
To organized and accurate record keeping in your accounting system!

See you on the next page ...
Your tutor
Member of the QuickBooks ProAdvisor® Program. Screen shots © Intuit Inc. All rights reserved. QuickBooks and QuickBooks ProAdvisor are registered trademarks and/or registered service marks of Intuit Inc.
Bookkeeping Essentials > Bookkeeping Systems > Learning How To Use QuickBooks Online
Bookkeeping Essentials > Learning QuickBooks Online > Customizing Reports In QuickBooks


