- Home
- Accounting System Setup
- Learning How To Use QuickBooks Desktop

Learning How To Use QuickBooks® Desktop
This Page is Archived and Will No Longer Be Updated

by L. Kenway BComm CPB Retired
Published August 2010 | Revised September 28, 2024 | Edited November 25, 2024
WHAT'S IN THIS ARTICLE
Introduction | Accounting System Flowchart | Customizing Reports | Performing Period End Closing Entries | Tracking GST/HST as a Registrant and a Non-Registrant | QBD Keyboard Shortcut Keys | Intuit QuickBooks Desktop Sunset Policies | Is QuickBooks Desktop Being Discontinued?
NEXT IN SERIES >> Tips About Learning QuickBooks Online
Today we are going to chat about how to use QuickBooks Desktop to create four very handy and useful custom reports to track ... cheques issued, customer deposits, construction holdbacks and top customers.
We'll begin by taking a look at the QuickBooks Desktop accounting system flowchart and end the chat with closing procedures and how GST/HST is handled.
While you don't have to have formal bookkeeping training to use QuickBooks® products, you do need to have a basic understanding of accounting principles to ensure you have accurate data ... and there are certain procedures you must follow to ensure you have accurate data.
“QuickBooks is easy? I agree! So is a pencil. But if I sit you down at a drafting table does it make you an architect?”
Sara Laidlaw Woodruff
Advertisement
12 Part QuickBooks® Primer
QuickBooks® is a registered trademark of Intuit Inc. Screen shots © Intuit Inc. All rights reserved.
Click here to subscribe to QuickBooks Online Canada. I do not receive any commissions for this referral.
Accounting System Work Flow
QuickBooks® Desktop WorkFlow Flowchart
When you first enter the QuickBooks® desktop program, you are presented with a flowchart of the accounting system. It gives you an overview of how your bookkeeping work flows ... and your first clue as to how to use QuickBooks®. If you follow the workflow process, you will be more productive and efficient.
The chart below is older version. The newer versions have additional items added to it like "accept credit cards" and "HR estimates and insurance".
Study the chart and notice the different areas of the program. Learning what each area is for will make learning how to use QuickBooks® Desktop go faster.
Each version has five sections:
- Vendors (for accounts payable and expenses ... money leaving the business)
- Customers (for accounts receivables and sales ... money coming into the business)
- Employees (for payroll and/or time tracking)
- Company (for COA and list management)
- Banking (for banking functions)
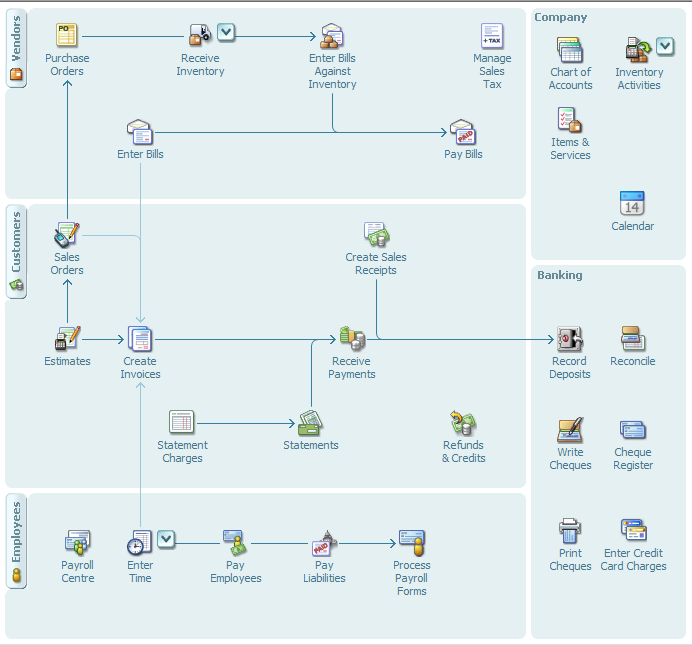
Try to understand the bookkeeping process by studying the flowchart.
Let me say again ... when learning how to use QuickBooks Desktop (QBD) ... before you do anything else ... stop and look over the flowchart.
Once you understand the bookkeeping workflow, things start to become easy. When in doubt, stop what you are doing and find out where you are on the flowchart. Then go from there.
The flowchart shown above varies. It depends what version you are using and what features you have. So if your chart doesn't look exactly like this one, don't worry about it. How to use QuickBooks Desktop is pretty much the same for each version ... only the features change to accommodate different sizes of businesses.
Customizing Reports in QuickBooks Desktop
When learning how to use QuickBooks Desktop, make sure you take time to learn how to customize reports tailored to your informational needs. Here are four that might come in handy.
- Track Checks Issued (or Invoices Issued by Number)
- Customer Deposits
- Construction Holdbacks
- Top Customers
Customizing Bookkeeping Reports
How to Use QuickBooks Desktop To Track Cheques Issued
Purpose: Internal Audit Control
Have you been wondering how to use QuickBooks Desktop to track the cheques issued during the month in your QuickBooks® accounting system?
A quick and easy way to get a cheque listing is to go to Reports / Banking / Missing Cheques. Create the report for the time period you want.
What I do is modify the report heading to Cheque Register Summary and memorize the report for easy access. I make a point of printing this report each month-end for my financial reporting package.
Learning how to use QuickBooks Desktop to create this customized report will enable you to track the sequencing of your cheques for your audit trail.
During the month, I update it and keep it handy for easy reference throughout the month too.
If you need to see the cheque details, then choose Reports / Banking / Cheque Detail.
The reason I prefer my "summary" report is that I can scan for a cheque quickly. The "detail" report prints a lot of pages and to use it, I have to flip a lot of paper.
So there are two ways to get track the cheques you have issued. It's your choice which you use.
ACTION REQUIRED
You already know I'm going to tell you that I investigate all missing or duplicate numbers shown in the Cheque Register or the Invoice Listing. The whole point to the exercise when learning how to use QuickBooks Desktop data that you've painstakingly entered is to manage and monitor your financial health, help you make better business decisions ... and to safeguard your business assets.
Customizing Bookkeeping Reports
How to use QuickBooks Desktop to Track Customer Deposits
Purpose: Tracking Special Types of Transactions
Guess what? There are also two methods to book customer deposits/prepayments.
If you use the liability method to process your customer deposits in your QuickBooks® Desktop accounting system, here's how to use QuickBooks® Desktop to keep track of who paid deposits.
- Create a Transaction Detail by Account report found under Reports/Accountant and Taxes.
- With the report open, customize the report. Begin with a click on Modify Report.
- Look for Total By in the columns section. Select Customer.
- Click on Filters tab.
- Filter the report by account and select the Customer Deposit account in the liability section.
- Click on Header/Footer tab.
- Change the Report Title to Customer Deposits.
- Click on ok.
- Click on the Memorize button to save the report for easy use ... consider adding it to your icon bar by going to the View drop down menu.
Here is an example of what the report would look like.
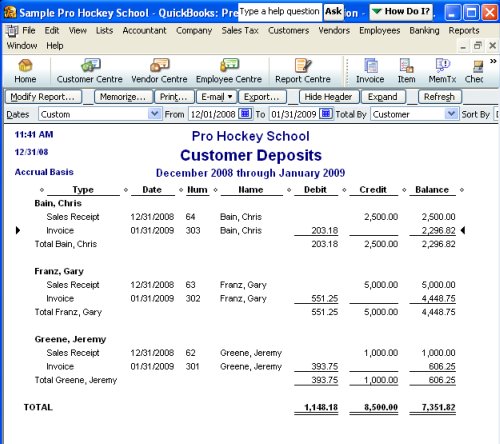
After customizing, the report shows your customer deposit transactions so that you can track who still has an unapplied or unused deposit. A customer deposit account should show a zero balance once the full deposit has been applied to an invoice or several invoices.
If you print a Sales Report by customer or by item, the deposit transactions will show up there as well, but not as nicely as this customized report.
This is an excellent example showing how customizing your reports in your QuickBooks® Desktop accounting system will help you make good business decisions based on solid information.
ACTION REQUIRED
Reconcile the Customer Prepayment account monthly for audit ready books.
Customizing Bookkeeping Reports
How to Use QuickBooks Desktop To Track Construction Holdbacks
Purpose: Tracking Special Types of Transactions
Holdbacks are not revenue ... and not subject to tax until the holdback amounts are billed. So it's important when accounting for holdbacks to have a way to track and monitor them.
Here is how to use QuickBooks Desktop to track and bill construction holdbacks.
Begin by setting up a current liability account named Holdbacks.
To facilitate invoice preparation, create an Other Charge list item also named Holdbacks. Code the item to the current liability account you just created above.
When you invoice your customer, show your customer the holdback by selecting the Holdback item in your drop down list. Enter your holdback amount as a negative amount. For example if your percentage of work completed to date is $5,000 with a 10% holdback, enter -500.00 as your holdback amount.
On your final invoice to bill your customer for the completion of the job, select the Holdback item ... but this time ... enter the amount as a positive number. This will clear out your holdback account and reclassify it to sales where it now becomes taxable.
Finally, setup up your QuickBooks® accounting system to create a customized report so you can easily keep track of the status of the holdbacks. I think these instructions will work but there are so many versions now, you may have to modify the instructions slightly to accommodate your version.
- Create a Transaction Detail by Account report found under Reports/Accountant and Taxes.
- With the report open, customize the report. Begin with a click on Modify Report.
- Look for Total By in the columns section. Select Customer.
- Click on Filters tab.
- Filter the report by account and select the Holdback account in the liability section.
- Click on Header/Footer tab.
- Change the Report Title to Construction Holdbacks.
- Click on ok.
- Click on the Memorize button to save the report for easy use ... consider adding it to your icon bar by going to the View drop down menu.
If you have done everything correctly, the report should look very similar to the example report shown in the Customer Deposits segment above.
ACTION REQUIRED
Reconcile the Construction Holdbacks account monthly for audit ready books
Good To Know

A useful resource for you if you are working with construction holdbacks, and learning how to use QuickBooks® to report it, is the CRA publication GST Memoranda G300-6-7 Partial Payments (GST 300-6-7). It explains the general rule for when GST/HST is payable:
The general timing of liability rule, under subsection 168(1) of the Act, is that tax is payable by the recipient of a taxable supply on the earlier of the day the consideration for the supply is paid and the day the consideration for the supply becomes due. Tax is generally collectible by the supplier at the same time that it is payable by the recipient.
[...]
Under subsection 152(1) of the Act, consideration, or a part thereof, for a taxable supply, is deemed to become due on the earliest of the following days:
(a) the day that the supplier first issues an invoice in respect of the supply for that consideration or part and the date of that invoice;
(b) the day the supplier would have, but for an undue delay, issued an invoice in respect of the supply for that consideration or part; and
(c) the day that the recipient is required to pay that consideration or part pursuant to an agreement in writing.
Customizing Bookkeeping Reports
How to Use QuickBooks Desktop To Track Your Top Customers
Purpose: Monitoring Concentrated Credit Risk
The Sales by Customer report shows you where your revenue comes from and who your top customers are. You can use it to determine if you have any concentrated credit risk. Here's how to create the report.
- Click on Sales under the Report menu.
- Now select Sales by Customer Summary ... how hard is that?
- Click modify. Select sort by total and % of column.
- Shorten the report by clicking on the collapse button. This hides the job information.
- Feel free to change the report heading to something else if you want.
- Memorize the report to save your customizing and for future use.
Consider how to use QuickBooks Desktop sales information to improve your customer relations and grow your business by finding creative ways to utilize the information.
For example, the September 2010 Admin Books Newsletter (Administrative Bookkeeping Co., Inc.) suggests you select your top 10 customers and send them a hand written note with a small gift ... or share the names of the top ten customers with your employees so they can provide them VIP service.
Take a look at the percentages. Does one customer stand apart from all the others or represent more than 10% of your business? Make plans on how your business could sustain revenue if your top client left.
ACTION REQUIRED
Monitor your concentrated credit risk regularly. Determine ways to minimize this risk.
QuickBooks Desktop Closing Procedures
What Are QuickBooks® Closing Procedures For Month-End and Year-End?
Learning how to use QuickBooks® to close your books is much simpler than most other accounting programs out there.
The QuickBooks Desktop accounting system does not require any period end entries, that is why it is important to set your closing date when you have completed your month-end procedures or year-end procedures.
This features allows you to always have access to prior years' data right down to the transaction level. It also allows you to create comparison reports.
QuickBooks Desktop automatically performs the following period end adjustments:
- The income and expense accounts are automatically zeroed out at each year end.
- The net income is automatically posted to the Retained Earnings account, which is created by QuickBooks®, for any reporting period.
QuickBooks Desktop does not reclassify the equity account. YOU need to book the closing entry to clear the Owner's Draws and Contributions to the Owner's Equity account.
The "closing" procedure is date driven and occurs based on the reporting dates of the financial reports you request.
QuickBooks® has a great feature for report time periods - This Month, Last Month, Year-to-Date, etc. that makes it quick and easy for you select your reporting period.
Good To Know

Soooo, here is how to use QuickBooks Desktop to close each month-end period:
- Perform your month-end procedures.
- Close your accounting period by setting the closing date. (See step 18 of month- end procedures.)
- Safeguard your data against accidental change by backing it up.
- Determine who has the right to change transactions in the closed period.
That's all there is to closing the books!
How To Use QuickBooks Desktop
Tracking GST/HST in QuickBooks Desktop
Learning how to use QuickBooks Desktop to track GST/HST depends on whether you are a GST/HST registrant or not. We'll look at both.This section was created using a 2009 version of QuickBooks® and before HST was implemented in B.C. and Ontario. I haven't updated it because BC will be returning to PST on April 1, 2013. All the instructions here should work in QuickBooks versions 2010, 2011, and 2012.
Please keep this in mind while learning how to use QuickBooks desktop sales tax module.
QuickBooks Online Accounting System
Handling HST/GST
If You Are NOT A Registrant With CRA
If you are not a GST/HST registrant with CRA, do not turn on the GST HST sales tax module in QBO. When you enter your data, your sales tax will be automatically expensed.
MORE >> Posting Expenses When Not GST Registered - Two Options
MORE >> Handling HST/GST If You Are NOT An Registrant
QuickBooks® Accounting System
Handling HST/GST
If You Are A Registrant With CRA
In the QuickBooks® accounting system, it is not necessary to have three accounts like you do when you handle GST/HST manually. One account called HST/GST Payable handles everything.
As
long as you are properly booking your entries and managing your sales
tax in the sales tax windows, the QuickBooks® accounting system keeps
track of your GST collected and input tax credits for you. When you need
to determine the amounts to report to CRA, you run your sales tax
report for the details.
Here's an overview of how it works, using versions 2009 through to 2012. Tracking sales tax has five steps:
1. Turn on the sales tax feature. This creates the Manage Sales Tax icon found on the right hand side in the Vendor section of the flowchart.
- Just be sure to go to Edit>Preferences>Sales Tax. Turn on the sales tax feature by answering Yes to "Do you collect sales tax?".
- Tick the Customer and Vendor Tax Codes so you can customize the tax code when necessary.
- Set your default sales tax codes. If you are in B.C., Saskatchewan, or Manitoba, set your default sales tax code to S for GST and PST (taxable items). Setup tax code E for non-taxable items.
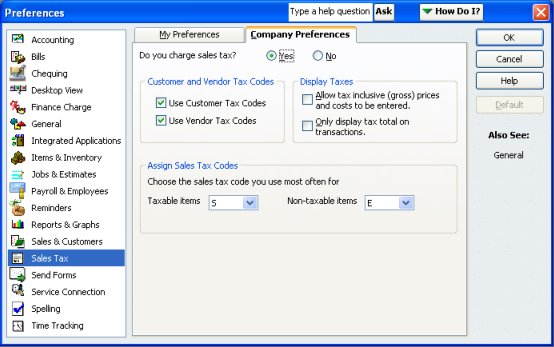
2. Setting up sales tax items and codes along with coding individual customers, vendors, sales items, and expense items.
- QuickBooks® uses Items to setup sales tax codes which automatically applies the correct taxes on your sales forms, your bill payments forms, and/or cheque payments.
- Your initial Canadian sales tax codes and sales tax groups are setup for you. If there is a sales tax rate change, you may have to modify some of the items and codes.
- It will handle provincial taxes as well. Setup your PST information through the Edit Vendor Window for Minister of Finance.
- Setup your GST information through the Company Information window.
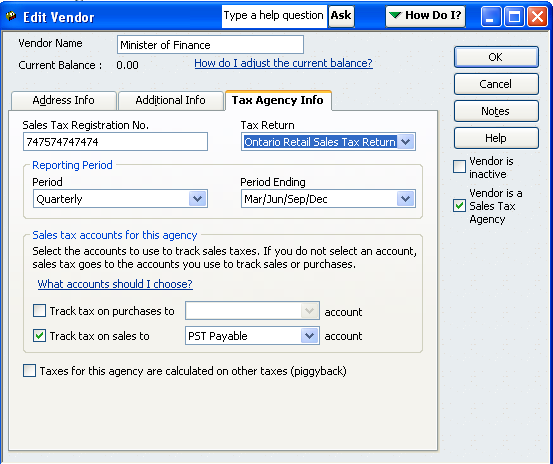
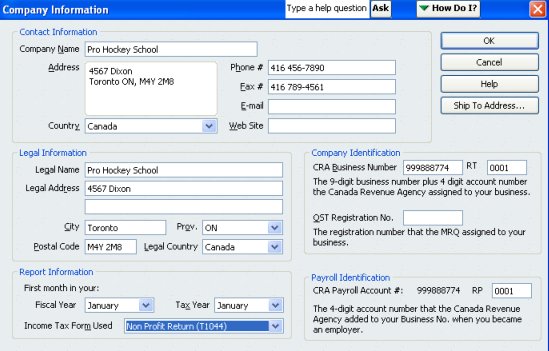
3. Collect sales tax through the sales forms - invoices and sales receipts.
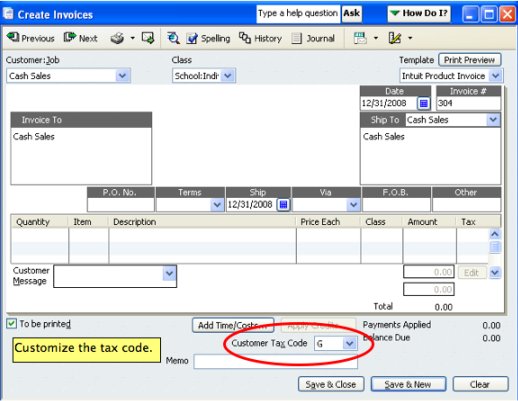
- The default code setup in Step 1 was S for both GST & PST. If you are an HST province, your default code will be HBC or HON or HNS ... you get the idea.
- You can change the sales tax code down to the customer level so that a customer can be customized. For example, you can change the default tax code from S to G for GST only customers by clicking on your Customers icon and selecting the customer you want to edit or directly in the invoice window.
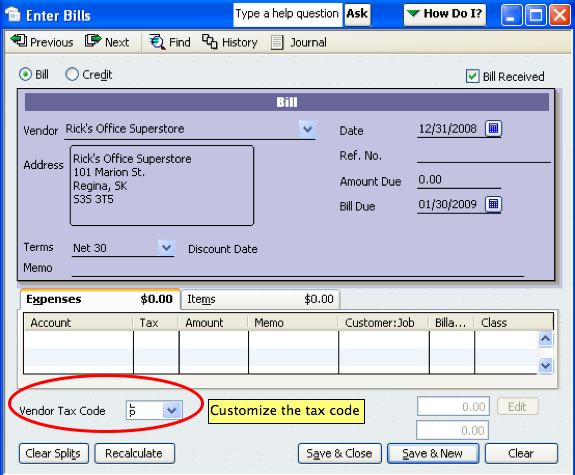
4. Capture your input tax credits through enter bills form and write cheque form.
- The default code setup in Step 1 was S for both GST & PST. You can change this so that a vendor can be customized. For example, you can change the default tax code from S to Z for zero rated GST vendors.
5. Pay your sales tax to CRA using the Sales Tax Drop Down Menu. Click on File Sales Tax. Here is where you find the sales tax reporting features and sales tax payment cheque form (which is NOT the same as the Write Cheque form).
- To find out what you need to report on form GST34-2 and how much you owe, run your sales tax liability reports.
- It is very important to pay your liability through the sales tax window NOT write cheque. If you use write cheque, your liability reports will be incorrect.
As long as you are entering your data correctly, the QuickBooks® accounting system automatically tracks your sales taxes for you.
A payable or receivable is automatically setup when you use the File Sales Tax function ...
When you get your GST/HST refund from CRA, use Receive Payment under the customer drop down menu to record your entry to undeposited funds account and clear the receivable.
If you owe, use Pay Bills to clear the payable when you make your GST/HST payment to CRA.
To organized and accurate record keeping in your accounting system!
How To Use QuickBooks Desktop
Learning Keyboard Shortcut Keys
The QuickBooks Desktop accounting system has keyboard shortcuts to make data entry more efficient. There are six different types or categories of shortcut keys:
- General
- Dates - my favorite category so I talk about it below
- Editing
- Help window
- Activity - I give you a few of my favorites below
- Moving around in a window
If you key in "keyboard shortcuts" to the QuickBooks® help menu, the above categories will come up. Click on the one you are interested in. Take the time when learning QuickBooks to memorize the shortcuts ... it will save you time.
My favorite shortcut keys are the dates. It is really quick and easy to enter dates using these shortcuts. They work in the desktop version AND online version.
- The + or - key can be used to increase (next day) or decrease (previous day) the date by one day to the next day or the previous day.
- Typing T in the date field will give you Today's date.
- W gives you the first day of the Week
- K gives you the last day of the Week.
- M gives you the first day of the Month
- H gives you the last day of the Month.
- Y gives you the first day of the Year
- R gives you the last day of the Year.
- If you want the date calendar to pop open, your shortcut key is Alt + down arrow.
As you can see, the keys are easy to remember because they are tied to what you want to accomplish and they are not case sensitive ... one of the reasons these are my favorite keys ... I can actually remember with no effort. That is great accounting system design.
A few activity shortcut keys that are very useful ... but only in the desktop version.
Ctrl + G ... transfers you to the line/entry of the account register directly from the entry you are in ... a real time saver when working on the bank reconciliation and one of my all time favorites!
Ctrl + M ... is one I use frequently to memorize a recurring transaction or report.
Ctrl + T ... takes you to your memorized transaction list.
Ctrl + Y ... opens up the transaction journal so you can see the entry in debits and credits ... bookkeepers like this one. :0) It's especially useful when using the forms to see the other side of the entry.
Ctrl + I ... quickly opens a customer invoice.
Ctrl + A ... brings up your COA but I prefer use my icon bar to get to my COA.
F2 let's you see the number of vendors, employees, and customers ... and the version you are using along with what updates have been installed.
F1 gets you to the contextual Help menu ... which helps to let you exhale while you are learning QuickBooks®! :0)
QuickBooks Desktop Intuit Updates
Do You Have The Latest Desktop Version?
Do You Have The Latest Desktop Version?
Intuit has a Desktop service discontinuation policy. This is not new. It's been here since QuickBooks began I believe. Support for older desktop versions are regularly scheduled to be discontinued after three years.
For example, it's 2024. The 2021 versions of QuickBooks will not have access to add-on services after May 31, 2024. If you don't upgrade before the deadline, you will no longer have access to live technical support or features that require internet access such as payroll and updates, and you will not receive critical security patches. In this day and age of technology, that's risky from a cybersecurity point of view.
Since Intuit rolled out QuickBooks Online in 2012, it has come along way. It is much more robust now. Intuit would like you to consider moving to Intuit Online to provide you with greater flexibility and collaboration opportunities.
Is QuickBooks Desktop Being Discontinued?
Is QuickBooks Desktop Being Discontinued?
Intuit decided that after July 31, 2024, they will no longer sell new subscriptions to the certain products in the U.S. only at this time. Starting April 15, 2025, this will also apply to new Canadian desktop subscribers.
It does not affect existing subscribers. QuickBooks Enterprise or QuickBooks Online will be the only solution for new subscribers after the deadline. The products affected are:
- QuickBooks Desktop Pro Plus (Canada - QuickBooks Desktop Pro)
- QuickBooks Desktop Premier Plus (Canada - QuickBooks Desktop Premier)
- QuickBooks Desktop Mac Plus (Canada - not applicable)
- QuickBooks Desktop Enhanced Payroll (Canada - QuickBooks Desktop Payroll)
Intuit encourages customers who use the standalone QuickBooks Desktop to move to QuickBooks Online or purchase a desktop subscription prior to July 31, 2024, April 15, 2025 in Canada.
The one thing I love and hate about QuickBooks Online is I no longer have to deal with upgrades however, it means stuff is always changing or moving around making it hard to set procedures. The changes often don't make sense so I always give them the benefit of the doubt that they do due to technology issues not just because they switching stuff for something to do!

See you on the next page ...
Your tutor
Member of the QuickBooks ProAdvisor® Program. Screen shots © Intuit Inc. All rights reserved. QuickBooks and QuickBooks ProAdvisor are registered trademarks and/or registered service marks of Intuit Inc.
Bookkeeping Essentials > Bookkeeping Systems > Learning How To Use QuickBooks Desktop
Bookkeeping Essentials > Learning QuickBooks > Customizing Reports In QuickBooks


